É já amanhã dia 1 de Julho de 2016 que a aplicação da taxa de IVA na restauração vai mudar, conheça um software que torna tudo muito mais simples.
A aplicação desta Lei está a revelar-se complexa, pois para além da alteração distinguir os tipos de produtos que vão ser consumidos, também será necessário saber onde vão ser consumidos e como foram confeccionados:
Foram consumidos dentro ou fora do estabelecimento?
São produtos sólidos ou líquidos?
São feitos no momento ou embalados?
Sabia que todas estas questões vão influenciar a taxa de IVA a cobrar aos clientes?
Em suma, a partir de 1 de Julho, os alimentos comprados nos cafés e restaurantes vão ter preços diferentes, caso sejam para consumo dentro ou fora do estabelecimento que os vende. A nova regra do IVA na restauração traz uma descida generalizada da taxa máxima de 23% para uma taxa intermédia de 13%. Mas há várias excepções e situações diferenciadas quando o consumo é no estabelecimento ou fora dele, o chamado Take Away.
POS do Projecto Colibri
Hoje deixamos uma novidade no que toca a software de Gestão Comercial multi-plataforma, para isso vamos conhecer o POS do Projecto Colibri!
O Módulo POS do Projecto Colibri vem dar ao cliente final uma nova forma de utilizar o software. Mais simples, rápida, intuitiva e fácil, sendo que qualquer utilizador conseguirá facilmente adaptar-se ao seu funcionamento, tendo como “back-office” o comprovado Projecto Colibri RCP. O Projecto Colibri Módulo POS é de muito fácil utilização e poderá ser utilizado quer por rato/teclado, quer através do interface de um ecrã touch.
Este Módulo POS estará disponível para qualquer plataforma, sendo uma mais-valia não haver necessidade de estar agarrado a uma plataforma para usar o software de facturação. Uma outra vantagem da sua utilização prende-se com a possibilidade de trabalharem vários postos em simultâneo utilizando uma base de dados na sua rede local ou mesmo na cloud.
Utilizando um caso prático, a partir do dia 1 de Julho, caso esteja num estabelecimento e peça um sumo de néctar, o produto será taxado com IVA a 23%. À saída, caso pretenda um outro néctar para levar e consumir fora do estabelecimento, este terá se ser vendido à taxa de IVA reduzida de 6%.
Com o Projecto Colibri Módulo POS será simples executar esta tarefa e gerir os vários cenários que a lei obriga. Este módulo está integrado no já conhecido Projecto Colibri.
Este é um projecto que acarinhamos há muitos anos pois tem sigo uma ferramenta útil para milhares de empresas em Portugal. Muitas delas utilizam a versão gratuita e sem dúvida que isso potencia uma forma única de crescer e desenvolver o negócio.
O Projecto Colibri é um Software de Gestão Comercial que está no mercado desde 2007, é certificado pela Autoridade Tributária e aborda as principais necessidades da área comercial de uma pequena/média empresa. Desenvolvido em Java o software é multi-plataforma, podendo ser executado em Windows, Linux e MacOS, tem como funcionalidades principais o controlo de vendas, controlo de compras, gestão de contas correntes e stocks. Conhecido pela sua rapidez, fiabilidade e simplicidade o Módulo POS é front office bastante intuito para o utilizador final e com uma fácil gestão através do back-office.
Este software de gestão foi desenvolvido por profissionais qualificados ligados às áreas da gestão financeira e programação. Para o desenvolvimento do programa foram tidas em conta as lacunas existentes no mercado actual, surgindo assim um software capaz de responder às actuais necessidades de gestão das empresas.
As principais funcionalidades baseiam-se no seu suporte Multi-plataforma, Multi-Base de dados, Multi-língua, Multi-empresa, Multi-utilizador e, porque o mercado global é hoje uma aldeia de proximidade, a aplicação é também Multi-moeda.
Além do mais, foram ainda tidos em especial atenção os seguintes aspectos:
Ambiente gráfico baseado em RCP – Rich Client Platform
Motor de reports baseado em BIRT – Business Intelligence and Reporting Tools
Motor de persistência baseado em DN – Data Nucleus Access Platform
Interface auto-adaptável a qualquer alteração de língua
Utilização de layouts dinâmicos em tabelas e documentos
Optimização de utilização pelo teclado
Motor de filtros e pesquisas avançado
Outputs directos para PDF
O Projecto Colibri está com constante evolução, acompanhando sempre as alterações fiscais impostas pelas respectivas autoridades tributárias.
Realçamos o facto do Projecto Colibri continuar a apostar na evolução e se encontrar na vanguarda a nível tecnológico em comparação com muitas outras empresas do mercado actual, acompanhando as constantes alterações fiscais impostas pela Autoridade Tributária e a criar novas ferramentas para a ajuda na gestão da sua empresa.
A versão RCP11 do Projecto Colibri está prestes a sair e promete muitas novidades. Em breve iremos mostrar aqui no Pplware.
Para a maioria dos problemas existe uma solução, mas primeiro é necessário diagnosticá-los. Hoje deixamos-lhe 7 ferramentas que o vão ajudar.
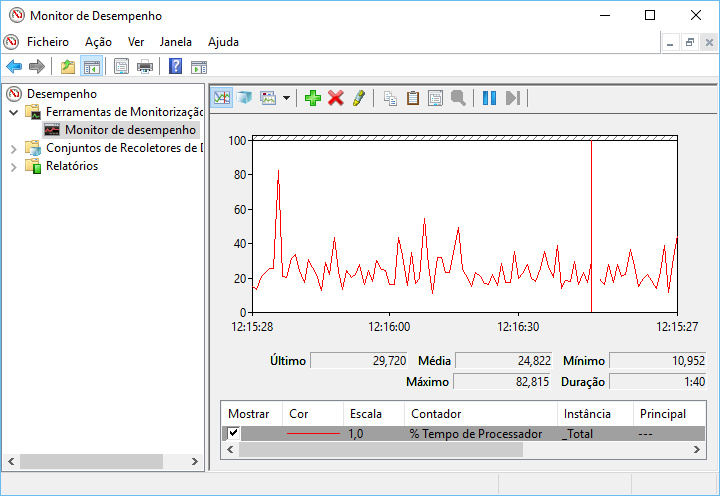
1. Monitor de Desempenho
O Windows tem já integrado um software que permite avaliar o desempenho do seu computador. No Windows 10, basta aceder ao menu iniciar do Windows e escrever “Monitor de Desempenho” (ou “Performance Monitor”) e abrir a aplicação.
Por definição, o Monitor só apresenta a percentagem do Tempo de Processador, que revela quanto da CPU está a ser utilizada em determinado momento. A esta análise poderá adicionar outros parâmetros como a utilização de disco, a energia utilizada, o tamanho índice de pesquisa, entre outras opções.
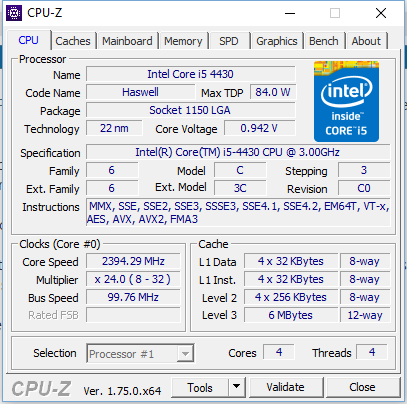
2. CPU-Z
O CPU-Z é um software que analisa e apresenta a informação de todo o hardware interno. É indispensável para, por exemplo, quem pretende alterar peças do PC e evitar problemas de incompatibilidade. No caso de querer comprar um computador em segunda mão, este software poderá ser útil para confirmar se inclui todo o hardware indicado pelo vendedor.
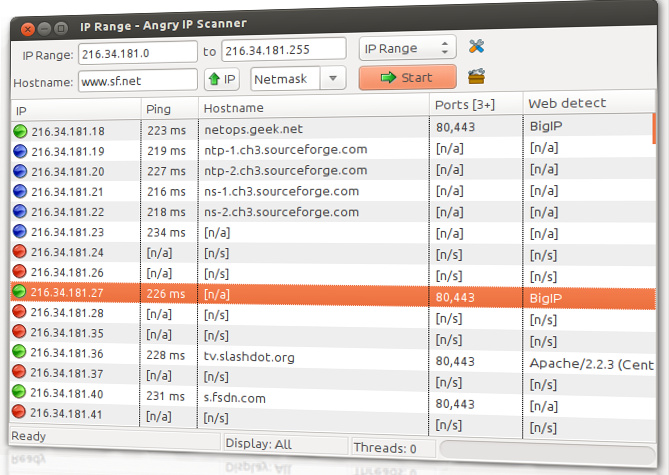
Esta ferramenta verifica a sua rede para detectar os endereços IP e as portas que estão a ser utilizadas e por que dispositivos. Poderá utilizá-lo para, por exemplo, verificar se não existe nenhum intruso na sua rede.
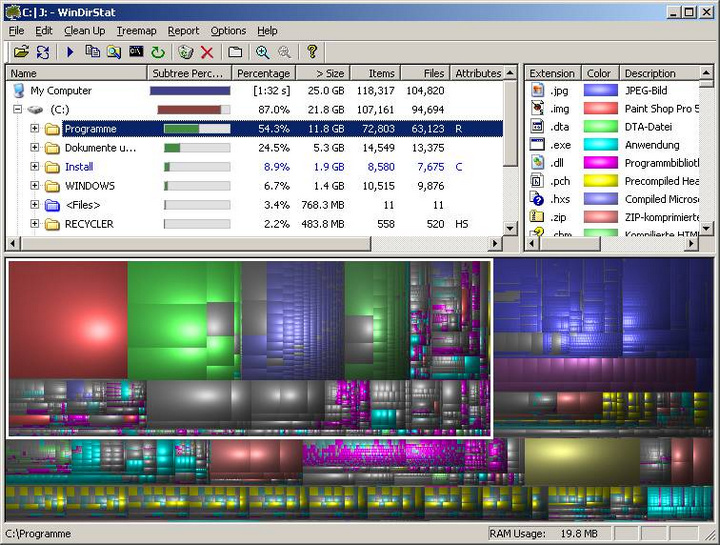
O WinDirStat verifica todas as unidades de memória do seu PC e mostra o espaço que cada uma tem ocupado, permitindo assim detectar e eliminar facilmente ficheiros que estão a ocupar espaço desnecessário.
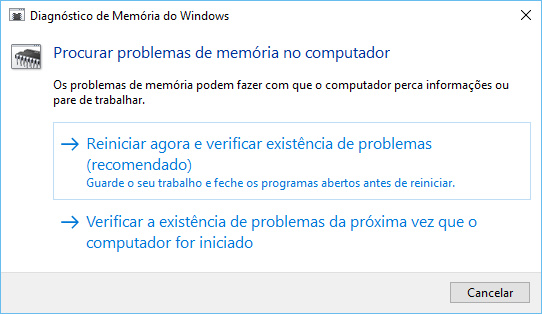
Esta é outra ferramenta que o Windows tem à sua disposição. Através dela, o PC será reiniciado e no arranque, a ferramenta irá executar vários testes à memória RAM. Se encontrar algum erro ou falha, a ferramenta irá indicar o foco do problema de modo a que o resolva rapidamente.
6. JScreenFix
Se o seu ecrã apresenta um píxel brilhante de forma constante, isso pode significar que tem um píxel preso (stuck pixel), esta ferramenta promete reparar a situação em menos de 10 minutos. Mas de que forma?
O que ela faz é piscar a área do ecrã com o píxel preso com centenas de cores diferentes de forma a que volte ao normal. Há, no entanto, que ter em consideração que a ferramenta não faz milagres e, em alguns casos, não irá conseguir solucionar o problema.
O MalwareBytes é um dos softwares de detecção e prevenção de malware mais populares. Através da versão gratuita é capaz de detectar e remover malware com tecnologia anti-malware, anti-spyware e anti-rootkit líder na indústria. Procura pelas ameaças mais recentes e mais perigosas e ainda remove malware com segurança.
Sublime Text is, no doubt, one of the most powerful text editors out there. The number of satisfied users attests to that. If you explore it, you will eventually see how beautifully its powerful features are hidden behind a simple and elegant interface. If you have been using Sublime Text for some time, now is the time to upgrade your arsenal with new ammunition. I’ll be taking you through some of my favorite tips and tricks. Knowing them might just unleash your hidden powers as a programmer to the world.
Package Control is a one-stop solution for downloading and managing Sublime Text-related plugins and themes. The installation instructions are available on the Package Control website.
Once it is installed, you can access it using the command palette. To install a plugin, press Cmd ⌘ + Shift ⇧ + P (Mac) or Ctrl ⌃ + Shift ⇧ + P(Windows and Linux), and then enter Install Package and press “Return.” The list of plugins in the repository takes a few moments to load, but then you can type the name of the plugin you are interested in and install it from there. Some of my favorite plugins are listed below.
Sublime Text’s default sidebar can only do some limited tasks. The Sidebar Enhancements plugin supercharges Sublime Text with commands for opening the file in a browser, copying, pasting, copying a path, duplicating, deleting and more.
Plain Tasks converts Sublime Text into a powerful to-do list manager. You can install it via Package Control. Create a file with .todo as the extension to activate Plain Tasks on top of it. For other tips, you can access the tutorial provided in the plugin, available at “Preferences” → “Package Settings” → “Plain Tasks” → “Tutorial.”
Check for errors in your code using Sublime Linter. The plugin provides a framework for linting your code. The actual linting is done by various plugins (for Ruby, Python, JavaScript etc.), which means you need to install Sublime Linter first and then install syntax-specific linters for your code. Extensive documentation is available.
Emmet, once known as Zen Coding, is an indispensable tool for any web developer. It is probably the most productive and time-saving plugin you’ll ever find.
Writing code takes time, and HTML grunt work such as writing tags and wrapping classes with quotes can be boring. Emmet takes care of all that. It magically expands abbreviations into a whole HTML or CSS structure. The syntax it uses for these abbreviations is inspired from CSS selectors. Let’s watch it in action.
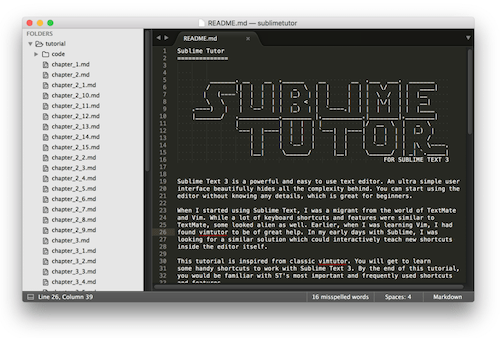
Sublime Tutor is an interactive in-editor tutorial for keyboard shortcuts in Sublime Text. If you have just started with Sublime Text, the plugin will instantly boost your productivity by teaching you nifty tips and tricks within the editor itself. The plugin uses the spaced repetition technique to make sure you remember the commands it teaches.
Sublime Tutor.
Use Package Control to install the plugin. Once it is installed, you can access the tutor via the “Help” menu or the Ctrl ⌃ + Alt ⌥ + K keyboard shortcut.
Put your cursor on a word, press the keyboard shortcode, and the word will instantly be selected. If you press the same key combination again, Sublime Text will go into multi-selection mode and select other instances of the same word in the document. You can use this method to quickly add or replace text in all instances of a word.
Word selection.
Ctrl ⌃ + Cmd ⌘ + G (Mac)
Alt + F3 (Windows and Linux)
This is another way to achieve the same thing. Instead of incrementally searching for a word, it performs a bulk search of the word under the cursor and switches to multi-selection mode.
This shortcut is extremely useful for JavaScript developers. It selects the current scope. Pressing the same key combination again selects its parent scope. The video makes clear how it works:
Use this shortcut to break the selected area into multiple lines, putting Sublime Text in multi-selection mode. I use this trick to quickly convert a list of words into an enclosed array of strings.
Use this shortcut to select a column in Sublime Text. Put your cursor anywhere in the document, and then press the shortcut to select columns upwards or downwards. This also takes you into multi-selection mode, like the two commands above.
I like to keep my CSS properties sorted alphabetically. This command is extremely useful for that. Select the block that you need to be sorted (pro tip: use Ctrl ⌃ + Shift ⇧ + J to select an indentation level), and then press the keyboard shortcode.
This is one of my most frequently used shortcut. Marking comments in any programming language is made simple with this shortcut. In an HTML file, it puts in a pair of <!-- --> tags, while in JavaScript it puts // at the beginning of a line.
Shift ⇧ + Ctrl ⌃ Up ↑ / Down ↓ (Windows and Linux)
Want to move a snippet of code five lines up? Cutting and pasting is really old school. Use this keybinding to take the snippet wherever you’d like. Press the shortcut again to keep moving it further up or down.
By default, this shortcut duplicates the current line and puts it on the next line. If you select a region and press this shortcut, it duplicates the whole region.
This joins the following line to the current line, replacing all white space in between with a single space. Performed on a block of lines, this joins all of the lines together.
Use this command to move your cursor from one bracket position to another. This is especially useful when you get lost in a long method and want to reach its starting position (or vice versa).
This is the grep equivalent of Sublime Text. It finds a term within an entire project. The special thing about this command is that it is blazing fast. There are options to make it case-sensitive and to perform a regex match as well.
To search for a particular term in the current document, project-wide, put the cursor on that term and then press Ctrl ⌃ + E, which will put that term in the search box. Pressing the shortcode above populates the project-wide search box with this term.
Ctrl ⌃ + Page Up ⇞ or Page Down ⇟ (Windows and Linux)
Just like in a web browser, you can open multiple tabs in Sublime Text. To move from one tab to another, you can use the shortcuts noted above, and use Cmd ⌘ + T (Mac) or Ctrl ⌃ + N (Windows and Linux) to create a new tab.
As you become proficient with Sublime Text, you’ll want to access the menus less and less and instead be able to do everything with a few taps of the keyboard. With the command palette, you can quickly type a command, and Sublime Text will do a fuzzy match with an existing set of commands, letting you access the commands from a convenient place.
Here are some things you can try in the command palette — set the syntax of a newly created file, sort lines in the current document, and install a plugin using Package Control.
Sublime Text comes with an embedded Python interpreter. It’s a handy tool to execute Python commands or to quickly test Sublime Text’s APIs when you’re developing a plugin for the editor.
Keep in mind that this interpreter comes bundled with Sublime Text, and it is different from your system-installed Python. The purpose of this console is to interact with Sublime Text’s API for plugins. You probably used this console when installing Package Control.
For writers and others who need to be able to concentrate intently, Sublime Text has an even more minimalistic interface. Use the shortcut to toggle distraction-free mode on and off.
Sublime Text includes a command-line tool that makes it super-easy to work with files on the command line. To get it working on a Mac, you need to make it available in your shell.
Assuming you’ve placed Sublime Text in the “Applications” folder and that you have a ~/bin directory in your path, you can run the following:
Sublime Text is full of such powerful shortcuts and commands. You probably won’t be able to remember these just by skimming this article; rather, you’ll need to practice as you’re going through it. List the most useful shortcuts for yourself, and refer to them regularly as you’re working with Sublime Text. Practice is the key. You are on your way to becoming a Sublime Text ninja.