Quantas vezes já não se viu perdido a olhar para o smartphone ou a correr as redes sociais, mas na verdade não está a ver nada?… E porque não aproveitar esse tempo para estimular o cérebro?
As aplicações que ajudam a manter a mente ativa são muitas e hoje sugerimos-lhe algumas das mais interessantes.
1. Lumosity
Lumosity é um dos melhores jogos para adultos para manter o cérebro a funcionar. É composto por vários desafios de estimulação do cérebro, projetado para testar raciocínio crítico, memória e habilidades de solução de problemas.
Este jogo incentiva o utilizador a jogar pelo menos 15 minutos por dia, em 3 a 5 dias por semana, mostrando a evolução do jogador num gráfico e comparando os resultados com os de outros jogadores.
Zenge trata-se de um jogo de puzzle com alguma complexidade, que aumenta com o avançar de níveis. Além da estimulação do cérebro para completar os puzzles este jogo ainda traz alguma tranquilidade com as imagens que vão surgindo por de trás de cada quebra-cabeças.
Este pode ser talvez considerado o jogo do ano na categoria dos mais simples para smartphone. Com poucos meses nas lojas de aplicações conta já com milhares de downloads, onde a sua simplicidade gráfica e o seu desafiar do cérebro podem ser a chave do sucesso.
Transmission é um jogo que o vai obrigar a pensar e a ser estratégico. É um jogo que retrata toda a Era da comunicação, dos primórdios aos dias de hoje, desenvolvida pelo Museu da Ciência de Londres.
Esta app parte do mesmo conceito da primeira que sugerimos, com vários jogos que têm como objetivo estimular o cérebro e melhorar algumas áreas como memória, atenção, velocidade, reação, lógica entre outras.
A ideia é que o jogador, abra todos os dias esta app e complete alguns desafios durante breves minutos.
A ShareX apresenta-se como uma ferramenta de captura de ecrã, partilha de ficheiros e de produtividade, e depois de a instalarmos é percetível a sua potencialidade.
Share X é uma solução gratuita de código aberto que permite capturar ou gravar qualquer área do ecrã e partilhá-la de forma muito rápida. Também permite enviar imagens, texto ou outros tipos de arquivos para mais de 80 destinos suportados à medida das necessidades do utilizador. Não ocupa muito espaço no sistema e também é isenta de publicidade.
A captura
A funcionalidade principal do ShareX é a captura de ecrã e é neste ponto que surge como um substituto mais que perfeito da Ferramenta de Recorte da Microsoft que é francamente mais limitada.
Contra quatro modos de captura, o ShareX conta com 13 modos que ainda podem ser configurados. Por exemplo, em Window, não é necessário ter que ter a janela que pretende capturar em primeiro plano. Ele deteta as janelas abertas e é só escolher a pretendida.
Fullscreen
Window
Active monitor
Region
Region (Light)
Region (Transparent)
Last region
Screen recording
Screen recording (GIF)
Scrolling capture
Webpage capture
Text capture (OCR)
Auto capture
Depois de capturar a imagem existe uma série de tarefas que podem ser executadas, como fazer edições à imagem, adicionar marca de água ou outros efeitos, imprimir a imagem, guardá-la para o clipboard. Se estivermos perante um código QR é possível lê-lo, deteta texto, é possível escolher a pasta para onde se pretende guardar a imagem e muitas outras opções.
Além da captura
O ShareX está associado a uma série de serviços online para onde podem ser enviadas imagens, textos ou pastas de forma automática. Imgur, Flickr, Google Photos, Twitter, Dropbox, FTP, OneDrive, Google Drive e Mega, são apenas alguns dos exemplos dos vários serviços associados.
Há ainda a possibilidade de associar um ou mais serviços de URL shorteners, como o Bit.ly, tinyurl.com ou vurl.com.
São diversas as situações que podem tirar partido de uma ferramenta de acesso remoto, desde o acesso ao computador lá de casa ou ao computador do trabalho quando está num outro local, ajudar um familiar ou cliente a fazer um procedimento ou a resolver um problema, transferir ficheiros, entre outras.
Embora existam outras soluções disponíveis no mercado, hoje damos a conhecer uma alternativa que é, provavelmente, a solução mais simples para acesso remoto.
O Iperius Remote Desktop desenvolvido a pensar na rapidez e facilidade de utilização, e por isso é “portátil”, não exigindo instalação para funcionar. Basta fazer o download do executável e abrir, não esquecendo a necessidade de uma ligação à Internet para a comunicação.
Mais simples seria difícil…
Após ter o executável do Iperius Remote no seu computador, logo depois de o abrir é mostrado um ID único que identifica o seu computador e uma senha, informação essa a ser fornecida para sem se for ligar ao seu computador.
No entanto, antes que seja possível alguém ligar-se, será necessário dar o seu consentimento explícito, que consiste simplesmente em carregar no botão “Permitir conexões”. Depois de premir nesse botão, basta que alguém tenha o seu ID e senha para que possa iniciar o acesso remoto ao seu PC.
Já se pretender o inverso, ou seja, se pretender ligar-se a um outro computador, assim que tiver os dados de ligação basta colocar o ID na caixa “ID de conexão” e premir em “Conectar”.
O que é possível fazer?
Assim que a comunicação estiver estabelecida entre os dois computadores, quem estiver a prestar assistência remota tem acesso a uma barra no topo do ecrã que mostra o computador remoto, onde pode enviar o comando “Ctrl + Alt + Del”, definir o modo de ecrã completo, pode iniciar uma conversa escrita (Chat) e transferir ficheiros.
Funcionalidade de um Operador e vários Clientes
Em situações de prestação de assistência remota a vários clientes, utilizando já uma licença do Iperius Remote, as contas Master e Client devem ser devidamente configuradas para que todo o processo de assistência seja feito rapidamente e sem complicações.
Para isso, basta clicar no botão “Configurações Gerais” (roda dentada), e no separador “Conta” definir as credenciais de acesso à conta “Master”. Depois, basta premir em “Test” e “Salvar”.
Para a conta cliente, basta fazer o mesmo procedimento mas no separador “Contas de Acesso”.
Do lado do Master há acesso à lista de todos os clientes configurados, de forma a facilitar o processo de assistência. É possível trabalhar simultaneamente com vários computadores remotos – onde o número de ligações depende da licença adquirida – e também é possível a ligação de vários operadores para o mesmo cliente, para reuniões, apresentações ou projetos de colaboração.
E em relação à segurança?
Quanto à segurança, o Iperius Remote usa o protocolo SSL criptografado (HTTPS) e, quando necessário, utiliza criptografias integradas de dados, para um nível de segurança dupla. Todos os clientes podem ser acedidos apenas com a permissão explícita do utilizador ou por meio de credenciais de acesso específicas, no caso de acesso sem supervisão.
Por ser um software que não é instalado, não altera qualquer definição do sistema e não inclui aplicações de terceiros, pelo que se pretender removê-lo, basta simplesmente apagar o ficheiro executável. A pasta auxiliar do programa, que contém a configuração, executável de updates e logs, encontra-se em “C:\ProgramData\IperiusRemote”.
Em resumo…
Se precisar de ajudar um familiar à distância em tarefas no computador, ou se tem clientes que dependem da sua assistência remota com regularidade, o Iperius Remote é uma ferramenta a considerar, pela sua simplicidade e rapidez de utilização.
Ninguém duvida disto: cada vez mais os nossos dados têm mais valor e merecem maior cuidado na sua segurança. O mundo agora “é digital” e tudo pode ser guardado em diversos tipos de unidades de armazenamento, mas essas informações não estão eternamente seguras e muita coisa de errado pode acontecer.
O mercado está bem servido no que diz respeito a ferramentas de backup e nós não nos cansamos de alertar e sugerir aos nossos leitores algumas soluções interessantes que permitam colocar “trancas à porta” antes que a “casa seja arrombada”. Hoje sugerimos o Iperius Backup.
O software Iperius Backup oferece vários tipos de soluções, desde uma opção para um computador pessoal, até a soluções completas para uso empresarial e adequadas a servidores. Neste artigo vamo-nos focar no Iperius Desktop, que mesmo na versão gratuita possui funcionalidades interessantes.
Temos maus hábitos?
Não generalizo, mas consigo classificar o ambiente que me rodeia. A preocupação com a segurança da informação acontece verdadeiramente apenas quando surge algum problema, como uma avaria num disco, a Pen Drive perdida ou que deixou de ser reconhecida, uma pasta que foi apagada sem querer ou um ransomware que infetou o computador e que bloqueou o acesso a tudo. Os documentos, as fotos, os vídeos, tudo pode ficar comprometido…
Os processos manuais, embora menos práticos, resolvem o problema e se forem bem feitos são capazes de garantir a segurança da informação. No entanto, mais cedo ou mais tarde, é natural que caia no esquecimento e que sejam perdidas informações importantes. A solução passa, obviamente, por ter uma aplicação que faça o trabalho por nós.
As funcionalidades
O Iperius Backup oferece um conjunto de funcionalidades determinantes para que os nossos dados fiquem devidamente seguros, mesmo considerando a versão gratuita, senão vejamos:
Cópia rápida de pastas para dispositivos de armazenamento, como um disco externo, um NAS ou outro, com autenticação automatizada para unidades de rede
Backup incremental, identificando as alterações na nova versão de forma a copiar apenas o necessário
Criptografia AES 256 bits
Agendamento e configuração de tarefas de backup
Execução de scripts externos, para utilizadores avançados
Notificação por email
Há depois outras funcionalidades que poderão ser determinantes para que tudo seja tratado com maior segurança, e caberá ao utilizador perceber e decidir se é justificável adquirir uma licença, a começar nos 29€, que traz algumas das seguintes funcionalidades adicionais:
Backup para a Cloud, para serviços como Google Drive, Amazon S3, Azure Storage, OneDrive ou Dropbox
Backup para FTP
Cópia de permissões NTFA (ACL)
Imagem integral do disco
Backup de ficheiros em utilização (VSS)
Capacidade de ligação à central de monitorização e controlo remoto, Iperius Console
Execução como um serviço do sistema
Licença vitalícia, com atualizações e suporte incluídos
Uma interface simples
Assim que tiver decidido o que pretende preservar nas suas cópias de segurança, pode começar por criar uma nova tarefa de backup e escolher todos esses itens, desde ficheiros, pastas, partições, contas FTP, contas VMWare e Hyper-V, Exchange e bases de dados SQL Server, MySQL, PostgreSQL e Oracle.
Depois deve escolher o destino dessa tarefa de backup, que pode ser uma pasta, um servidor FTP ou um serviço na Cloud.
Dependendo da frequência com que esse conteúdo sofre atualizações, é importante definir no agendamento quando pretende que essa tarefa de backup seja executada.
Resta definir depois algumas opções da sua preferência e concluir o processo, para iniciar depois a cópia de segurança.
Mais tarde, se tiver a necessidade de restaurar um backup, deve então aceder à opção Restaurar, selecionar a tarefa de backup e escolher o item que pretende restaurar, entre os itens que escolheu no primeiro passo.
Mais simples que isto, é difícil. Em poucos cliques poderá configurar e executar/automatizar as tarefas de backup, assegurando a integridade dos seus dados com um agendamento automático.
Lembre-se…
Não deixe os backups para “amanhã”. Quando menos esperar, os seus dados podem ficar comprometidos devido a uma avaria, roubo ou mero erro de software, que possa inesperadamente apagar o que não deve. Este software de backup resolverá esse problema, mesmo na versão gratuita.
Foi em janeiro de 2017 que a Microsoft acabou com o Windows Essentials. Do pacote fazia parte o famoso Windows Movie Maker que, apesar de não ser uma super ferramenta, permitia trabalhar facilmente conteúdos de vídeo. Atualmente o Windows 10 não tem nenhuma ferramenta específica, apesar de estarem disponíveis algumas funcionalidades básicas na app Fotografias.
Hoje apresentamos 5 fantásticos editores de vídeo gratuitos para Windows 10.
Existem muitas ferramentas para edição de imagem para Windows, mas muitas são limitadas. Sem entrarmos no mundo do software pago, profissional, deixamos 5 sugestões de editores de vídeo, gratuitas, que vão ser de certeza do vosso agrado.
#1 Hitfilm Express
O Hitfilm Express é um dos mais populares editores de vídeo gratuitos. Esta ferramenta disponibiliza mais de 410 efeitos e é totalmente compatível com o Windows (até com o MacOS).
Este é um editor de vídeo do segmento profissional e como tal, com esse estatuto, disponibiliza todas as funcionalidades básicas necessárias para a manipulação de vídeo. No site os utilizadores podem ver algumas demos de conteúdos trabalhados com esta ferramenta.
A versão gratuita disponibiliza várias funcionalidades mas os utilizadores podem ter mais adquirindo a versão paga.
Para quem procura um interessante editor de vídeo gratuito então o Shotcut é uma boa sugestão. Esta ferramenta Open Source oferece uma interface bastante intuitiva, assim como várias funcionalidades que permitem manipular conteúdos de vídeo (e também de áudio).
O Shotcut tem suporte para vários formatos, incluindo resoluções 4K. Destaque ainda para o facto de ser possível a reprodução de conteúdos via rede, através dos protocolos HTTP, HLS, RTMP, RTSP, MMS, UDP, etc.
O Lightworks é um software de edição de vídeo de nível profissional mas de fácil utilização. Esta ferramenta está disponível numa versão gratuita, mas existem também uma versão mais completa, contudo é paga. É multi-plataforma, tendo suporte para Windows, Mac e Linux.
Esta ferramenta tem uma interface bastante intuitiva, disponibiliza uma timeline bastante prática, possibilidade de exportar o vídeo para o YouTube e para a plataforma.
O DaVinci Resolve 15 é uma ferramenta da edição que combina edição profissional online e offline, correção de cores, pós-produção de áudio e também efeitos visuais. Isto tudo na mesma ferramenta de software!
Com um único clique, o utilizador pode alternar entre edição, cor, efeitos e áudio.
Esta ferramenta é uma referência para a pós-produção de alto nível e é provavelmente o software mais utilizado na finalização de longas‑metragens.
O VideoPad Video Editor é um editor de vídeo gratuito direcionado especialmente para utilizadores domésticos. Tem uma interface simples e muitos efeitos disponíveis. Para utilizadores mais avançados, o VideoPad também possui funcionalidades para fazer o mix do áudio, correção de cor, controlos de velocidade de vídeo e muitos outros recursos.
Esta ferramenta está disponível para Windows e macOS.
O ano de 2017 foi o grande ano das criptomoedas. A Bitcoin cresceu imenso e, cada vez mais, surgem outras moedas que também querem ganhar espaço. No entanto, para muita gente, o Mundo das criptomoedas é algo extremamente complexo e difícil de compreender.
Masde onde é que vêm estas moedas? Como é funcionam as transferências? Estas são das perguntas mais frequentes, mas antes de procurar resposta para elas, deve entender a tecnologia Blockchain e o seu funcionamento. As criptomoedas podem ser confusas, sem dúvida, mas se entender os conceitos por detrás do Blockchain está no caminho certo.
De onde é que vem o Blockchain?
Apesar da tecnologia Blockchain se ter tornado famosa apenas há alguns anos, a sua origem começa nos anos 70. Um artigo científico publicado em 1976 apresentou pela primeira vez a ideia de registo distribuído e que, basicamente, é a ideia por detrás do Blockchain.
No entanto, foram necessárias mais algumas décadas, o poder de processamento dos computadores atuais e uma moeda virtual chamada Bitcoin para que o Blockchain se tornasse a tecnologia importante que é hoje.
A Bitcoin, criação de Satoshi Nakamoto, apareceu pela primeira vez em 2009 e com ela chegou também o Blockchain. Com o aparecimento desta criptomoeda e graças ao Blockchain, passou a ser possível fazer transferências sem interferências e de forma extremamente segura.
O que é o Blockchain?
O Blockchain é um registo digital que é incorruptível e que pode ser programado para registar transações financeiras ou algo que tenha valor virtual.
Imagine uma folha de cálculo do Excel que é duplicada milhares de vezes através de uma rede de computadores que está espalhada por todo o Mundo. Agora imagine que essa rede foi desenvolvida para ser atualizada regularmente e registar qualquer alteração que ocorra.
Pronto, aqui tem! Este é o conceito de Blockchain.
A informação guardada num Blockchain existe como uma grande base de dados partilhada e que está sempre a atualizar e a ser alterada, pois a informação que contem também é modificada. Obviamente, esta forma de uso tem as suas vantagens.
A base de dados blockchain não se encontra guardada em nenhuma localização específica, o que significa que os registos que mantém são verdadeiramente públicos e fáceis de verificar. Para além disso, não existe nenhuma versão centralizada da informação que guarda, o que significa que não pode ser alterada por qualquer hacker que tente atacar o sistema. Finalmente, pode ser acedida por qualquer pessoa com acesso à Internet.
A Bitcoin e o Blockchain
A Bitcoin é uma moeda virtual, também conhecida como criptomoeda, que é descentralizada, ou seja, não existe nenhuma autoridade reguladora, e permite aos utilizadores realizar transferências sem a intervenção de terceiros.
Deste modo, todas as transações de Bitcoin são guardadas e mantidas numa base de dados pública que preserva a sua autenticidade e ajuda a prevenir fraudes. A tecnologia que permite a realização destas transações e que elimina a necessidade de um intermediário chama-se Blockchain.
Agora, evocando os conhecimentos que obteve dos parágrafos anteriores, é fácil de perceber que um dos principais benefícios de usar a tecnologia Blockchain no contexto da Bitcoin reside na transparência que providencia, dado que todas as transações ficam guardadas para sempre.
Sempre que ocorre uma transação, os seus detalhes são adicionados a um bloco que contém transações do mesmo tipo e que foram submetidas recentemente. A validade dessas transações é depois verificada e confirmada pelos mineiros.
Quando essa verificação é concluída e tudo está correto, o bloco que contem as transações é anexado ao mais recente bloco que se encontra na cadeia de blocos, criando assim um registo que pode ser visto por qualquer pessoa, ou seja, o Blockchain.
Assim, este processo continua perpetuamente e cria-se um registo de confiança e que guarda todas as transações que são efetuadas.
A encriptação por detrás da Bitcoin
A Bitcoin é uma moeda digital que utiliza criptografia de chave pública, ou seja, existe uma chave privada e uma chave pública ligadas matematicamente que permitem controlar e gastar as Bitcoins que estão associadas a uma determinada carteira.
Se um utilizador não tiver na sua posse as chaves privadas então não possui Bitcoins. Isto porque é esta chave única que permite gastar/enviar Bitcoins. Cada carteira de Bitcoins contém uma ou mais chaves privadas. Estas chaves privadas estão ligadas aos endereços de Bitcoin que, por sua vez, estão associados a uma determinada carteira.
As chaves privadas são também utilizadas para tornar as transações irreversíveis. Esta irreversibilidade é garantida pelas “assinaturas” matemáticas que estão associadas a cada transação. E é aqui que entra o conceito de chave pública.
Sempre que uma transação é efetuada, uma chave pública é derivada a partir da chave privada para assinar a transação. Isto acontece para não ser necessário revelar a chave privada. Assim, para cada transação estas assinaturas são únicas, mesmo que sejam geradas a partir da mesma chave privada.
E aqui está um pormenor interessante: devido às funções matemáticas utilizadas é impossível derivar as chaves privadas a partir das chaves públicas geradas.
Uma vez que a transação é verificada, as Bitcoins são enviadas para o endereço público do recetor das Bitcoins, que é o código que está associado a cada carteira que existe e a transação é adicionada ao Blockchain.
O Blockchain não serve apenas para criptomoedas…
Para já, é necessário que autoridades centrais confiem umas nas outras e sigam os termos especificados nos contratos, mas com o Blockchain é possível garantir de forma automática que a transparência entre parceiros se mantém e que a confiança não é quebrada.
Essa é a grande inovação do Blockchain.
Assim, o Blockchain pode, no futuro, vir a ser utilizado para manter e guardar uma enorme variedade de informação. Por exemplo, organizações que estão a tentar implementar projetos de votação eletrónica usam o Blockchain para tornar o processo mais seguro e garantir que a informação não é alterada.
Sem dúvida, um dia, o Blockchain poderá vir a ter um impacto tão grande no Mundo como a Internet.Mudar o estado das coisas e ajudar criar um sistema financeiro melhor seria algo incrível.
Os problemas podem ser vários: recuperar dados perdidos causados pelo bloqueio do sistema operativo Windows, BSOD (ou ecrãs azuis) constantes e outros problemas no arranque do PC. Poucas promessas e muitos resultados não é para todos, especialmente quando se fala de recuperar “catástrofes”.
A Wondershare lançou o Data Recovery Pro 6.60 com o WinPE Bootable Media para resolver problemas de arranque e recuperação de dados perdidos causados por um bloqueio do sistema.
Para que serve o Data Recovery Pro
Com inúmeros recursos avançados, recentemente, a Wondershare lançou o Data Recovery Pro 6.60. Em resumidas palavras podemos dizer que um dos benefícios mais evidentes da ferramenta é que permite a recuperação de dados de um sistema que crashou ou não se encontra nas melhores condições de trabalho.
O facto de dar suporte ao arranque com CD, DVD ou PEN via WinPE, permite ser usado para executar a operação de recuperação de dados quando um qualquer sistema do Windows não é capaz de arrancar de forma dita «normal».
Ora, esta característica permite aos seus utilizadores recuperar os seus conteúdos, mesmo quando o sistema falha ao arrancar ou mesmo se estiver a funcionar de forma irregular.
A atualização mais recente do Wondershare Data Recovery Pro 6.60 agora oferece suporte ao ambiente de pré-instalação do Windows. A ter em conta que esta Ferramenta de Recuperação de Dados está disponível para Windows e Mac, embora o seu recurso seja dedicado exclusivamente aos sistemas Windows.
Novidades para Recuperar Informação
Atualmente, esta poderosa ferramenta que é utilizada por mais de 5 milhões de utilizadores em todo o mundo, é considerada uma das mais antigas aplicações de recuperação de dados com mais de 10 anos de presença no mercado.
Em síntese, o Data Recovery Pro permite a recuperação de dados a partir de sistemas FAT, NTFS, exFAT, HFS e todos os principais sistemas de arquivos.
Além dos discos rígidos, este software consegue executar as operações de recuperação em unidades USB – pen drives ou discos rígidos USB -, cartões de memória e outras unidades de armazenamento de dados secundárias. É ainda possível recuperar mais de 550 formatos diferentes de arquivos.
Nesta mais recente atualização do Wondershare Data Recovery Pro, vai ser possível utilizar esta ferramenta para executar a operação de recuperação mesmo quando o sistema não está a funcionar, o que torna verdadeiramente útil antes de praticar um ato de desespero como pode ser ter de formatar o PC sem qualquer recuperação de dados.
Os utilizadores podem criar um CD, DVD ou uma USB de arranque a partir da interface do programa e que pode, sem dúvida, ajudar a arrancar com o sistema.
O dispositivo de arranque criado por nós pode ser usado para recuperar dados perdidos e excluídos em caso de emergência. Se o sistema Windows pendurar ou, por algum motivo não arranca, os utilizadores somente têm de inserir, por exemplo, uma pen de arranque e vai ser possível obter um arranque estável com escolha de dados a recuperar.
Uma vez que o utilizador faça o arranque a partir do dispositivo amovível criado com o Data Recovery Pro, a pesquisa para conteúdos a recuperar ou perdido passa a ser possível.
A ferramenta de recuperação de dados executa uma análise rápida, mas profunda com elevado nível de precisão. No final, vai ser possível visualizar os dados encontrados e possíveis de recuperar, bem como vai ser possível escolher somente os dados que pretendemos recuperar seletivamente.
Para quem ainda não conhece, esta ferramenta pode ser descarregada a partir da página oficial. Quem já conhece, este é um reforço de qualidade e merece uma grande oportunidade.
Recuperar informação após um desastre com o WinPE Bootable Media
Abaixo, apresentamos, por passos, como é possível criar um sistema de arranque WinPE Bootable Media através o Wondershare Data Recovery Pro:
Passo 1:
Criar Unidade USB de arranque ou CD / DVD
Garantir uma pen USB em branco ou CD / DVD virgem para criar o disco de arranque. De seguida, podemos fazer o download gratuito do Wondershare Data Recovery Pro e continuar a seguir este guia.
Passo 2:
Defina o computador para inicializar a partir da unidade USB
Antes de começar a recuperação de dados, iremos necessitar alterar a sequência do arranque do computador onde será efetuada a recuperação. É necessário reiniciar o computador e com a tecla de função da BIOS (poderá ser a tecla DEL ou F2) para configurar o computador para arrancar a partir da unidade USB.
Passo 3:
Recupere os seus dados com o Wondershare Data Recovery WinPE
Corra o Wondershare Data Recovery a partir da pen drive para começar a pesquisar o computador, sendo possível copiar os dados do disco rígido ou recuperar todos os dados do computador.
Com o Deep Scan, a aplicação pode pesquisar mais ficheiros do computador que deu problemas, embora o tempo da operação possa variar consoante as características do mesmo.
Passo 4:
Visualizar Dados Recuperados e Guardá-los
Após a verificação profunda, Deep Scan, concluída, vai ser possível visualizar todos os ficheiros perdidos e clicar no botão “Recuperar” para recuperar os nossos ficheiros.
O MySQL é, muito provavelmente, o sistema de gestão de base de dados (SGBD) mais usado em todo o mundo, estando disponível em várias versões e para diferentes sistemas operativos. Por outro lado o MariaDB (fork do MySQL) tem tido um crescimento fantástico.
Hoje deixamos 6 dicas de segurança para quem usa o MySQL ou o MariaDB.
Por omissão, depois de instalar o MySQL/MariaDB, a segurança dos serviços não é totalmente garantida. Nesse sentido é preciso realizar alguns ajustes importantes. Aqui ficam as nossas dicas para hoje:
Dica 1 – “Instalação” segura do MySQL
Depois de instalar o MySQL/MariaDB devem executar o script mysql_secure_installation para:
Definir uma password para o utilizador root
Remover bases de dados de testes
Remover utilizadores anónimos
Não permitir o acesso remoto ao gestor de base de dados
etc.
Durante a configuração, devem seguir os seguintes passos:
Enter current password for root (enter for none): # DAR ENTER #
Set root password? [Y/n] # DAR ENTER #
New password: # Redefinir Password #
Re-enter new password: # Redefinir Password #
Remove anonymous users? [Y/n] Y
Disallow root login remotely? [Y/n] Y
Remove test database and access to it? [Y/n] Y
Reload privilege tables now? [Y/n] Y
Dica 2 – Permitir apenas o acesso local
Se não usar o script anterior para bloquear o acesso remoto à base de dados, pode fazê-lo através do ficheiro /etc/mysql/mariadb.conf.d/50-server.cnf adicionando, a seguir à secção mysql, o comando:
bind-address = 127.0.0.1
Nota: Caso pretenda definir esta alteração no MySQL, deve ser no ficheiro /etc/mysql/mysql.conf.d/mysql.cnf.
Dica 3 – Mudar o porto de ligação ao MySQL/MariaDB
Por omissão, o porto de ligação ao MySQL/MariaDB é o conhecido 3306. Para mudarem, por exemplo, para 5555, devem ir ao ficheiro /etc/mysql/mariadb.conf.d/50-server.cnf e mudar a variável port.
Dica 4 – Apagar comandos MySQL
Todos os comandos executados na shell do MySQL/MariaDB são guardados no ficheiro ~/.mysql_history.
Para apagar toda a informação desse ficheiro devem usar o comando:
cat /dev/null > ~/.mysql_history
Dica 5 – Mude frequentemente a password de acesso ao MySQL/MariaDB
Para mudar com frequência a password de acesso ao gestor de base de dados basta que use os seguintes comandos:
MariaDB [(none)]> USE mysql;
MariaDB [(none)]> UPDATE user SET password=PASSWORD('YourPasswordHere') WHERE User='root' AND Host = 'localhost';
MariaDB [(none)]> FLUSH PRIVILEGES;
Hoje em dia qualquer editor de texto oferece um vasto conjunto de funcionalidades. Este tipo de ferramenta pode ser usada nas mais diversas tarefas que vão desde a programação, registo de texto simples, ajuda na configuração de serviços, listagem de ações, etc.
Hoje apresentamos um TOP 10 dos melhores editores de texto em 2017. Veja se falta algum.
O Notepad++ é um poderosíssimo editor de texto que combina uma série de funcionalidades que facilitam o trabalho de qualquer pessoa que trabalhe com texto digital. É bastante leve, reconhece a sintaxe de aproximadamente 40 linguagens de programação (C, C++, HTML, XML, ASP, JAVA, SQL, Perl, Python, HTML5, CSS entre outras com sistema syntax highlight, excelente para programadores).
O Atom, o popular editor de código do Github, é um dos preferidos dos programadores devido às funcionalidades que oferece. O Atom permite que os programadores acedam à semântica de várias linguagens de programação, à integração com o Git e (claro) com o próprio Github, a temas completamente personalizáveis e o acesso a uma comunidade que está a desenvolver e a criar módulos e extensões para o Atom.
Sublime Text é um editor de texto e código-fonte multiplataforma, escrito em linguagem C++, que foi inicialmente pensado para ser uma extensão do vim. Este editor oferece recursos extraordinários e um desempenho simplesmente surpreendente.
Considerado como o substituto do gedit (editor de texto com interface gráfica), o Brackets é um editor de texto código, muito versátil, leve e pode ser facilmente artilhado através das mais diversas extensões disponíveis.
Bluefish é um poderoso editor de texto, recomendado para programadores e webdesigners. Como muitas opções disponíveis, permite desenvolvimento em HTML, XHTML, CSS, XML, XML, PHP, C, Javascript, Java, SQL, Perl, JSP, Python, entre outros.
O Bluefish foi criado por Chris Mazuc e Olivier Sessink em 1997, com o objetivo de facilitar o desenvolvimento web a profissionais tivessem como sistema operativo o Linux.
7# Light Table
Light Table é considerado um editor de texto altamente moderno e inovador. Este editor pode ser facilmente personalizado, podemos embeber gráficos e ver em tempo real o resultado de um determinado código. Vale a pena experimentar.
O Vim é um dos principais editores de texto do GNU/Linux. São fantásticas as suas capacidades e por isso é um dos eleitos pela maioria dos utilizadores. A interface não é muito amigável e no principio é difícil dominar o editor.
Tal como o Sublime Text, o UltraEdit é também um editor muito completo em termos de funcionalidades. Este editor pode ser facilmente personalizado e até podemos configurar ligações FTP, SSH, Telnet para trabalhar em código que está do lado do servidor.
Uma das ferramentas mais usadas em qualquer sistema GNU/Linux é sem dúvida o editor de texto. Ao nível da linha de comandos são várias as opções mas um dos mais populares é sem dúvida o nano.
E são estes alguns dos bons editores de texto que existem hoje no mercado. Os primeiros que apresentamos são os mais completos e por isso são também dos mais populares.
HTTPS is a must for every website nowadays: Users are looking for the padlock when providing their details; Chrome and Firefox explicitly mark websites that provide forms on pages without HTTPS as being non-secure; it is an SEO ranking factor; and it has a serious impact on privacy in general. Additionally, there is now more than one option to get an HTTPS certificate for free, so switching to HTTPS is only a matter of will.
HTTPS is a must for every website nowadays: Users are looking for the padlock when providing their details; Chrome and Firefoxexplicitly mark websites that provide forms on pages without HTTPS as being non-secure; it is an SEO ranking factor; and it has a serious impact on privacy in general. Additionally, there is now more than one option to get an HTTPS certificate for free, so switching to HTTPS is only a matter of will.
Setting up HTTPS can be a bit intimidating for the inexperienced user — it takes many steps with different parties, it requires specific knowledge of encryption and server configuration, and it sounds complicated in general.
In this guide, I will explain the individual components and steps and will clearly cover the individual stages of the setup. Your experience should be easy, especially if your hosting provider also supplies HTTPS certificates — chances are you will be able to perform everything from your control panel quickly and easily.
I have included detailed instructions for owners of shared hosting plans on cPanel, administrators of Apache HTTP servers and of nginx on Linux and Unix, as well as Internet Information Server on Windows.
HTTP Vs. HTTPS Vs. HTTP/2 Vs. SSL Vs. TLS: What’s What? Link
A lot of acronyms are used to describe the processes of communication between a client and a server. These are often mixed up by people who are not familiar with the internals.
The Hypertext Transfer Protocol (HTTP) is the basic communication protocol that both clients and servers must implement in order to be able to communicate. It covers things such as requests and responses, sessions, caching, authentication and more. Work on the protocol, as well as on the Hypertext Markup Language (HTML), started in 1989 by Sir Tim Berners-Lee and his team at CERN. The first official version of the protocol (HTTP 1.0) was released in 1996, shortly followed by the currently widely adopted version (HTTP 1.1) in 1997.
The protocol transfers information between the browser and the server in clear text, allowing the network, through which the information passes, to see the information transmitted. This is a security concern, so HTTP Secure (HTTPS) was introduced, allowing the client and the server to first establish an encrypted communication channel, and then pass the clear text HTTP messages through it, effectively protecting them from eavesdropping.
The encrypted channel is created using the Transport Layer Security (TLS) protocol, previously called Secure Socket Layer (SSL). The terms SSL and TLS are often used interchangeably, with SSL 3.0 being replaced by TLS 1.0. SSL was a Netscape-developed protocol, while TLS is an IETF standard. At the time of writing, all versions of SSL (1.0, 2.0, 3.0) are deprecated due to various security problems and will produce warnings in current browsers, and the TLS versions (1.0, 1.1, 1.2) are in use, with 1.3 currently a draft.
So, sometime around 1996 and 1997, we got the current stable version of the Internet (HTTP 1.1, with or without SSL and TLS), which still powers the majority of websites today. Previously, HTTP was used for non-sensitive traffic (for example, reading the news), and HTTPS was used for sensitive traffic (for example, authentication and e-commerce); however, increased focus on privacy means that web browsers such as Google Chrome now mark HTTP websites as “not private” and will introduce warnings for HTTP in future.
The next upgrade of the HTTP protocol — HTTP/2 — which is being adopted by a growing number of websites, adds new features (compression, multiplexing, prioritization) in order to reduce latency and increase performance and security.
In HTTP version 1.1, the secure connection is optional (you may have HTTP and/or HTTPS independent of each other), while in HTTP/2 it is practically mandatory — even though the standard defines HTTP/2 with or without TLS, most browser vendors have stated that they will only implement support for HTTP/2 over TLS.
Why bother with HTTPS in the first place? It is used for three main reasons:
Confidentiality
This protects the communication between two parties from others within a public medium such as the Internet. For example, without HTTPS, someone running a Wi-Fi access point could see private information such as credit cards when someone using the access point purchases something online.
Integrity
This makes sure information reaches its destined party in full and unaltered. For example, our Wi-Fi friend could add extra advertisements to our website, reduce the quality of our images to save bandwidth or change the content of articles we read. HTTPS ensures that the website can’t be modified.
Authentication
This ensures that the website is actually what it claims to be. For example, that same person running the Wi-Fi access point could send browsers to a fake website. HTTPS ensures that a website that says it’s example.com is actually example.com. Some certificates even check the legal identity behind that website, so that you know yourbank.com is YourBank, Inc.
Confidentiality, integrity and authentication aren’t HTTPS-specific: They’re the core concepts of cryptography. Let’s look a little more closely at them.
Confidentiality is privacy — that is, it protects information from being read by an unauthorized third party. The process usually involves turning a readable (i.e. audible and visible) form of the information, called plaintext, into a scrambled, unreadable version, called ciphertext. This process is called encryption. The reverse process — turning the unreadable ciphertext back into readable plaintext — is called decryption. There are many methods — cipher functions (or algorithms) — to encrypt and decrypt information.
In order for two parties to be able to communicate, they should agree on two things:
which algorithm (cipher function) they will use in their communication;
which parameters, password or rules (i.e. secret) will be used with the method selected.
There are two main types of encryption methods:
symmetric
Both parties share a common secret key.
asymmetric
One of the parties has a pair of a secret and a public key, the foundation of public key infrastructure (PKI).
The symmetric class of methods relies on both parties having a shared secret, which the sender uses to encrypt the information, which in turn the receiver decrypts using the same method and key (see the figure below). The problem with these methods is how both parties will negotiate (i.e. exchange) the secret without physically meeting each other — they need to have a secure communication channel of some sort.
The asymmetric methods come to solve this kind of problem — they are based on the notion of public and private keys. The plaintext is encrypted using one of the keys and can only be decrypted using the other complementary key.
So, how does it work? Let’s assume we have two parties who are willing to communicate with each other securely — Alice and Bob (these are always the names of the fictional characters in every tutorial, security manual and the like, so we’ll honor the tradition here as well). Both of them have a pair of keys: a private key and a public one. Private keys are known only to their respective owner; public keys are available to anyone.
If Alice wants to send a message to Bob, she would obtain his public key, encrypt the plaintext and send him the ciphertext. He would then use his own private key to decrypt it.
If Bob would like to send a reply to Alice, he would obtain her public key, encrypt the plaintext and send her the ciphertext. She would then use her own private key to decrypt it.
When do we use symmetric and when do we use asymmetric encryption? Asymmetric encryption is used to exchange the secret between the client and the server. In real life, we usually do not need two-way asymmetric communication — it is sufficient if one of the parties (we’ll just call it a server, for the sake of simplicity) has the set of keys, so it can receive an encrypted message. It really protects the security of information in only one direction — from the client to the server, because the information encrypted with the public key can only be decrypted using the private key; hence, only the server can decrypt it. The other direction is not protected — information encrypted with the server’s private key can be decrypted with its public key by anyone. The other party (we’ll similarly call it a client) begins the communication by encrypting a randomly generated session secret with the server’s public key, then sends the ciphertext back to the server, which, in turn, decrypts it using its own private key, now having the secret.
Symmetric encryption is then used to protect the actual data in transit, since it’s much faster than asymmetric encryption. The two parties (the client and the server), with the previously exchanged secret, are the only ones able to encrypt and decrypt the information.
That’s why the first asymmetric part of the handshake is also known (and referred to) as key exchange and why the actual encrypted communication uses algorithms known (and referred to) as cipher methods.
Another concern, solved with HTTPS, is data integrity: (1) whether the entire information arrived successfully, and (2) whether it was modified by someone in transit. In order to ensure the information is transmitted successfully, message digest algorithms are used. Computing message authentication codes (MACs) for each message exchanged are a cryptographic hashing process. For example, obtaining a MAC (sometimes called a tag) uses a method that ensures that it is practically impossible (the term commonly used is infeasible) to:
change the message without affecting the tag,
generate the same tag from two different messages,
reverse the process and obtain the original message from the tag.
What about authentication? The problem with the real-life application of the public key infrastructure is that both parties have no way of knowing who the other party really is — they are physically separate. In order to prove the identity of the other party, a mutually trusted third party — a certificate authority (CA) — is involved. A CA issues a certificate, stating that the domain name example.com (a unique identifier), is associated with the public key XXX. In some cases (with EV and OV certificates — see below), the CA will also check that a particular company controls that domain. This information is guaranteed by (i.e. certified by) the certificate authority X, and this guarantee is valid no earlier than (i.e. begins on) date Y and no later than (i.e. expires on) date Z. All of this information goes into a single document, called an HTTPS certificate. To present an easily understandable analogy, it is like a country government (a third party trusted by all) issuing an ID or a passport (a certificate) to a person — every party that trusts the government would also accept the identity of the ID holder (assuming the ID is not fake, of course, but that’s outside the scope of this example).
Certification authorities (CAs) are organizations trusted to sign certificates. Operating systems, such as Windows, macOS, iOS and Android, as well as the Firefox browser, have a list of trusted certificates.
You can check which CAs are trusted by your browser:
Mac
“Applications” → “Utilities” → “Keychain Access.” Under “Category,” pick Certificates”
All certificates are then checked and trusted — by the operating system or browser if directly trusted or by a trusted entity if verified. This mechanism of transitive trust is known as a chain of trust:
You can add other unlisted CAs, which is useful when working with self-signed certificates (which we’ll discuss later).
In most common situations, only the server needs to be known to the client — for example, an e-commerce website to its customers — so, only the website needs a certificate. In other situations, such as e-government systems, both the server and the client, requesting a service, should have their identity proven. This means that both parties should be using certificates to authenticate to the other party. This setup is also outside the scope of this article.
Domain validated (DV)
The most common type of certificate, a DV certificate verifies that the domain matches a particular public key. The browser establishes a secure connection with the server and displays the closed padlock sign. Clicking the sign will show “This website does not supply ownership information.” There are no special requirements other than having a domain — a DV certificate simply ensures that this is the correct public key for that domain. The browser does not show a legal entity. DV certificates are often cheap (10 USD per year) or free — see the sections on Let’s Encrypt and Cloudflare below.
Extended validation (EV)
EV certificates verify the legal organization behind a website. This is the most trustworthy type of certificate, which is obtained after a CA checks the legal entity that controls the domain. The legal entity is checked with a combination of:
control of the domain (such as a DV certificate);
government business records, to make sure the company is registered and active;
independent business directories, such as Dunn and Bradstreet, Salesforce’s connect.data.com, Yellow Pages, etc.;
a verification phone call;
inspection of all domain names in the certificate (wildcards are explicitly forbidden for EV certificates).
As well as the closed padlock sign, EV HTTPS certificates display the name of the validated legal entity — typically a registered company — before the URL. Some devices, such as iOS Safari, will only show the validated legal entity, ignoring the URL completely. Clicking the sign will show details about the organization, such as the name and street address. The cost is between 150 and 300 USD per year.
Organization validated (OV)
Like EV, OV certificates verify the legal organization behind a website. However, unlike EV, OV HTTPS certificates do not display the verified legal name in the UI. As a result, OV certificates are less popular, because they have high validation requirements, without the benefits of these being shown to users. Prices are in the 40 to 100 USD per year range.
Once upon a time, HTTPS certificates generally contained a single domain in the CN field. Later, the “subject alternative name” (SAN) field was added to allow additional domains to be covered by a single certificate. These days, all HTTPS certificates are created equal: Even a single-domain certificate will have a SAN for that single domain (and a second SAN for the www version of that domain). However, many certificate vendors still sell single- and multi-domain HTTPS certificates for historical reasons.
Single domain
This is the most common type of certificate, valid for the domain names example.com and www.example.com.
Multiple domains (UCC/SAN)
This type of certificate, also known as Unified Communications Certificate (UCC) or Subject Alternative Names (SAN) certificate, can cover a list of domains (up to a certain limit). It is not limited to a single domain — you can mix different domains and subdomains. The price usually includes a set number of domains (three to five), with the option to include more (up to the limit) for an additional fee. Using it with related websites is advised, because the client inspecting the certificate of any of the websites will see the main domain, as well as all additional ones.
Wildcard
This type of certificate covers the main domain as well as an unlimited number of subdomains (*.example.com) — for example, example.com, www.example.com, mail.example.com, ftp.example.com, etc. The limitation is that it covers only subdomains of the main domain.
The variety of HTTPS certificates available is summarized in the table below:
CERTIFICATE TYPE
DOMAIN VALIDATED (DV)
ORGANIZATION VALIDATED (OV)
HTTPS
HTTPS
Verified legal owner
Single domain
example.com, www.example.com
Multiple domains
example.com, www.example.com, mail.example.com, example.net, example.org, etc.
predefined list, up to a certain limit (usually 100)
Wildcard
*.example.com
matches any subdomain
N/A — all names must be included explicitly in the certificate and inspected by the CA.
To recap, four components of HTTPS require encryption:
The initial key exchange
This uses asymmetric (private and public key) algorithms.
The identity certification (the HTTPS certificate, issued by a certification authority)
This uses asymmetric (private and public key) algorithms.
The actual message encryption
This uses symmetric (pre-shared secret) algorithms.
The message digesting
This uses cryptographic hashing algorithms.
Each of these components has a set of used algorithms (some of them deprecated already) that use different key sizes. Part of the handshake involves the client and the server agreeing on which combination of methods they will use — select one out of about a dozen public key (key exchange) algorithms, one out of about a dozen symmetric key (cipher) algorithms and one out of three (two deprecated) message-digesting (hashing) algorithms, which gives us hundreds of combinations.
For example, the setting ECDHE-RSA-AES256-GCM-SHA384 means that the key will be exchanged using the Elliptic Curve Diffie-Hellman Ephemeral (ECDHE) key exchange algorithm; the CA signed the certificate using the Rivest-Shamir-Adleman (RSA) algorithm; the symmetric message encryption will use the Advanced Encryption Standard (AES) cipher, with a 256-bit key and GCM mode of operation; and message integrity will be verified using the SHA secure hashing algorithm, using 384-bit digests. (A comprehensive list of algorithm combinations is available.)
So, there are some configuration choices to be made.
Deciding the cipher suites to use is a balance between compatibility and security:
Compatibility with older browsers needs the server to support older cipher suites.
However, many older cipher suites are no longer considered secure.
OpenSSL lists the supported combinations (see above) in order of cryptographic strength, with the most secure at the top and the weakest at the bottom. It is designed in this way because, during the initial handshake between the client and the server, the combination to be used is negotiated until a match is found that is supported by both parties. It makes sense to first try the most secure combinations and gradually resort to weaker security only if there is no other way.
Wikipedia has a comprehensive list of algorithms for all components of TLS and their support in different versions of SSL and TLS.
A very useful and highly recommended resource, advising on what cryptographic methods to enable on the server, is the Mozilla SSL Configuration Generator, which we’ll use later on with actual server configurations.
Elliptic Curve Cryptography (ECC) certificates are faster and use less CPU than the RSA certificates, which is particularly important for mobile clients. However, some services, such as Amazon, CloudFront and Heroku, don’t yet, at the time of writing, support ECC certificates.
A 256-bit ECC key is considered sufficient.
Rivest Shamir Adleman (RSA) certificates are slower but compatible with a wider variety of older servers. RSA keys are larger, so a 2048-bit RSA key is considered minimal. RSA certificates of 4096 and above may hurt performance — they’re also likely to be signed by a 2048-bit intermediary, undermining much of the additional security!
You might have noticed the fluidity of the statements above and the lack of any numbers — it is because what is a heavy load on one server is not on another. The best way to determine the impact on performance is to monitor the load on your server, with your real website(s) and your real visitors. And even that will change over time.
To obtain an HTTPS certificate, perform the following steps:
Create a private and public key pair, and prepare a Certificate Signing Request (CSR), including information about the organization and the public key.
Contact a certification authority and request an HTTPS certificate, based on the CSR.
Obtain the signed HTTPS certificate and install it on your web server.
There exists a set of files, containing different components of the public key infrastructure (PKI): the private and public keys, the CSR and the signed HTTPS certificate. To make things even more complicated, different parties use different names (and file extensions) to identify one and the same thing.
To start, there are two popular formats for storing the information — DER and PEM. The first one (DER) is binary, and the second (PEM) is a base64-encoded (text) DER file. By default, Windows uses the DER format directly, and the open-source world (Linux and UNIX) uses the PEM-format. There are tools (OpenSSL) to convert between one and the other.
The files we’ll be using as examples in the process are the following:
example.com.key
This PEM-formatted file contains the private key. The extension .key is not a standard, so some might use it and others might not. It is to be protected and accessible only by the system super-user.
example.com.pub
This PEM-formatted file contains the public key. You do not actually need this file (and it’s never explicitly present), because it can be generated from the private key. It is only included here for illustration purposes.
example.com.csr
This is a certificate signing request. A PEM-formatted file containing organizational information, as well as the server’s public key, should be sent to the certification authority issuing the HTTPS certificate.
example.com.crt
This HTTPS certificate is signed by the certification authority. It is a PEM-formatted file, including the server’s public key, organizational information, the CA signature, validity and expiry dates, etc. The extension .crt is not a standard; other common extensions include .cert and .cer.
File names (and extensions) are not standard; they can be anything you like. I have chosen this naming convention because I think it is illustrative and makes more obvious which component has what function. You can use whatever naming convention makes sense to you, as long as you refer to the appropriate key-certificate files in the commands and server configuration files throughout the process.
The private key is a randomly generated string of a certain length (we’ll use 2048-bit), which looks like the following:
This particular CSR contains the server’s public key and details about the organization ACME Inc., based in London, UK, and which owns the domain name example.com.
Finally, the signed HTTPS certificate looks like the following:
All parts are connected and should match each other. The final certificate was generated for illustration purposes only — it is the so-called self-signed certificate, because it was not signed by a recognized certification authority.
The process will be illustrated with actual steps for cPanel, Linux, FreeBSD and Windows. This is a universal process, valid for all kinds of certificates. If you are interested in getting a free DV certificate, there are other procedures to follow in the sections on Let’s Encrypt and Cloudflare.
Step 1: Create A Private Key And A Certificate Signing Request (CSR) Link
In the following examples, we’ll use 2048-bit RSA certificates, for their wide compatibility. If your server provider supports it (for example, if you don’t use Heroku or AWS), you might prefer to use ECC instead.
Scroll down to the “Security” section and click “SSL/TLS.” cPanel “Security” section (View large version)
You are now in the “SSL/TLS Manager” home. Click “Private Keys (KEY)” to create a new private key. cPanel “SSL/TLS Manager (View large version)
You will be redirected to a page to “Generate, Paste or Upload a new “Private
Key.” Select “2048-bit” in the “Key Size” dropdown, and click “Generate.”
cPanel “Private Key” management (View large version)
The new private key will be generated, and you will get a confirmation screen: cPanel private key confirmation (View large version)
If you go back to the “Private Keys” home, you will see your new key listed: cPanel “Private Keys” with the new key generated (View large version)
Go back to the “SSL/TLS Manager” home. Click “Certificate Signing Requests (CSR)” to create a new certificate request. cPanel “SSL/TLS Manager” (View large version)
You will now be presented with the “Generate Service Request” form. Select the previously created private key and fill in the fields. Answer all of the questions correctly (they will be public in your signed certificate!), paying special attention to the “Domains” section, which should exactly match the domain name for which you are requesting the HTTPS certificate. Include the top-level domain only (example.com); the CA will usually add the wwwsubdomain as well (i.e. www.example.com). When finished, click the “Generate” button. cPanel “Create New Certificate Signing Request” form (View large version)
The new CSR will be generated, and you will get a confirmation screen: cPanel CSR confirmation (View large version)
If you go back to the “Certificate Signing Request” home, you will see your new CSR listed: cPanel “Certificate Signing Request” with the new CSR generated (View large version)
The private key will be generated, and you will be asked some information for the CSR:
Generating a 2048 bit RSA private key
........................+++
................................................................+++
writing new private key to 'example.com.key'
-----
You are about to be asked to enter information that will be incorporated
into your certificate request.
What you are about to enter is what is called a Distinguished Name or a DN.
There are quite a few fields but you can leave some blank
For some fields there will be a default value,
If you enter ‘.', the field will be left blank.
Answer all questions correctly (they will be public in your signed certificate!), paying special attention to the “Common Name” section (for example, server FQDN or YOUR name), which should exactly match the domain name for which you are requesting the HTTPS certificate. Include the top-level domain only (example.com), the CA will usually add the www subdomain as well (i.e. www.example.com):
Country Name (2 letter code)[AU]:GB
State or Province Name (full name)[Some-State]:London
Locality Name (eg, city)[]:London
Organization Name (eg, company)[Internet Widgits Pty Ltd]:ACME Inc.
Organizational Unit Name (eg, section)[]:IT
Common Name (e.g. server FQDN or YOUR name)[]:example.com
Email Address []:admin@example.com
Please enter the following 'extra' attributes
to be sent with your certificate request
A challenge password []:
An optional company name []:
Open “Start” → “Administrative Tools” → “Internet Information Services (IIS) Manager.” Click the server name. Double-click “Server Certificates” in the middle column: Open “Internet Information Services (IIS) Manager.” Double-click “Server Certificates.” (View large version)
Click “Create Certificate Request” in the right column. Click “Create Certificate Request” in the right column. (View large version)
Enter your organization’s details, paying special attention to “Common
Name,” which should match your domain name. Click “Next.”
Enter your organization’s details. (View large version)
Leave the default “Cryptographic Service Provider.” Set the “Bit length” to 2048. Click “Next.” Set the “Bit length” to 2048. (View large version)
Browse for a place to save the generated CSR and click “Finish.” Browse for a place to save the generated CSR and click ‘Finish’. (View large version)
In order to get your website certificate, first purchase a HTTPS certificate credit of a chosen type (DV, OV, EV, single site, multisite, wildcard — see above) from an HTTPS certificate provider. Once the process is complete, you will have to provide the certificate signing request, which will spend the purchased credit for your chosen domain. You’ll be asked to provide (i.e. to paste in a field or to upload) the whole CSR text, including the -----BEGIN CERTIFICATE REQUEST----- and -----END CERTIFICATE REQUEST----- lines. If you would like to have an EV or OV certificate, you’ll need to provide the legal entity for which you’re requesting the certificate — you might also be asked to provide additional documents to confirm that you represent this company. The certificate registrar will then verify your request (and any supporting documents) and issue the signed HTTPS certificate.
Your hosting provider or HTTPS registrar might have a different product and registration procedure, but the general logic should be similar.
Find an HTTPS certificate vendor.
Select a type of certificate (DV, OV, EV, single site, multisite, wildcard), and click “Add to cart.” Specify your preferred payment method and complete the payment.
Activate the new HTTPS certificate for your domain. You can either paste or upload the certificate signing request. The system will extract the certificate details from the CSR.
You will be asked to select a method of “Domain Control Validation” — whether by email, uploading an HTML file (HTTP-based) or adding a TXTrecord to your domain zone file (DNS-based). Follow the instructions for your DCV method of choice to validate.
Wait several minutes until the validation is performed and the HTTPS certificate is issued. Download the signed HTTPS certificate.
It is also possible to sign a certificate yourself, rather than have a certificate authority do it. This is good for testing purposes because it will be cryptographically as good as any other certificate, but it will not be trusted by browsers, which will fire a security warning — you can claim you are anything you want, but it wouldn’t be verified by a trusted third party. If the user trusts the website, they could add an exception in their browser, which would store the certificate and trust it for future visits.
The example certificate above is a self-signed one — you can use it for the domain example.com, and it will work within its validity period.
You can create a self-signed certificate on any platform that has OpenSSL available:
Once the certificate is available, you will have to install it on your server. If you are using hosting and HTTPS registration services from the same provider (many hosting providers also sell HTTPS certificates), there might be an automated procedure to install and enable your newly obtained HTTPS certificate for the website. If you are hosting your website elsewhere, you will need to download the certificate and configure your server to use it.
Step 3: Installing The HTTPS Certificate For Your Website Link
Go back to the “SSL/TLS Manager” home. Click “Certificates (CRT)” to import the new certificate. cPanel “SSL/TLS Manager” (View large version)
You will be redirected to a page to “Paste, Upload or Generate” a new “Certificate.” Paste the contents of the certificate file received from the HTTPS registrar or upload it using the “Browse” button. cPanel “Import” a new HTTPS certificate (View large version)
When you paste the contents of the HTTPS certificate, it will be parsed, and plain text values will be presented to you for confirmation. Review the contents and click the “Save Certificate” button. cPanel “Review” and confirm HTTPS certificate (View large version)
The new HTTPS certificate will be saved, and you will get a confirmation screen: cPanel HTTPS certificate confirmation (View large version)
If you go back to the “Certificates (CRT)” home, you will see your new HTTPS certificate listed: cPanel “Certificates” with the new HTTPS certificate listed (View large version)
Go back to the “SSL/TLS Manager” home. Click “Install and Manage SSL for your website (HTTPS)” to assign the new certificate to your existing website. cPanel “SSL/TLS Manager” (View large version)
You will be presented with the “Install an SSL Website” form. Click the “Browse Certificates” button and select your HTTPS certificate. Select your website domain from the dropdown list (if it’s not automatically selected), and verify that the fields for “Certificate” and “Private Key” are populated. cPanel “Install an SSL Website” (View large version)
Test to see that you can access your website at the address https://www.example.com. If all works OK, you will most probably want to permanently redirect your HTTP traffic to HTTPS. To do so, you’ll have to include several lines of code to an .htaccess file (if you’re using an Apache web server) in your website’s root folder:
RewriteEngine On

RewriteCond %{HTTPS} off
RewriteRule ^(.*)$ https://%{HTTP_HOST}%{REQUEST_URI} [L,R=301]
If the .htaccess file already exists, then paste the RewriteCond and RewriteRulelines only, right after the existing RewriteEngine On directive.
Place the generated private key (example.com.key), Certificate Signing Request (example.com.csr) and the valid HTTPS certificate (example.com.crt) in the appropriate locations:
make -C /usr/ports/www/apache24 config install clean
apachectl restart
Edit the Apache configuration file (httpd.conf):
Debian, Ubuntu /etc/apache2/apache2.conf
Red Hat, CentOS /etc/httpd/conf/httpd.conf
FreeBSD /usr/local/etc/apache2x/httpd.conf
Listen 80
Listen 443
<VirtualHost *:80>
ServerName example.com
ServerAlias www.example.com
Redirect 301 / https://www.example.com/
</VirtualHost><VirtualHost *:443>
ServerName example.com
Redirect 301 / https://www.example.com/
</VirtualHost><VirtualHost *:443>
ServerName www.example.com
...
SSLEngine on
SSLCertificateFile/path/to/signed_certificate_followed_by_intermediate_certs
SSLCertificateKeyFile /path/to/private/key
# Uncomment the following directive when using client certificate authentication#SSLCACertificateFile /path/to/ca_certs_for_client_authentication# HSTS (mod_headers is required) (15768000 seconds = 6 months)
Header always set Strict-Transport-Security "max-age=15768000"...
</VirtualHost># intermediate configuration, tweak to your needs
SSLProtocol all -SSLv3
SSLCipherSuite ECDHE-ECDSA-CHACHA20-POLY1305:ECDHE-RSA-CHACHA20-POLY1305:ECDHE-ECDSA-AES128-GCM-SHA256:ECDHE-RSA-AES128-GCM-SHA256:ECDHE-ECDSA-AES256-GCM-SHA384:ECDHE-RSA-AES256-GCM-SHA384:DHE-RSA-AES128-GCM-SHA256:DHE-RSA-AES256-GCM-SHA384:ECDHE-ECDSA-AES128-SHA256:ECDHE-RSA-AES128-SHA256:ECDHE-ECDSA-AES128-SHA:ECDHE-RSA-AES256-SHA384:ECDHE-RSA-AES128-SHA:ECDHE-ECDSA-AES256-SHA384:ECDHE-ECDSA-AES256-SHA:ECDHE-RSA-AES256-SHA:DHE-RSA-AES128-SHA256:DHE-RSA-AES128-SHA:DHE-RSA-AES256-SHA256:DHE-RSA-AES256-SHA:ECDHE-ECDSA-DES-CBC3-SHA:ECDHE-RSA-DES-CBC3-SHA:EDH-RSA-DES-CBC3-SHA:AES128-GCM-SHA256:AES256-GCM-SHA384:AES128-SHA256:AES256-SHA256:AES128-SHA:AES256-SHA:DES-CBC3-SHA:!DSS
SSLHonorCipherOrder on
SSLCompression off
SSLSessionTickets off
# OCSP Stapling, only in httpd 2.3.3 and later
SSLUseStapling on
SSLStaplingResponderTimeout 5
SSLStaplingReturnResponderErrors off
SSLStaplingCache shmcb:/var/run/ocsp(128000)
This configuration was generated using the Mozilla SSL Configuration Generator, mentioned earlier. Check with it for an up-to-date configuration. Make sure to edit the paths to the certificate and private key. The configuration provided was generated using the intermediate setting — read the limitations and supported browser configurations for each setting to decide which one suits you best.
Some modifications to the generated code were made (marked in bold above) to handle redirects from HTTP to HTTPS, as well as non-www to the www domain (useful for SEO purposes).
Debian, Ubuntu, Red Hat, CentOS /etc/nginx/nginx.conf
FreeBSD /usr/local/etc/nginx/nginx.conf
server {
listen 80 default_server;
listen [::]:80 default_server;# Redirect all HTTP requests to HTTPS with a 301 Moved Permanently response.return 301 https://$host$request_uri;}
server {
listen 443 ssl http2;
listen [::]:443 ssl http2;# certs sent to the client in SERVER HELLO are concatenated in ssl_certificate
ssl_certificate /path/to/signed_cert_plus_intermediates;
ssl_certificate_key /path/to/private_key;
ssl_session_timeout 1d;
ssl_session_cache shared:SSL:50m;
ssl_session_tickets off;# Diffie-Hellman parameter for DHE ciphersuites, recommended 2048 bits
ssl_dhparam /path/to/dhparam.pem;# intermediate configuration. tweak to your needs.
ssl_protocols TLSv1 TLSv1.1 TLSv1.2;
ssl_ciphers 'ECDHE-ECDSA-CHACHA20-POLY1305:ECDHE-RSA-CHACHA20-POLY1305:ECDHE-ECDSA-AES128-GCM-SHA256:ECDHE-RSA-AES128-GCM-SHA256:ECDHE-ECDSA-AES256-GCM-SHA384:ECDHE-RSA-AES256-GCM-SHA384:DHE-RSA-AES128-GCM-SHA256:DHE-RSA-AES256-GCM-SHA384:ECDHE-ECDSA-AES128-SHA256:ECDHE-RSA-AES128-SHA256:ECDHE-ECDSA-AES128-SHA:ECDHE-RSA-AES256-SHA384:ECDHE-RSA-AES128-SHA:ECDHE-ECDSA-AES256-SHA384:ECDHE-ECDSA-AES256-SHA:ECDHE-RSA-AES256-SHA:DHE-RSA-AES128-SHA256:DHE-RSA-AES128-SHA:DHE-RSA-AES256-SHA256:DHE-RSA-AES256-SHA:ECDHE-ECDSA-DES-CBC3-SHA:ECDHE-RSA-DES-CBC3-SHA:EDH-RSA-DES-CBC3-SHA:AES128-GCM-SHA256:AES256-GCM-SHA384:AES128-SHA256:AES256-SHA256:AES128-SHA:AES256-SHA:DES-CBC3-SHA:!DSS';
ssl_prefer_server_ciphers on;# HSTS (ngx_http_headers_module is required) (15768000 seconds = 6 months)
add_header Strict-Transport-Security max-age=15768000;# OCSP Stapling ---# fetch OCSP records from URL in ssl_certificate and cache them
ssl_stapling on;
ssl_stapling_verify on;## verify chain of trust of OCSP response using Root CA and Intermediate certs
ssl_trusted_certificate /path/to/root_CA_cert_plus_intermediates;
resolver <IP DNS resolver>;....}
This configuration was generated using the Mozilla SSL Configuration Generator, mentioned earlier. Check with it for an up-to-date configuration. Make sure to edit the paths to the certificate and private key. The configuration provided was generated using the intermediate setting — read the limitations and supported browser configurations for each setting to decide which one suits you best.
The generator automatically generates code for handling redirects from HTTP to HTTPS, and it enables HTTP/2 out of the box!
Open “Start” → “Administrative Tools” → “Internet Information Services (IIS) Manager.” Click the server name. Double-click “Server Certificates” in the middle column: Open “Internet Information Services (IIS) Manager.” Double-click “Server Certificates.” (View large version)
Click “Complete Certificate Request” in the right column. Click “Complete Certificate Request” in the right column. (View large version)
Select the signed certificate file (example.com.crt) that you obtained from the CA. Enter some name in the “Friendly name” field to be able to distinguish the certificate later. Place the new certificate in the “Personal” certificate store (IIS 8+). Click “OK.” Select the signed certificate file. (View large version)
If the process went OK, you should see the certificate listed under “Server
Certificates.”
You should see the certificate listed under “Server Certificates.” (View large version)
Expand the server name. Under “Sites,” select the website to which you want to assign the HTTPS certificate. Click “Bindings” from the right column. Select the website and click “Bindings.” (View large version)
In the “Site bindings” window, click the “Add” button. Click the “Add” button. (View large version)
In the new window, select:
“Type”: “https”
“IP address”: “All Unassigned”
“Port”: “443”
In the “SSL Certificate” field, select the installed HTTPS certificate by its friendly name. Click “OK.”
Select “HTTPS,” and select the installed HTTPS certificate. (View large version)
You should now have both HTTP and HTTPS installed for this website. You should now have both HTTP and HTTPS installed for this website. (View large version)
You might get a warning sign next to the address bar and a message such as “Connection is not secure! Parts of this page are not secure (such as images).” This does not mean that your installation is wrong; just make sure that all links to resources (images, style sheets, scripts, etc.), whether local or from remote servers, do not start with http://. All resources should be pointed to with paths relative to the root (/images/image.png, /styles/style.css, etc.) or relative to the current document (../images/image.png), or they should be full URLs beginning with https://, such as https://code.jquery.com/jquery-3.1.0.min.js.
These tips should eliminate the mixed-content warnings, and your browser should display the closed padlock without an exclamation mark.
After you have configured your server and have the website up and running on HTTPS, I strongly recommend checking its security configuration using the Qualys SSL Server Test. This performs a scan of your website, including a comprehensive evaluation of its configuration, possible weaknesses and recommendations. Follow the advice there to further improve your server’s security configuration.
Your certificate is valid for a set period — typically, a year. Don’t wait to renew it at the last moment — your registrar will start sending you emails as the renewal date approaches. Do issue a new certificate as soon as you get your first reminder. The procedure is pretty much the same: Create a new certificate signing request, get a new HTTPS certificate, and install it on your server. The certificate’s validity will start running at the time of signing, while the expiration will be set one year after your current certificate expires. Thus, there will be a time when both your old and new certificates will be valid, and then a full new year after the expiration of the old certificate. During the overlap, you will be able to make sure that the new certificate is working OK, before the old one expires, allowing for uninterrupted service of your website.
If your server is compromised or if you think someone might have access to your private key, you should immediately revoke your current HTTPS certificate. Different registrars have different procedures, but it generally boils down to marking the compromised certificate as inactive in a special database of your registrar, and then issuing a new HTTPS certificate. Of course, revoke the current certificate as soon as possible, so that nobody can impersonate you, and get the new certificate only after you have investigated and fixed the cause of the security breach. Please ask your registrar for assistance.
Let’s Encrypt is a free, automated, and open certificate authority (CA), run for the public’s benefit. Let’s Encrypt is a service provided by the Internet Security Research Group (ISRG).
The key principles behind Let’s Encrypt are:
Free
Anyone who owns a domain name can use Let’s Encrypt to obtain a trusted certificate at zero cost.
Automatic
Software running on a web server can interact with Let’s Encrypt to painlessly obtain a certificate, securely configure it for use, and automatically take care of renewal.
Secure
Let’s Encrypt will serve as a platform for advancing TLS security best practices, both on the CA side and by helping website operators properly secure their servers.
Transparent
All certificates issued or revoked will be publicly recorded and available for anyone to inspect.
Open
The automatic issuance and renewal protocol will be published as an open standard that others can adopt.
Cooperative
Much like the underlying Internet protocols themselves, Let’s Encrypt is a joint effort to benefit the community, beyond the control of any one organization.
To take advantage of Let’s Encrypt, set up your hosting account or server properly. Let’s Encrypt offers short-term certificates that need to be renewed regularly in order to keep an HTTPS website operational.
There are some substantial differences in the mode of operation between Let’s Encrypt and the other CAs. Following the first three points above, here are the main ones:
Free
The Let’s Encrypt HTTPS certificates are completely free for the whole lifespan of your website.
Automatic
The Let’s Encrypt HTTPS certificates are valid
for 90 days, unlike regular HTTPS certificates, which are valid for one year. People are encouraged to automate their certificate renewal; for example, the administrator of the server would set up a dedicated software service (or would periodically invoke software from cron) to manage the initial domain validation and subsequent renewal for all hosted domains — set-it-and-forget-it style.
Secure
Let’s Encrypt HTTPS certificates are issued with no compromise on security, leading to certain incompatibilities with older and more exotic platforms. Check the compatibility page to determine whether you are fine cutting off incompatible platforms.
Let’s Encrypt provides only DV certificates. OV and EV are not supported, and there are currently no plans to support them. Single- and multiple-domain HTTPS certificates are offered, but no wildcard ones at the moment. See the Let’s Encrypt FAQ for more information.
Let’s Encrypt’s automated mode of operation enforces some usage limits in order to protect the infrastructure from intentional and unintentional abuse. The rate limits are high enough not to affect regular users with even hundreds of domains. However, if you manage HTTPS certificates at a very large scale, you might want to check them out.
Older and exotic clients (prior to Windows XP SP3) are not supported. Check the compatibility page for details.
Using The Let’s Encrypt HTTPS Certificates In Practice Link
Scroll down to the “Security” section, and click “Let’s Encrypt for cPanel.” cPanel “Security” section (View large version)
You are now in the “Let’s Encrypt for cPanel” section. Check both domain names (example.com and www.example.com), and click “Issue Multiple.” Check both domain names and click “Issue Multiple.” (View large version)
You will be taken to a confirmation screen. Your top-level (i.e. non-www) domain name will be selected as the primary, and your www domain name as an alias, which will be placed in the HTTPS certificate’s “Subject Alt Name” (SAN) record. Click “Issue” to continue. Please be patient and do not refresh the page, because the initial validation might take longer — about a minute or two. Click “Issue” and be patient for about a minute or two. (View large version)
If the process completes successfully, you will see a confirmation message. Click “Go back” to see the installed HTTPS certificate. If the process completes successfully, you will see a confirmation message. (View large version)
You will see your domain listed under “Your domains with Let’s Encrypt certificates.” You may check the certificate’s details and verify that the website opens with the https:// prefix in your browser. Your domains with Let’s Encrypt certificates (View large version)
Cloudflare is a service that provides a content delivery network (CDN), website security, and protection against distributed denial of service (DDoS) attacks. It features a free HTTPS certificate with all subscription plans, including the free one — a shared DV Cloudflare Universal SSL certificate. In order to have a unique HTTPS certificate, you need to upgrade to the Business plan.
To take advantage, simply create an account, set up your website, and visit the “Crypto” section.
CertSimple is an EV-only HTTPS certificate vendor. It is disrupting the EV HTTPS certificate market in a way similar to what Let’s Encrypt is doing in the DV HTTPS certificate market, by providing a faster, easier process of organization validation — an otherwise slow and cumbersome routine. Here are its advantages:
Simplified application procedure
No software to install or command line questions. Live validation, with most details checked before payment.
Fast validation time
Three hours on average versus the industry standard 7 to 10 days.
Free reissues for the lifetime of the certificate
Easily add domain names later or fix a lost private key.
You can read an excellent, in-depth review of the process on Troy Hunt’s blog.
Multiple HTTPS Websites On A Single IP Address Link
Due to the nature of the handshake process, virtual hosts with a single IP address are a problem for TLS. Virtual hosts work by having the client include the domain name as part of the HTTP request header, but when HTTPS is used, the TLS handshake happens before the HTTP headers are sent — the secure channel should be initialized and fully functional before transmitting any plain-text HTTP, including headers. So, the server does not know which HTTPS certificate to present up front to a connecting client, so it presents the first one it finds in its configuration file, which, of course, only works correctly for the first TLS-enabled website.
There are several workarounds: to have a unique IP for each TLS-enabled domain, or to have all domains in a single certificate. Both are impractical — the IPv4 address space is now used up, and having one big HTTPS certificate means that if you want to add a single website to this server, you’ll need to reissue the whole multiple-domain certificate.
An extension to the TLS protocol, named Server Name Indication (SNI), was introduced to overcome this limitation. Both servers and clients should support it, and although SNI support is nowadays widely available, it is still not 100% bulletproof, if compatibility with all possible clients is a requirement.
You can read more about running SNI for Apache, nginx and IIS (8+) in the respective documentation.

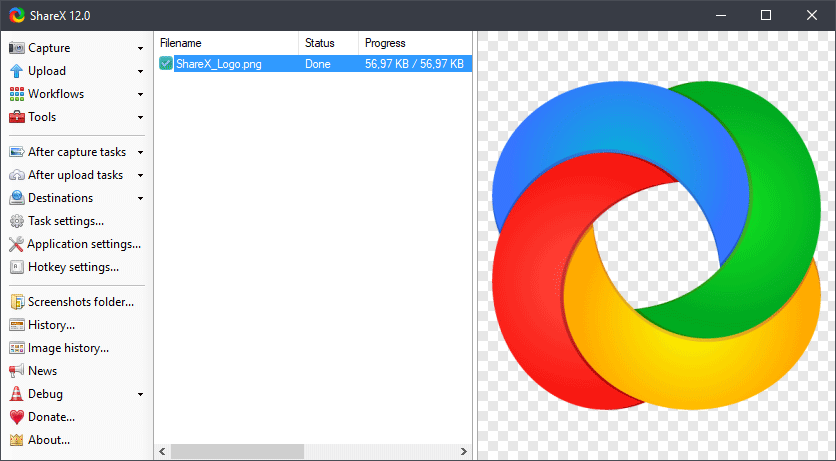
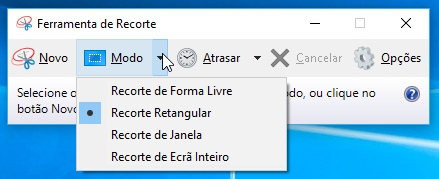

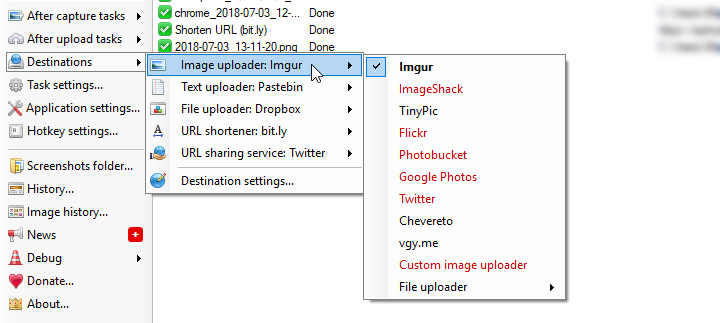

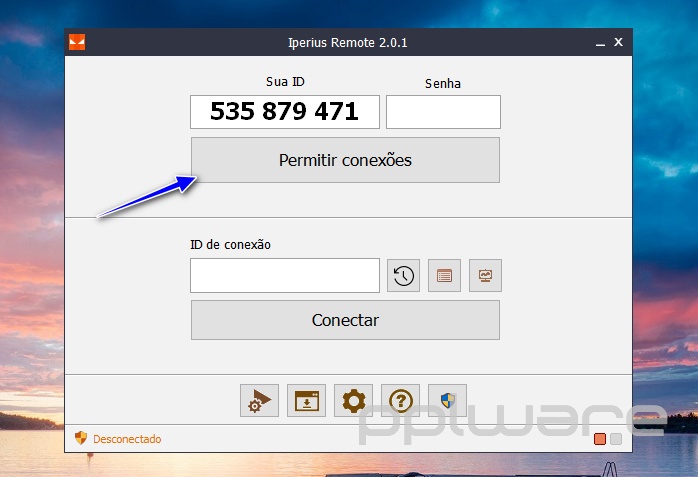


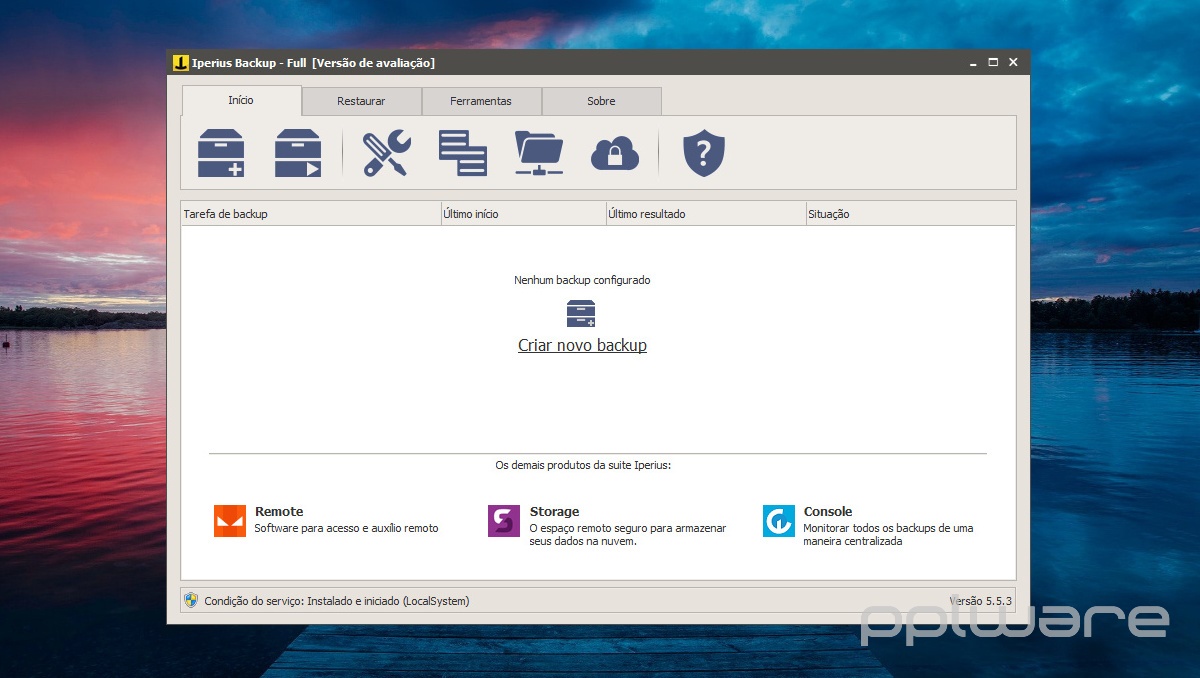
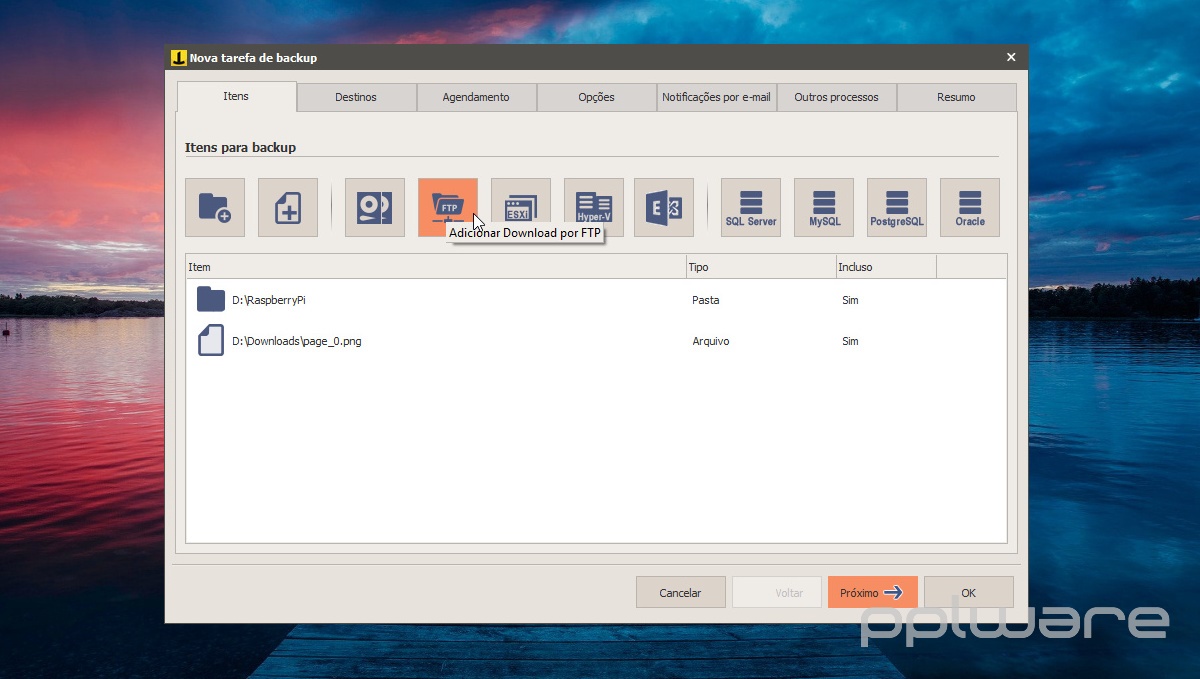
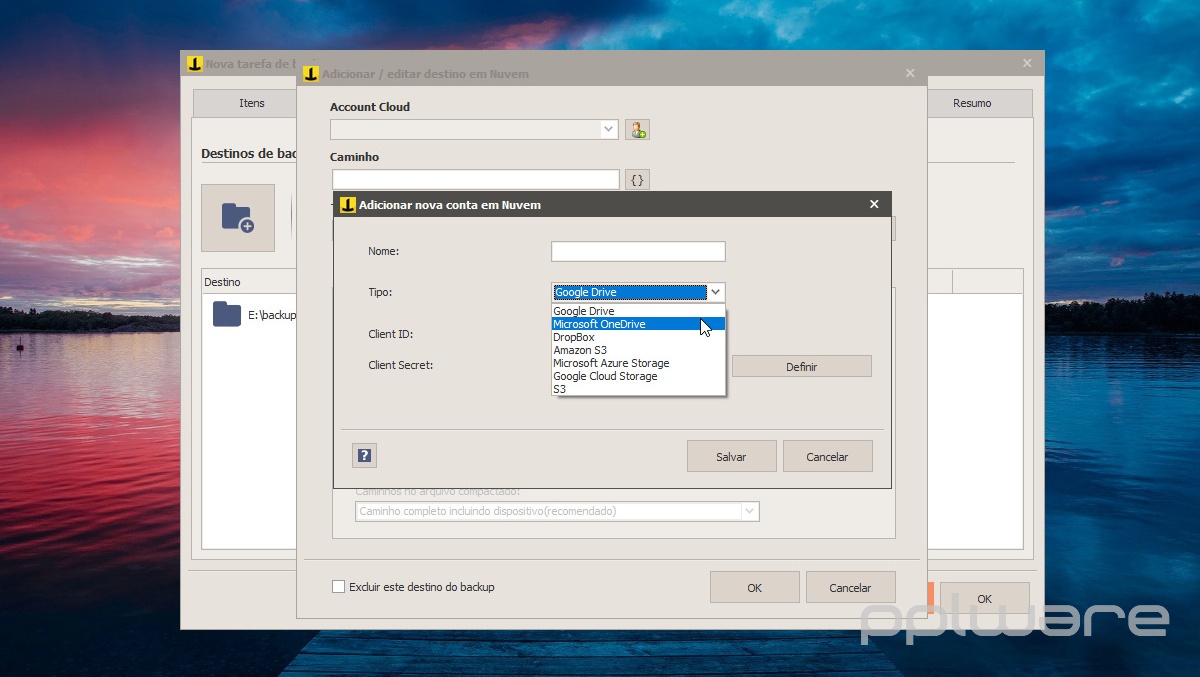
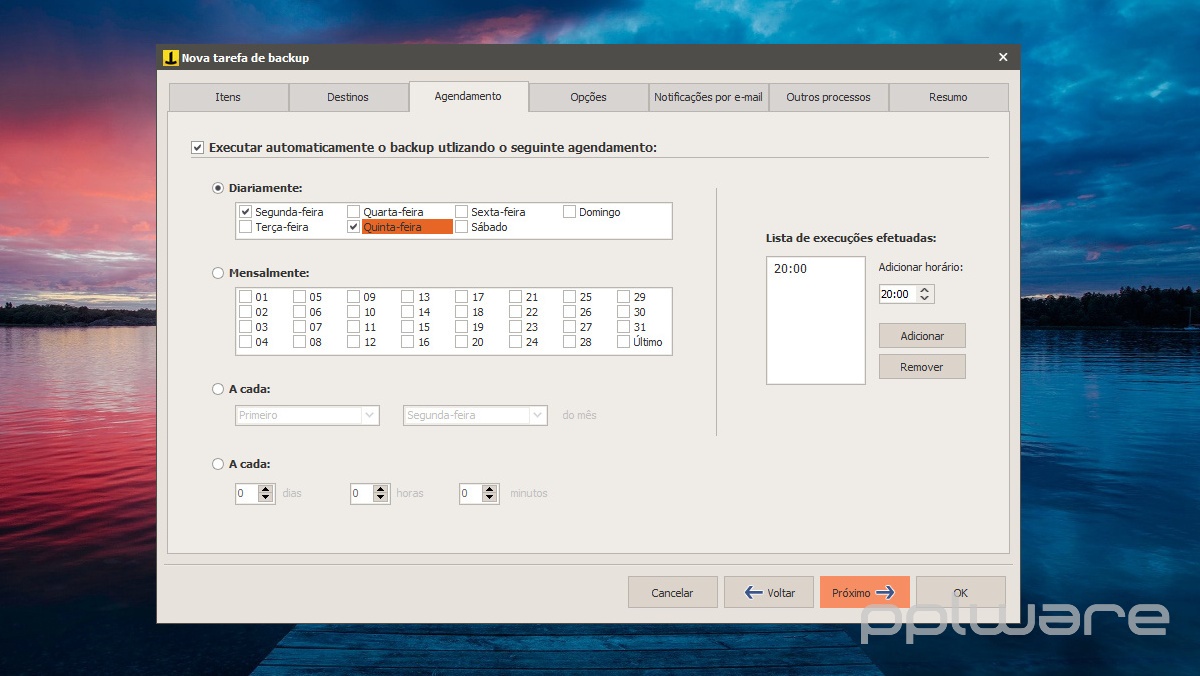
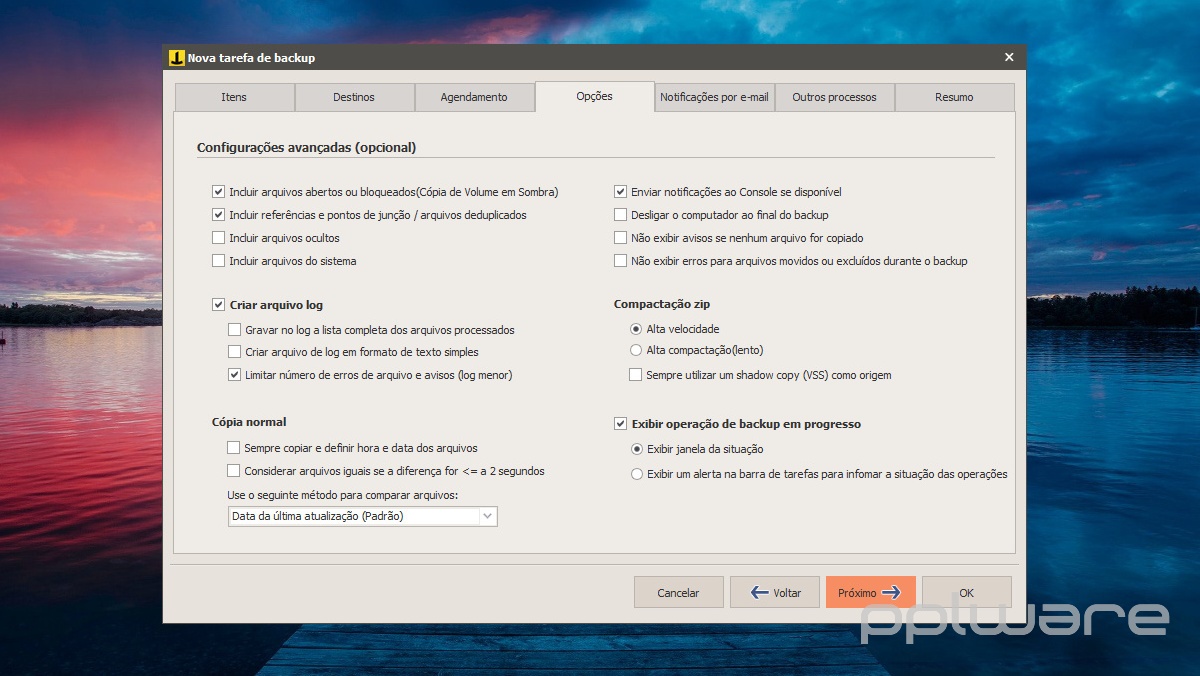
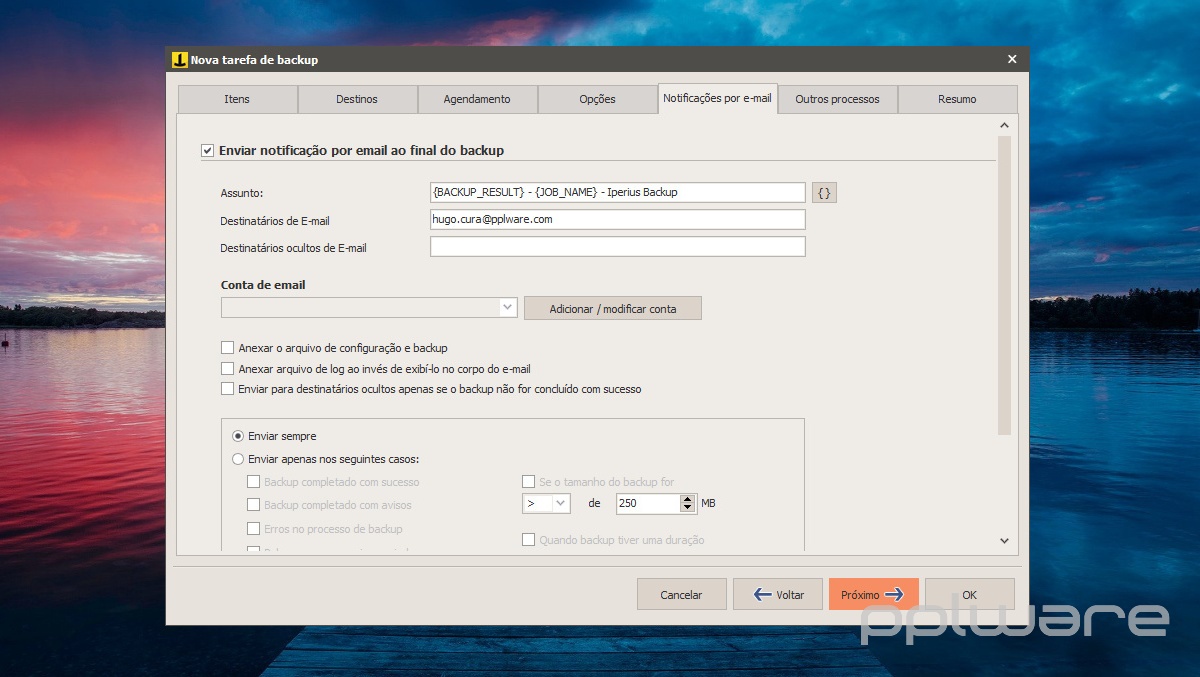

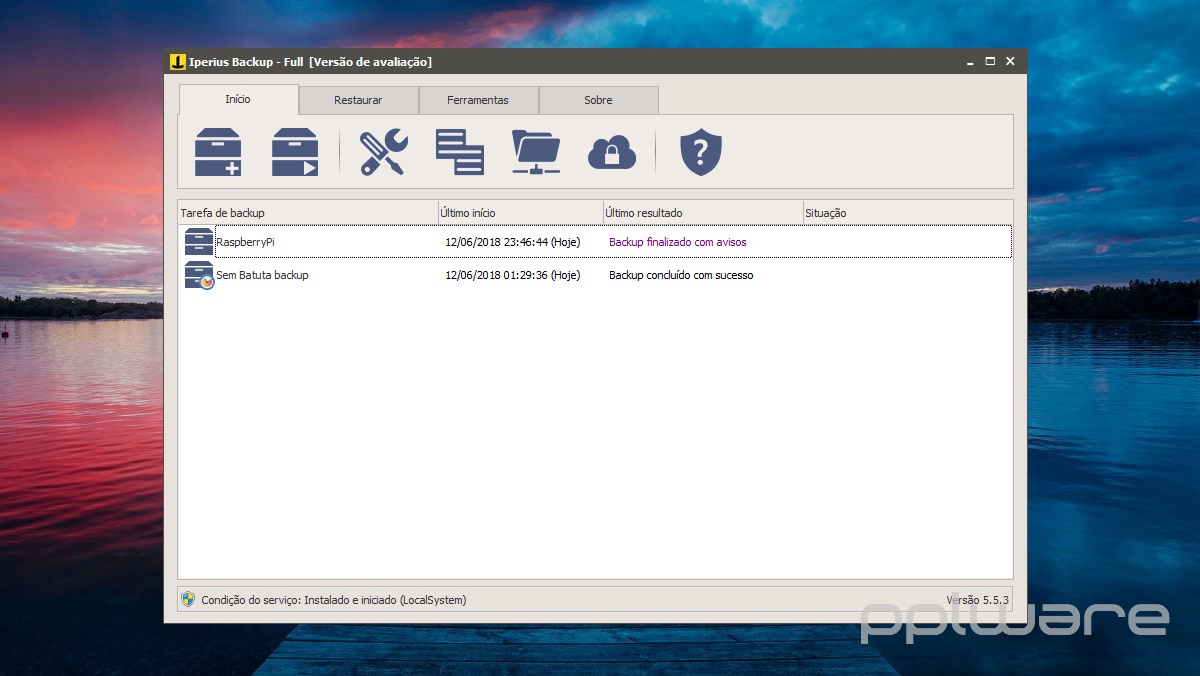


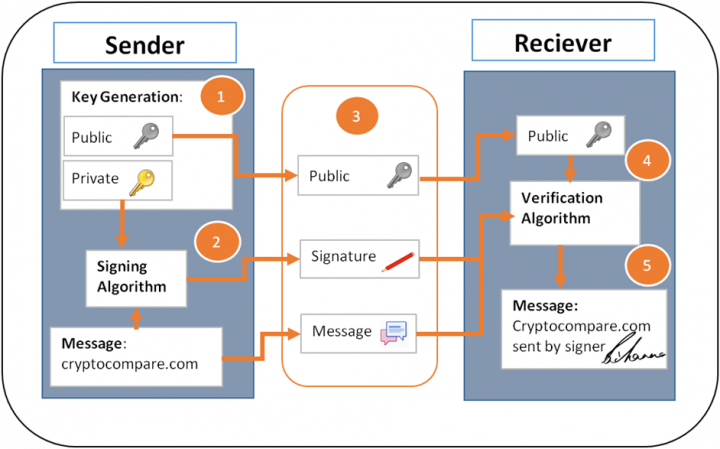


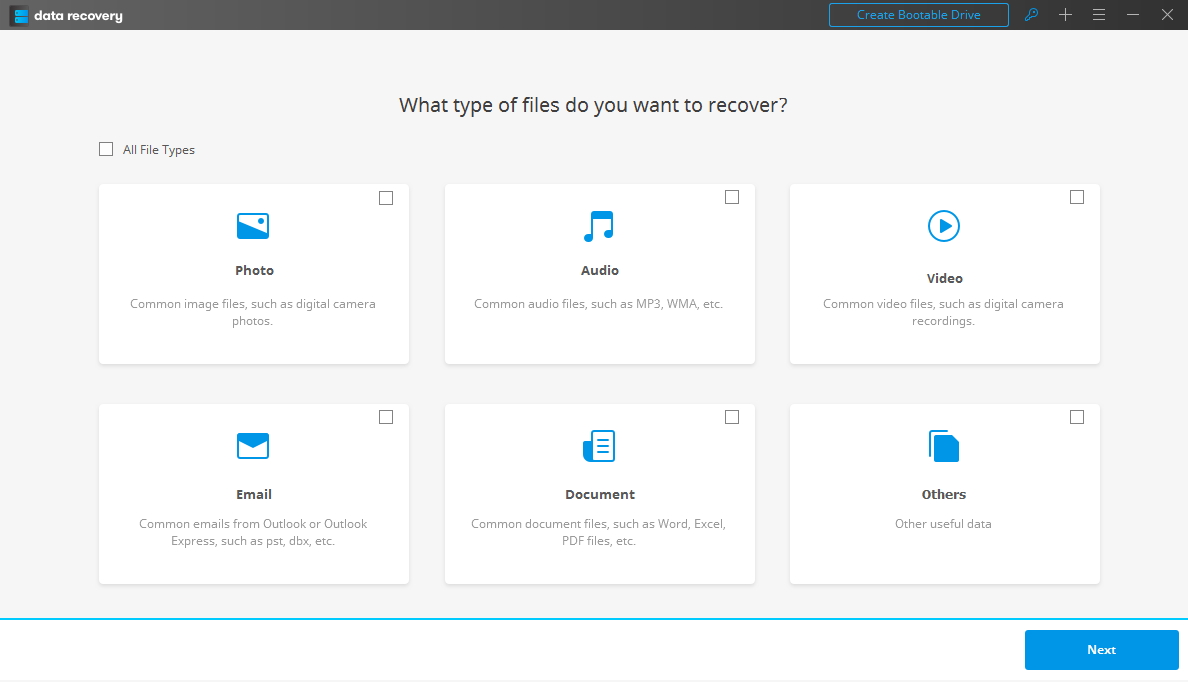

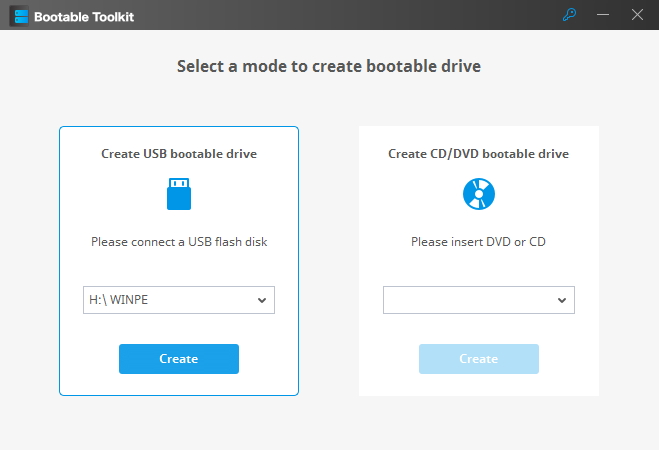

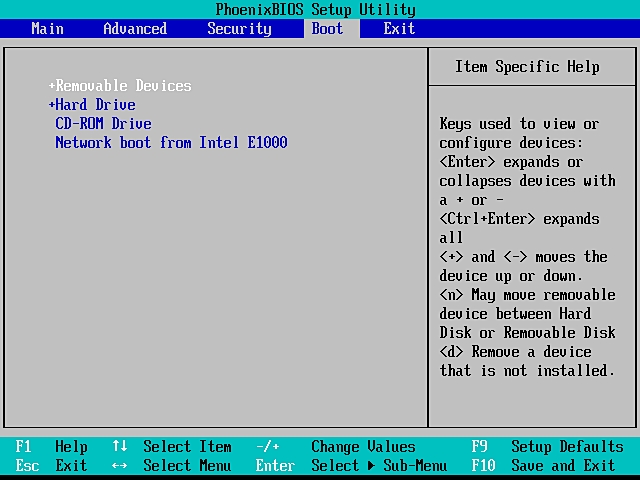


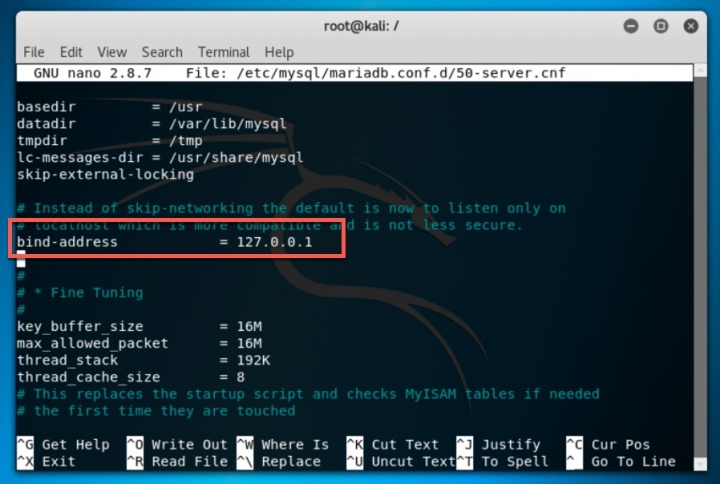


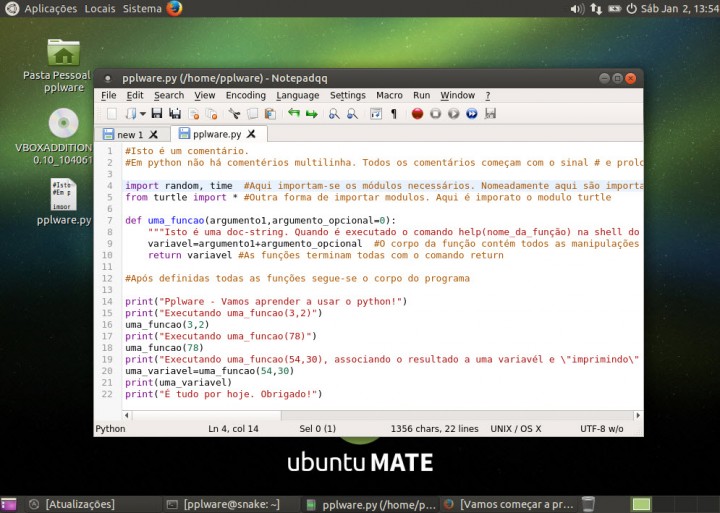
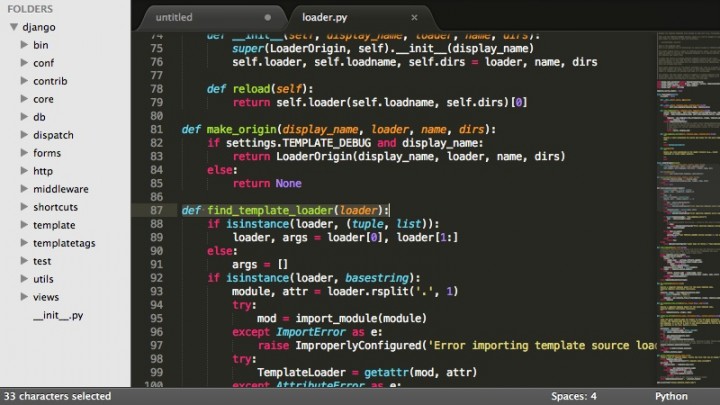
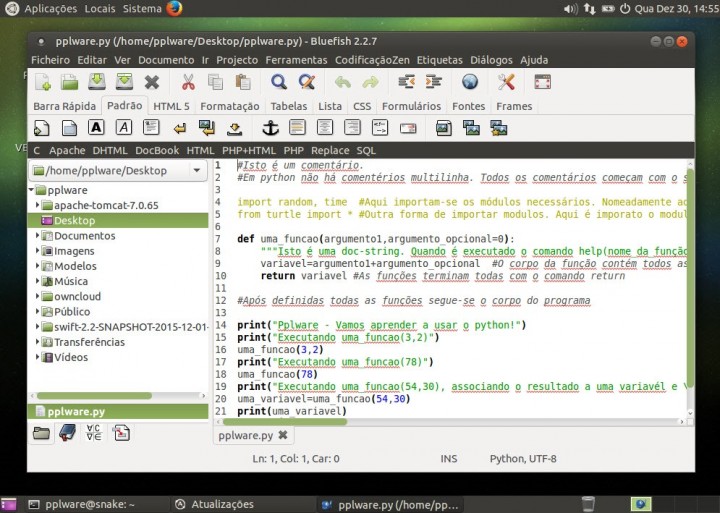
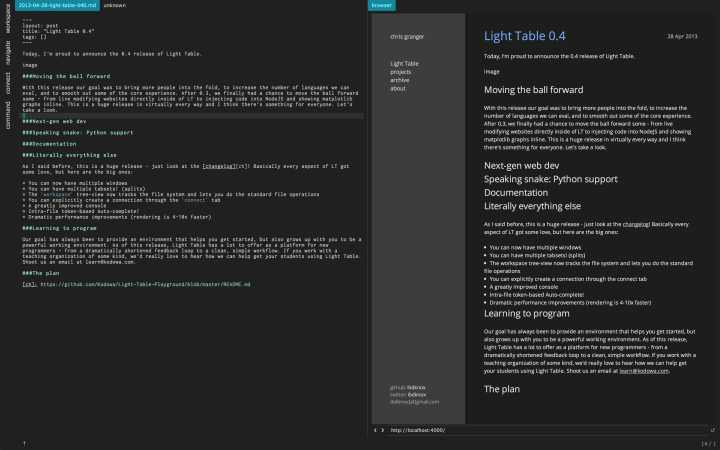


 Manager. Double-click Server Certificates")


