30+ Water Inspired Websites

30+ Water-Inspired Websites: BAD 2010

Rafael Soto on Oct 15th 2010 with 25 comments

Share

This year, Nettuts+ is taking part in Blog Action Day to raise awareness about clean water and water conservation. To tie that in with the web development world, we’ve compiled 30+ examples of websites, which make use of a water motif.

Startling Fact: Two million children under the age of five die from unsafe drinking water every single year. While many members of the Nettuts+ community (including myself) are in a constant state of saving for Adobe CSX, or any other expensive gadget, it can become alarmingly easy to forget that as many as a billion people on the planet don’t have access to something as simple as clean drinking water.

However, these scary statistics are not beyond our control. Did you know that even a $20 donation to sites like “Charity: Water” can provide one person with clean drinking water for twenty years? Money that we so often frivolously waste — on junk we don’t need — could be put to much better use.

Sometimes, it’s easy to do nothing — if only because you feel that you must give a lot in order for it to count. On the contrary, this couldn’t be further from the truth. If you only donated your lunch money for a day or two…that would absolutely make a difference. I’m in; are you?
-Jeffrey


30+ Water-Inspired Websites

1. Pusula Web

Name of site


2. Surf In Paradise

Name of site


3. Dizzain

Name of site


4. 4 Internet

Name of site


5. icebrrg

Name of site


6. iceberg

Name of site


7. dgerelo.net

Name of site


8. Tropical Sky Scuba Diving

Name of site


9. Alex Swanson

Name of site


10. Feed stitch

Name of site


11. Flossed Today

Name of site


12. Marketing Informatico

Name of site


13. Squared Eye

Name of site


14. Nirmal

Name of site


15. Viget Inspire

Name of site


16. Agami Creative

Name of site


17. happy cog

Name of site


18. Matt Dempsey

Name of site


19. bcandullo.com

Name of site


20. ali felski

Name of site


21. Biola

Name of site


22. Football made in Africa

Name of site


23. vSplash

Name of site


24. Sunrise Design

Name of site


25. Toggle

Name of site


26. Le Bloe

Name of site


27. Circa

Name of site


28. Siete de Febrero

Name of site


29. jumpstart

Name of site


30. Boompa

Name of site


31. Charity Water

Charity Water


About Blog Action Day

“Blog Action Day (originally created by Envato) is an annual event held every October 15 that unites the world’s bloggers in posting about the same issue on the same day with the aim of sparking a global discussion and driving collective action.”


Why Water?

“Right now, almost a billion people on the planet don’t have access to clean, safe drinking water. That’s one in eight of us who are subject to preventable disease and even death because of something that many of us take for granted.

Access to clean water is not just a human rights issue. It’s an environmental issue. An animal welfare issue. A sustainability issue. Water is a global issue, and it affects all of us.”

50 Powerful Time Savers for Designers

There are tools that make our lives much easier. However, finding those obscure time-savers which would save time in every single project isn’t easy and requires a lot of time. At Smashing Magazine, we are regularly looking for such useful tools, gather them, review them and eventually prepare for a truly smashing round-up. Such posts are quite lengthy and extensive, but they are always worth checking out.

In this post, you’ll find an overview of useful and handy tools that can help you increase your productivity and improve your workflow. Some tools are more general, the others are more technical, yet we hope that this round-up has something to offer to every one of our readers. Please feel free to leave your comments and share with us which one of the tools you’ve found most useful and interesting.

[Offtopic: by the way, did you know that there is a Smashing eBook Series? Book #2 is Successful Freelancing for Web Designers, 260 pages for just $9,90.]

Useful Time-Savers For Web Designers

House of Buttons
A growing collection of various buttons spotted in the wild by Jason Long. Very nice and useful collection, and submissions are welcome.

Useful-278 in 50 Powerful Time-Savers For Web Designers

Historious
Historious makes bookmarking work the way you want it. Bookmark sites with a single click, then come back to Historious and find sites by entering a few keywords!

Useful-236 in 50 Powerful Time-Savers For Web Designers

Browser UI
The Browser UI is an action that creates a browser window around any size Photoshop document you can throw at it. The Browser UI is easily installed and helps you get around with your Photoshop documents. A quick screencast is available on the site for a quick understanding of how Browser UI works.

Useful-243 in 50 Powerful Time-Savers For Web Designers

A/B Split Testing Calculator
A/B Test Calculator shows you a comparison of several versions of a particular web page. In order to discover which one is most effective for your audience, you have to enter ‘statistically significant’ numbers.

Useful-121 in 50 Powerful Time-Savers For Web Designers

What deux yeux have teux deux teuxday?
TeuxDeux is a simple, design to-do app that can be used for your iPhone. If you like making to-do lists, you will love TeuxDeux. This free browser-based app can be used everywhere; this way you have your to-dos ready to hand all the time. Check out the various TeuxDeux features included in this iPhone App shown in the left column.

Useful-231 in 50 Powerful Time-Savers For Web Designers

Fillerati – Faux Latin is a Dead Language
‘Fillerati’ instead of ‘Lorem ipsum’… something different for a change. Modern browsers such as Chrome, Firefox, Safari or Opera are recommended.

Useful-252 in 50 Powerful Time-Savers For Web Designers

Inline Code Finder
Inline Code Finder is a tool to traverse through all elements in a web page, and when it finds a HTML element with any of these, it will highlight them. It finds inline JavaScript events, inline CSS coding andjavascript:-links.

Useful-283 in 50 Powerful Time-Savers For Web Designers

Share your ideas – Mark (them) Up!
MarkUp works in any browser without the need of being downloaded nor installed. Simply add the MarkUp icon to your bookmarks bar and share your ideas and thoughts swiftly!

Useful-229 in 50 Powerful Time-Savers For Web Designers

Placehold.it
Format, Text, Color and Size – Quick and simple image placeholders. You may want to check Dynamic Dummy Image Generator, too.

Useful-253 in 50 Powerful Time-Savers For Web Designers

ResizeMyBrowser
This site helps you adjust your browser automatically, starting with a simple iPhone-sized browser (320×480) to a MacBook Pro (1440×900).
Note: This web application requires JavaScript. Please check your browser’s settings and make sure JavaScript is enabled.

Useful-132 in 50 Powerful Time-Savers For Web Designers

XRefresh for web developers
A browser plug-in which refreshes the current web page due to file change in selected folders and communicates with browser extension using TCP/IP. This makes it possible to do live page editing with your favorite HTML/CSS editor, especially when working with two monitors at the same time.

Useful-168 in 50 Powerful Time-Savers For Web Designers

Kodingen
The so-called ‘Cloud Development Environment’ which lets you connect to your own FTPs. Web-based access to file-system & svn integration. Also includes an Online Code Editor and Cloud Hosting.

Useful-246 in 50 Powerful Time-Savers For Web Designers

LiberKey
LiberKey is a large collection of portable applications that can be run without installation on your local PC nor from any portable media. You may want to check Portable Apps as well.

Useful-277 in 50 Powerful Time-Savers For Web Designers

Notes for Later
This bookmarklet is a web service for remembering websites. It creates a unique bookmarklet for your personal browser in which you can simply receive the content you need via email. If you select nothing, you still get the current page’s URL and a time stamp. Registration is quick and painless. No login is required – just an email address.

Useful-237 in 50 Powerful Time-Savers For Web Designers

Timy
An easy-to-use desktop application to fill out your Basecamp timesheet and save a lot of time completeing your own personal timesheet.

Useful-181 in 50 Powerful Time-Savers For Web Designers

Slammer – Designer’s Geometry Box
Overlays any grid you want, anywhere you want. A variety of themes and overlays are presented: Typographic Grids, Golden Sections, Fibonacci series, Rule of Thirds and more! Slammer also includes Rulers, Crosshair, Magnifier, Measurements and Screenshots; watching the movie on the Slammer main page will help you learn more. However, Snow Leopard is required.

Useful-196 in 50 Powerful Time-Savers For Web Designers

URList
By dragging the bookmarklet to your browser’s bookmark bar, you will instantly save time in browsing the web and have a preview of the collected links that have been grouped previously. By clicking on the bookmarklet, you can always add a link. URlist not only enables you to create and save link lists easily, but also lets you access those links from anywhere. And creating lists is dead easy. Try it!

Useful-275 in 50 Powerful Time-Savers For Web Designers

Licorizer
A new bookmarking service which allows you to mark relevant content without losing focus. Using a bookmarklet such as this one, enables you to add web pages and clippings to Licorize without leaving nor interrupting the web page you are currently focusing on.

Useful-270 in 50 Powerful Time-Savers For Web Designers

Readability – An Arc90 Lab Experiment
Readability™ is developed to make reading on the Web more enjoyable and remove any clutter around what you’re reading at the moment. A preview of a given text is available to give you an idea of how the style, size and margin can be adjusted. Installing Readability™ into your Web browser is quite easy…and makes it easier on your eyes!

Useful-233 in 50 Powerful Time-Savers For Web Designers

Joli: Print to PDF in Google Reader
Joliprint bookmark provides you an easy and quick way to print a Google Reader post as a PDF. First, you have to create a bookmarklet onto your browser’s bookmark bar, then select a post in Google reader and finally, click on the Joliprint bookmarklet to convert the activated post into a PDF document. Ta-dah! You can check Clipr Bookmarklet as well.

Useful-285 in 50 Powerful Time-Savers For Web Designers

Spoon
Spoon lets you run desktop applications with no installs, conflicts or dependencies such as .NET, Java nor AIR. By virtualizing your existing apps, you can turn them in standalone EXEs, MSIs or flash drives. This tool is also very useful for cross-browser testing right within your browser and is provided in two versions: Spoon for Business or for Developers.

Ie in 50 Powerful Time-Savers For Web Designers

Web Development Project Estimator
A simple tool for web designers and site developers to quickly and thoroughly estimate the time and materials required for a proposed web project. A personal task list can be created, leaving you to decide which ones to include or even exclude. Most importantly, hours and rates of the particular project allow you to calculate the estimated final fee.

Useful-201 in 50 Powerful Time-Savers For Web Designers

Golden Ratio Calculator
This online tool helps you calculate the width of your containers to achieve the golden ratio. You can have a column with a certain width (perhaps to achieve a nice word:line ratio) and you wish to find a matching column. Type in the width and use the left side, which gives you both a smaller and larger column. Or if you have a container and wish to divide it in two, type in the container width and use the right side measurements.

Useful-271 in 50 Powerful Time-Savers For Web Designers

My DebugBar
Companion.JS is a Javascript debugger for IE. The current version is 0.5.5 and contains features such as JavaScript error reporting as well as a console feature which helps inspect JavaScript objects at runtime. Please note that CJS requires a Microsoft script debugger.

Useful-194 in 50 Powerful Time-Savers For Web Designers

Entitifier
Cleaning up text for the Web can be very time-consuming and prone to error. In case your client ever ends up delivering content in Microsoft Word or a similar format, cleaning it up is definitely a necessary task to do — if you don’t want to end up with characters that don’t display properly online. By entering a HTML or simple text into the given text box and clicking on the ‘entitify’ button, you instantly have discovered a new tool which helps you escape any nasty characters that should be entities!

Useful-272 in 50 Powerful Time-Savers For Web Designers

Every Time Zone
This tool shows an interactive chart of time in various cities across the globe. It also includes a slider to see the time in a particular city at any time of the day.

Useful-273 in 50 Powerful Time-Savers For Web Designers

Instapaper
This is a simple tool that helps you save web pages for reading later, when you have time — for instance on mobile devices, iPad or Kindle.

Useful-251 in 50 Powerful Time-Savers For Web Designers

Redmark: the easiest way to mark up a design and track revisions
Communication is very important and helps designers and their clients come to clear terms with each other. This site offers visual communication in just three simple steps between designers and clients. It is also possible for a client to find a particular designer they need to match their business. A Demo Project is portrayed for a quick view about how the site actually works.

Useful-155 in 50 Powerful Time-Savers For Web Designers

Awesome Fontstacks
Fonts have always carried an important meaning to web typography. As we all know, a lot of work is required to match and adjust a satisfactory web font for a website. This site helps you create a font stack bundle and also gives you a preview into CSS coding inclusive.

Useful-x in 50 Powerful Time-Savers For Web Designers

Framebox: a wireframing tool
With Framebox, you can sketch your wirframes or just visualize your ideas using UI units such as boxes, headers, buttons, inputs, links, text, text links etc. You can then save it and get a link to created frame, and then send a link to your colleagues.

Useful-281 in 50 Powerful Time-Savers For Web Designers

Droplr
Drag, drop, share! Droplr is the best way to share files from your Mac OS X on the internet, aiming for simplicity, ease of use and flexibility. This application is also completely free to use with ad supported content. Once the selected file is uploaded, Droplr returns a URL in which a user can share with anyone.

Useful-238 in 50 Powerful Time-Savers For Web Designers

Mockingbird: Website wireframes
Mockingbird is an online tool that makes it easy for you to create, link together, preview, and share mockups of your website or application.

Useful-250 in 50 Powerful Time-Savers For Web Designers

CodeBurner: Reference Tool for Web Developers
CodeBurner is a suite of tools for web developers that provides reference material for HTML and CSS, integrated with a range of popular development environments.

Useful-172 in 50 Powerful Time-Savers For Web Designers

HTML Soft Hyphenation Generator
Configurable generator for automatic soft hyphenation in static HTML text without a script.

Useful-137 in 50 Powerful Time-Savers For Web Designers

SelfControl
Is email a distraction? SelfControl is an OS X application which blocks access to incoming and/or outgoing mail servers and websites for a predetermined period of time. For example, you could block access to your e-mail, Facebook, and Twitter for 90 minutes, but still have access to the rest of the Web. Once started, it can not be undone by the application, by deleting the application, or by restarting the computer — you must wait for the timer to run out.

Useful-257 in 50 Powerful Time-Savers For Web Designers

MinutesPlease.com – Manage your web time
This is an extraordinary website that you can have to help you control the time you spend on a particular site. Just type in the URL and the time you are willing to spend on this site – you will notice how fast time flies by!

Useful-239 in 50 Powerful Time-Savers For Web Designers

Clue
A fun and easy way to create memory tests and see how much and what exactly people remember on your website.

Useful-241 in 50 Powerful Time-Savers For Web Designers

Neuskool.com
Neuskool is a personal start page for all your browsing needs with a collection of useful search services, all on one page.

Useful-224 in 50 Powerful Time-Savers For Web Designers

Check My Colours: analyze the color contrast of your web pages
This tool checks foreground and background color combinations of all DOM elements and determine if they provide sufficient contrast when viewed by someone having color deficits. All the tests are based on the algorithms suggested by the W3C.

Useful-157 in 50 Powerful Time-Savers For Web Designers

COPASO: Color Palette tool
COPASO is an advanced color palette tool that helps you create the perfect color palette.

Useful-255 in 50 Powerful Time-Savers For Web Designers

Useful Firefox Extensions

Pixel Perfect Firefox Extension
This extension allows you to overlay a web composition on top of the developed HTML. Letting the developer visually see how many pixels they are off in development.

SenSEO Firefox Extension – Official Website
SenSEO analyzes web pages and tells you how good they fulfill on-page Search Engine Optimization criteria. SenSEO is a Firefox add-on integrated with the popular Firebug web development tool. The code is based on the YSlow extension.

Useful-174 in 50 Powerful Time-Savers For Web Designers

Firefinder
Firefinder is an extension to Firebug (in Firefox) and offers the functionality to, in a quick way, find HTML elements matching chosen CSS selector(s) or XPath expression. It allows you to instantly test your CSS selectors in the page while seeing the content at the same time, and matching elements will be highlighted.

Useful-175 in 50 Powerful Time-Savers For Web Designers

Firediff
Firediff is a Firebug extension that tracks changes to a page’s DOM and CSS and implements a change monitor that records all of the changes made by Firebug and the application itself to CSS and the DOM.

Useful-206 in 50 Powerful Time-Savers For Web Designers

Useful References

SEO Checklist
When it comes to SEO, there are certain elements that need to be in place for any newly-designed or updated website. Have 301 redirects been put into place? Is the robots.txt file authored to allow adequate crawling? This infographic depicts a handy checklist that will help get you through any new site launch or transition.

Useful-190 in 50 Powerful Time-Savers For Web Designers

Typographic Sins
Typographic Sins (also available as PDF) by James Godfrey and Patrick Wilkey covers 35 mistakes commonly made by novice designers. The website puts them in a neat orderly list, but the PDF showcases them visually. It’s a great reference guide and learning tool if you want to learn better typography design.

Useful-267 in 50 Powerful Time-Savers For Web Designers

Entity Code: a Clear and Quick Reference to HTML Entities Codes
A website that eliminates the frustration and the wasted time caused by constant need to add those hard to remember HTML entity codes, such as the copyright symbol © or em-dash —, every time you’re developing a new website or writing a new article.

Useful-198 in 50 Powerful Time-Savers For Web Designers

Thirty Conversations on Design
The site creators asked 30 of the world’s most creative professionals two questions: “What single example of design inspires you most?” and “What problem should design solve next?” Their answers might surprise you. And, hopefully they’ll inspire you.

Useful-230 in 50 Powerful Time-Savers For Web Designers

Essential Interaction Design Essays and Articles
A list of essays and articles that could be important touchstones and reference points for interaction designers.

Further Useful Tools

Min.us
You can drag your data which you wish to share online onto the min.us page. Very convenient.

Mr. Data Converter
Mr. Data Converter will convert your Excel data into one of several web-friendly formats, including HTML, JSON and XML.

PDF Split and Merge
PDFsam is a free open source tool (GPL License) designed to split and merge PDF documents. Whether it be only extracting sections into a single document or changing the order of the pages. The basic version can be downloaded and simply used on every platform with a Java support.

Last Click

Unsuck It
What terrible business jargon do you need unsucked? Unsuck It translates management speak to normal language, making your day to day on- and offline slogs through corporate jargon a little easier to bear. You can even tweet your results as they often turn out to be quite funny.

Useful-269 in 50 Powerful Time-Savers For Web Designers

Temperature Conversion, Weight Conversion and Length Conversion
This simple online tool doesn’t do much, but it’s truly beautiful and it’s a pleasure to use. The tools lets you convert length values, temperature values and weight values.

Useful-258 in 50 Powerful Time-Savers For Web Designers

Coffee Drinks Illustrated
With the vast number of ordering options and new words with accented characters to pronounce the coffee shop ordering experience can be intimidating. Lokesh Dhakar created a few small illustrations to help himself and others wrap their head around some of the small differences.

Useful-290 in 50 Powerful Time-Savers For Web Designers

50 new useful CSS techniques

These are great times for front-end developers. After months of exaggerated excitement about HTML5 and CSS3, the web design community now starts coming up with CSS techniques that actually put newly available technologies to practical use instead of abusing them for pure aesthetic purposes. We see fewer “pure CSS images” and more advanced, clever CSS techniques that can actually improve the Web browsing experience of users. And that’s a good thing!

In this post we present recently released CSS techniques, tutorials and tools for you to use and enhance your workflow, thus improving your skills. Please don’t hesitate to comment on this post and let us know how exactly you are using them in your workflow. However, please avoid link dropping, but share your insights and your experience instead. Also, notice that some techniques are not only CSS-based, but use JavaScript, or JavaScript-libraries as well.

[Offtopic: by the way, did you know that there is a Smashing eBook Series? Book #2 is Successful Freelancing for Web Designers, 260 pages for just $9,90.]

CSS Techniques

Now Playing: transitions and animations with CSS
Tim Van Damme showcases a fairly simple CSS design that uses transitions, animations and subtle hover-effects to produce an engaging user experience. Also, notice the use of favicons as background-images for attribute selectors. Unfortunately, the demo works best in Webkit-browsers, but it degrades gracefully in other modern browsers. Unfortunately, we didn’t find the documentation of the technique.

Css-technique-394 in 50 New Useful CSS Techniques, Tutorials and Tools

CSS3 range slider, checkbox + radio button
A demo of HTML input elements made with CSS3. They include realistic range sliders, checkboxes and radio buttons. The designer used minimal markup, no JavaScript and no images. Downside: there is a ton of messy CSS3 code, and Safari renders the page best. Chrome is close, but the 3D perspective doesn’t quite work.

Css-technique-409 in 50 New Useful CSS Techniques, Tutorials and Tools

CSS3 Media Queries
CSS2 allows you to specify stylesheet for specific media type such as screen or print. Now CSS3 makes it even more efficient by adding media queries. You can add expressions to media type to check for certain conditions and apply different stylesheets. For example, you can have one stylesheet for large displays and a different stylesheet specifically for mobile devices. It is quite powerful because it allows you to tailor to different resolutions and devices without changing the content. Continue on this post to read the tutorial and see some websites that make good use of media queries.

Css-technique-323 in 50 New Useful CSS Techniques, Tutorials and Tools

Proportional leading with CSS3 Media Queries
A fluid layout should be responsive to the width of the columns of text. This problem, of proportional leading, is what holds many designers back from adopting fluid layouts. In this article, Andy Clarke explains how you can achieve proportional leading for your typography using CSS3 Media Queries.

Css-technique-408 in 50 New Useful CSS Techniques, Tutorials and Tools

Responsive Web Design
This article by Ethan Marcotte explains how to use fluid grids, flexible images, and media queries to create elegant user experiences with responsive web design. Check out the demo — of course, don’t forget to resize the browser window.

Css-technique-414 in 50 New Useful CSS Techniques, Tutorials and Tools

Popout Details on Hover with CSS
This tutorial describes a technique that presents details of a content item on hover. The solution is quite simple and uses position: relative and z-index to achieve the effect.

Htmldemo2 in 50 New Useful CSS Techniques, Tutorials and Tools

CSS3 Border-Radius and Rounded Avatars
Trent Walton came up with a clever technique to create rounded images (in this case, rounded avatars) with the border-radius property. The solution is simple: create a frame class for your image, and give it a border. Then, round both the frame and image with the border-radius property, and you’re done: a simple technique with no additional images or scripts — just an extra line of code. You may want to checkTim Van Damme’s similar CSS technique, too.

Css-108 in 50 New Useful CSS Techniques, Tutorials and Tools

CSS3 Rounded Image With jQuery
“The other day I was trying to style CSS3 border-radius to image element and I realized that Firefox doesn’t display border-radius on images. Then I figured a way to work around it — wrap a span tag around with the original image as a background-image.”

Css-technique-379 in 50 New Useful CSS Techniques, Tutorials and Tools

The Simpler CSS Grid
Why restrict your layout so that it can fit into this 960gs? A grid is supposed to help you in design, not to limit your creativity. The 978 grid is not just about increasing the page width, but to loosen the gutter space, so users can read it more comfortably.

Css-technique-321 in 50 New Useful CSS Techniques, Tutorials and Tools

Correcting Orphans with CSS Overflow
When typesetting, designers try to avoid leaving just one or a few words hanging on a line at the end of a paragraph. Doing so is considered poor typography because it leaves too much white space between paragraphs and interrupts the reader’s eye movement (see the example below). A simple typographic solution is to rework the line by adding indented paragraph endings. But the problem is particularly annoying when aligning a paragraph next to an image that exceeds the paragraph’s height. Soh Tanaka has come up with a simple and quick solution to this problem with CSS.

Css-technique-412 in 50 New Useful CSS Techniques, Tutorials and Tools

Apple-like Retina Effect With jQuery
This tutorial explain how you can recreate the effect displayed on the image below, using jQuery and CSS.

Css-technique-500 in 50 New Useful CSS Techniques, Tutorials and Tools

How to create a kick-ass CSS3 progress bar
New features introduced in CSS3 allows developers to create stunning visual effects: this post exaplains how you can create a fancy progress bar using CSS3 and jQuery, without Flash or images.

Css-technique-335 in 50 New Useful CSS Techniques, Tutorials and Tools

CSS pseudo-element Solar System using semantic HTML
This is a complete reworking of another author’s basic reproduction of the classic model of our solar system using CSS. By using pseudo-elements (again) I wanted to reproduce as much as possible without presentational HTML and JavaScript. In addition, by hooking into HTML microdata I’ve put together a rough scale model of the solar system that demonstrates some further uses of CSS generated content.

Css-technique-415 in 50 New Useful CSS Techniques, Tutorials and Tools

Advanced Columns using the :nth-child(N)
Imagine this task: you have to display product listings as columns laid out in a zig zag pattern. The first instinct is to split each section into its own list, but if the site is running on a CMS, all products had to be spit out in one giant list. Given this scenario, you can use pseudo-selectors :nth-child(N) and a bit of jQuery to help with IE support.

Css-technique-324 in 50 New Useful CSS Techniques, Tutorials and Tools

Lost World’s Fairs
Trent Walton explains the workflow and design techniques used to create the Lost World’s Fairs website to celebrate the launch of Internet Explorer 9. The result is truly remarkable.

Css-technique-404 in 50 New Useful CSS Techniques, Tutorials and Tools

New Twitter Design with CSS and JQuery.
This post explains the techniques used by Twitter’s new web interface and re-creates its interactivity using CSS and jQuery.

Css-technique-314 in 50 New Useful CSS Techniques, Tutorials and Tools

Europe, CSS & jQuery clickable map
CSS converts a simple list of countries into the fully clickable map. Works with disabled style sheets and JavaScript, as well as on mobile devices. A simple code does not require Flash Player or other plug-ins!

Css-technique-413 in 50 New Useful CSS Techniques, Tutorials and Tools

Simple Tooltip w/ jQuery & CSS
There are a lot of tooltip plugins out there, but not many of them explain what exactly goes on in the logic of a tooltip. I would like to share how I’ve created mine today, and am also open to any critiques and suggestions for those jQuery ninjas out there. Lets take a look.

Css-technique-325 in 50 New Useful CSS Techniques, Tutorials and Tools

Super Cool CSS Flip Effect with Webkit Animation
Webkit support some fancy transform and animation effects that can really spice up the web experiences for users with Safari or Chrome browsers. Here’s a quick look at how the rotateY property can produce a flip effect, and how it can be used to create a Transformers themed top trumps design.

Css-technique-399 in 50 New Useful CSS Techniques, Tutorials and Tools

CSS3 Border Images for Beautiful, Flexible Boxes
The CSS3 buzz is in full swing, and many of CSS3′s most useful properties are receiving a fair bit of attention. Properties like border-radius, text-shadow, custom gradients, and even CSS3 transitions have been shown to be quite practical, resolving real-world design issues with minimal markup and maintainable code.

Css-199 in 50 New Useful CSS Techniques, Tutorials and Tools

Animated wicked CSS3 3D bar chart
Create a beautiful 3D bar chart. But instead of creating a “stacked” one, several bars are placed under each other. When hovering, the animation shows and the bar grows to the appropriate size.

Css-technique-411 in 50 New Useful CSS Techniques, Tutorials and Tools

CSS Border Tricks
Since I released my new redesigned blog, a lot of people have asked me how I styled the pressed effect on my category navigation. I would like to share some simple border style tricks to get various effects for your next project.

Beveled in 50 New Useful CSS Techniques, Tutorials and Tools

The Background Trick With CSS
This page provides links to a couple of examples for the trick used on Design Made In Germany 5 where a couple of layers are used and the middle layer has a fixed background, while other layers have absolute positioning. The visual effect is unique and interesting. Unfortunately, the explanations are in German, but the demos are self-explanatory.

Css-technique-403 in 50 New Useful CSS Techniques, Tutorials and Tools

Footnotes With CSS
in their simplest implementation — using sup tags and linking within the page — footnotes aren’t very user-friendly. They interrupt the experience, requiring the user to click the link, read the information and then return to the page with the browser’s “Back” button.” Lukas Mathis has come up with an elegant solution to improve this user experience: his jQuery script shows the content of footnotes as soon as the user indicates that they are interested in it — i.e. when they move the cursor over the footnote symbol.

Css-166 in 50 New Useful CSS Techniques, Tutorials and Tools

Why and how to create Microsoft Office Minibar with jQuery and CSS3
Although many will argue that Microsoft products are an example of a good design, Minibar was one of design refreshments that came out with the Office 2007. It is a variation of a toolbar that exposes context-related functionality. In case of MS Word, context is a text selection. Since Minibar always pops up near the mouse pointer it enables users to quickly perform actions related to a selection.

Css-technique-388 in 50 New Useful CSS Techniques, Tutorials and Tools

CSS image replacement with pseudo-elements (NIR)
An accessible image replacement method using pseudo-elements and generated-content. This method works with images and/or CSS off; works with semi-transparent images; doesn’t hide text from screen-readers or search engines; and provides fallback for IE6 and IE7.

Css-technique-416 in 50 New Useful CSS Techniques, Tutorials and Tools

Diagonal CSS Sprites – Aaron Barker
So you’ve got your sprite created, and it’s working great. 30+ icons in one image, and major HTTP connections saved. You have made your little corner of the interwebs a little happier and faster. Steve Souders would be proud.

Css-110 in 50 New Useful CSS Techniques, Tutorials and Tools

Sneak — Fixing the background ‘bleed’
I recently came up with an issue in Safari where the background colour of an element seemed to “bleed’ through the edge of the corners when applying both borders and a border-radius (see the image above). I then found a solution, and it came in the form of the -webkit-background-clip property.

Css-121 in 50 New Useful CSS Techniques, Tutorials and Tools

Zebra-striping rows and columns
Zebra-striping tables is certainly not a new thing; it has been done and discussed for years. They (allegedly) aid usability in reading tabular data by offering the user a coloured means of separating and differentiating rows from one another. We can create zebra-stripes using the nth-of-type selector — but we can apply it not only to rows but also columns.

Css-technique-341 in 50 New Useful CSS Techniques, Tutorials and Tools

Feature Table Design
“I ran into the feature table design and I was inspired to try and replicate it. First in Photoshop, then in HTML/CSS. Recreating cool stuff you find on the web is definitely an excise I recommend (a few days after, I read this – couldn’t agree more). As these exercises typically do, it lead me down some interesting paths.”

Css-technique-372 in 50 New Useful CSS Techniques, Tutorials and Tools

ShineTime – A jQuery & CSS3 Gallery With Animated Shine Effects
This article shows how you can create an animated Shine Effect with jQuery & CSS3 and then use it to create your very own Shiny Gallery ‘ShineTime’. This effect is useful in making your user interface elements look like they’re a real polaroid photo (or made of glass) and the best part is, it’s not that difficult to achieve.

Css-technique-373 in 50 New Useful CSS Techniques, Tutorials and Tools

The Mac-style Skype Application Menu with CSS3 and jQuery
This tutorial re-creates the Skype application menu in the web browser. The final design mimics not the full layout — only the menu where all your friends are listed. For the nifty layout CSS3 is used and jQuery is used for the extra functionality.

Css-technique-381 in 50 New Useful CSS Techniques, Tutorials and Tools

Further Interesting Techniques

Object-oriented CSS
All the resources you need to get started are linked from the left navigation. Start by downloading the base files. Exercises one and two can be completed in Firebug if you are comfortable with it. Then you can download the finished file at the beginning of Exercise 3.

Css-technique-326 in 50 New Useful CSS Techniques, Tutorials and Tools

clearfix Reloaded +
clearfix and overflow:hidden may be the two most popular techniques to clear floats without structural markup. This short article is about enhancing the first method and shedding some light on the real meaning of the second.

CSS3 text-shadow and box-shadow trick
All browsers that support the CSS text-shadow and box-shadow properties also support the new CSS3 RGBa syntax. Which means you can safely combine them today. That’s handy, because it means no worrying about matching a precise hex colour shadow to a specific hex colour background. Instead just let the browser blend.

Data theft with CSS
Mozilla has released security updates to Firefox 3.5 and 3.6 that include defenses for an old, little-known, but serious security hole: cross-site data theft using CSS. These defenses have a small but significant chance of breaking websites that rely on “quirks mode” rendering and use a server in another DNS domain (e.g. a CDN) for their style sheets.

Show Markup in CSS Comments
“Let’s say you are creating a CSS file for a modular bit of a webpage. Perhaps you are the type that separates your CSS files into bits like header.css, sidebar.css, footer.css, etc. I just ran across an idea I thought was rather clever where you include the basic markup you will be styling as a comment at the top of your CSS file.”

Css-114 in 50 New Useful CSS Techniques, Tutorials and Tools

How to Micro-Optimize Your CSS
Minification shrinks file size significantly, by as much as 30% or more (depending on input code). This size-reduction is the net result of numerous micro-optimization techniques applied to your stylesheet. By learning these techniques and integrating them into your coding practice, you’ll create better-optimized CSS during the development process. Sharper skills, cleaner code, faster downloads — it’s a “win-win” for everyone.

Css-157 in 50 New Useful CSS Techniques, Tutorials and Tools

Transparent Borders with background-clip
Have you ever seen an element on a page with transparent borders? I think Facebook originally popularized it giving birth to lightbox plugins like Facebox. I don’t think Facebook sports the look anymore, but it’s still rather neat.

Css-130 in 50 New Useful CSS Techniques, Tutorials and Tools

Showing and hiding content with CSS 3
One very common feature is the expanding/collapsing or shown/hidden box, whether this is a tabbed interface, a content “tray” on the side that can be slid out and then put away again, or a complex tree menu with expanding/collapsing sub-menus. Generally, these features are implemented via JavaScript, however using CSS3 it is possible to create such content using only HTML and CSS — no JavaScript required.

CSS for Blockin’ Stuff
If you want to use user stylesheets, ad blockers, flash blockers, or whatever else, more power to you. Here are some CSS projects intended for blockin’ stuff.

CSS Tools and Services

ProCSSor: Advanced CSS Prettifier
This online tool allows you to submit your CSS (either copy and paste the code, upload the file or point to a URL) and choose your formatting options. You can save options and reuse them every time you run code through ProCSSor. You can separate properties and selectors across multiple lines, indent up to four levels with either the space bar or tab key and even sort properties. The tool also has a “Columnize” mode, which groups elements into columns, making for a more elegant style sheet; you need to deactivate “Fail-safe mode” to use it.

Css-technique-417 in 50 New Useful CSS Techniques, Tutorials and Tools

Selectivizr – CSS3 selectors for IE 6-8
selectivizr is a JavaScript utility that emulates CSS3 pseudo-classes and attribute selectors in Internet Explorer 6-8. Simply include the script in your pages and selectivizr will do the rest. Selectivizr adds support for 19 CSS3 pseudo-classes, 2 pseudo-elements and every attribute selector to older versions of IE. It can also fix a few of the browsers native selector implementations.

Css-127 in 50 New Useful CSS Techniques, Tutorials and Tools

CSS Desk
CSSDesk is an online HTML/CSS sandbox. The tool allows you too experiment with CSS online, see the results live, and share your code with others. You may want to check Rendera , too.

Css-technique-423 in 50 New Useful CSS Techniques, Tutorials and Tools

The Square Grid
A quite simple CSS framework that is based on 35 equal-width columns. It aims to cut down on development time and help you create well-structured websites. The total width of the grid is 994 pixels – which the majority of modern monitors support. You can use the grid in a variety of columns: 18, 12, 9, 6, 4, 3 and 2. The pack contains sketch sheets for printing (PDF), design layout templates for Photoshop, InDesign and Illustrator and source code files with explanations.

Css-188 in 50 New Useful CSS Techniques, Tutorials and Tools

Instant Blueprint
Instant Blueprint allows you to quickly create a web project framework with valid HTML/XHTML and CSS in only a matter of seconds, allowing you to get your project up and running faster. You may want to checkProject Deploy, too.

Css-technique-418 in 50 New Useful CSS Techniques, Tutorials and Tools

HTML5 Boilerplate
HTML5 Boilerplate is the professional base HTML/CSS/JS template for a fast, robust and future-proof site. You get the best of the best practices baked in: cross-browser normalization, performance optimizations, even optional features like cross-domain ajax and flash. A starter apache .htaccess config file hooks you the eff up with caching rules and preps your site to serve HTML5 video, use @font-face, and get your gzip zipple on. You may want to check HTML5 Reset, too.

Css-technique-421 in 50 New Useful CSS Techniques, Tutorials and Tools

HTML5 Starter Pack
A a very basic HTML5 starter pack with a clean and ordered directory structure that will fit for most projects. The pack contains the most common files (HTML, CSS, JavaScript), as well as a basic Photoshop web design template, again with a group’s structure that would fit for most projects.

Css-technique-419 in 50 New Useful CSS Techniques, Tutorials and Tools

PrimerCSS
Primer undercoats your CSS by pulling out all of your classes and id’s and placing them into a starter stylesheet. Paste your HTML in to get started.

Css-technique-363 in 50 New Useful CSS Techniques, Tutorials and Tools

Hardboiled CSS3 Media Queries
These hardboiled CSS3 Media Queries are empty placeholders for targeting the devices and attributes that you may be interested in making responsive designs for. The stylesheet covers smartphones in portrait and landscape modes, iPads, iPhone and large screens.

Css-technique-422 in 50 New Useful CSS Techniques, Tutorials and Tools

Grid Generator
This tool allows you treate your own custom CSS grids. You can select base unit, number of columns, column width, gutter width and margins and download PNG as well as a CSS source code.

Css-technique-382 in 50 New Useful CSS Techniques, Tutorials and Tools

Baseline framework
Baseline makes it easy to develop a website with a pleasing grid and good typography. Baseline starts with several files to reset the browser’s default behavior, build a basic typographic layout — including style for HTML forms and new HTML 5 elements — and build a simple grid system.

Css-technique-426 in 50 New Useful CSS Techniques, Tutorials and Tools

Gridulator
Gridulator is a quick and easy grid calculator for web designers and developers. You can choose the overall width and number of columns, select the column width and gutter width and download the PNG of the grid.

Css-technique-309 in 50 New Useful CSS Techniques, Tutorials and Tools

Dust-Me Selectors
Dust-Me Selectors is a Firefox extension (for v1.5 or later) that finds unused CSS selectors. It extracts all the selectors from all the stylesheets on the page you’re viewing, then analyzes that page to see which of those selectors are not used. The data is then stored so that when testing subsequent pages, selectors can be crossed off the list as they’re encountered.

Css-technique-330 in 50 New Useful CSS Techniques, Tutorials and Tools

zen-coding – Project Hosting on Google Code
Zen Coding is an editor plugin for high-speed HTML, XML, XSL (or any other structured code format) coding and editing. The core of this plugin is a powerful abbreviation engine which allows you to expand expressions — similar to CSS selectors — into HTML code.

Css-technique-356 in 50 New Useful CSS Techniques, Tutorials and Tools

Turbine
Turbine is a collection of PHP-powered tools that are designed to decrease CSS development time. It includes packing, gzipping and automatic minification of multiple style files, “CSS variables”, selector aliases as well as nested css selectors and OOP-like inheritance, extensions and templating features.

Css-technique-338 in 50 New Useful CSS Techniques, Tutorials and Tools

CSS Usage
CSS Coverage is an extension for Firebug which allows you to scan multiple pages of your site to see which CSS rules are actually used in your site.

Css-technique-331 in 50 New Useful CSS Techniques, Tutorials and Tools

CSS Reloader
CSS Reloader is a browser extension for Mozilla Firefox and Google Chrome, that allows you to reload all the CSS of any site without you have to reload the page itself. The goal for this browser extension is to enable developers to become more productive.

Css-technique-332 in 50 New Useful CSS Techniques, Tutorials and Tools

CSS Frame Generator
This tool returns corresponding CSS in a line-by-line way indented with spaces to reflect XHTML structure — each selector and all of its properties and values in one line. This may be a bit strange for you at the beginning, but if you get used to it you’ll find it much better. It’s essential to use a predefined properties order, such as this one:

Css-technique-327 in 50 New Useful CSS Techniques, Tutorials and Tools

Switch CSS
Switch is a full featured, production ready CSS preprocessor. It runs under Apache with mod_python, or as an environment-agnostic command line tool.

Css-technique-317 in 50 New Useful CSS Techniques, Tutorials and Tools

CSS Tools: Diagnostic CSS
Validation is great, but it won’t catch everything. For example, if you have a link where you forgot to add a URL value to the href attribute, the validator won’t complain. The syntax is valid, even if it’s a broken experience. Similarly, the validator will be happy to let through empty class and id values.

Css-technique-301 in 50 New Useful CSS Techniques, Tutorials and Tools

IE Print Protector – ieCSS
IE Print Protector is a piece of javascript that allows you to print HTML5 pages in Internet Explorer. IE Print Protector helps IE render HTML5 elements correctly, both on screen and in print.

Css-technique-302 in 50 New Useful CSS Techniques, Tutorials and Tools

CSS reset, CSS framework, Toucan CSS reset
It is a reset stylesheet. Unlike Meyer’s or YUI’s, it not only removes the default styling of HTML elements, but also rebuilds the new generic rules for the typography, headings, paragraphs, lists, forms, tables etc. It’s light-weight, flexible and browser-friendly.

Css-technique-359 in 50 New Useful CSS Techniques, Tutorials and Tools

PHP CSS Browser Selector
CSS Browser Selector is a very small javascript with just one line php function which empower CSS selectors. It gives you the ability to write specific CSS code for each operating system and each browser.

Css-technique-362 in 50 New Useful CSS Techniques, Tutorials and Tools

CSS3Machine for iPad
CSS3Machine makes the most advanced CSS3 styles simple. Easily create stunning gradients, drop-shadows, and 3D transforms. CSS3Machine also builds, edits, and exports WebKit animations.

Css-technique-391 in 50 New Useful CSS Techniques, Tutorials and Tools

minify
Minify is a PHP5 app that helps you follow several of Yahoo!’s Rules for High Performance Web Sites. It combines multiple CSS or Javascript files, removes unnecessary whitespace and comments, and serves them with gzip encoding and optimal client-side cache headers.

Css-186 in 50 New Useful CSS Techniques, Tutorials and Tools

Modernizr
Modernizr adds classes to the element which allow you to target specific browser functionality in your stylesheet. You don’t actually need to write any Javascript to use it.

Css-149 in 50 New Useful CSS Techniques, Tutorials and Tools

Spritebaker: Easy Base64 encoding for designers
This free tool parses your CSS and returns a copy with all external media “baked” right into it as Base64 encoded datasets. The number of time consuming http-requests on your website is decreased significantly, resulting in a massive speed-boost (server-side gzip-compression must be enabled).

Css-technique-427 in 50 New Useful CSS Techniques, Tutorials and Tools

My DebugBar
IETester is a free application that allows you to have the rendering and JavaScript engines of IE9 preview, IE8, IE7 IE 6 and IE5.5 on Windows 7, Vista and XP, as well as the installed IE at the same time.

Css-technique-311 in 50 New Useful CSS Techniques, Tutorials and Tools

Less Framework 2
This framework is a CSS framework for cross-device layouts. The framework has a minimal set of features, and does away with things like predefined classes. All it really contains are a set of media-queries, typography presets aligned to a 24 px baseline grid and a grid, with its column sizes noted down within CSS comments. You can select what features you want to have in your framework files, and the tool will provide you with a zipped archive right away. Note that this framework isn’t related with LESS CSS, another framework that extends CSS with variables, mixins, operations and nested rules.

Css-technique-428 in 50 New Useful CSS Techniques, Tutorials and Tools

Last Click

Never Mind the Bullets
HTML5 is coming to modern browsers, and developers are already pushing its limits. To this end, Microsoft has created an online comic to show off HTML5/CSS3’s features (SVG background, JavaScript acceleration, etc.) as they function on IE9. It’s a fully interactive experience, complete with animations and other features that were until now possibly only with JavaScript or Flash.

Css-196 in 50 New Useful CSS Techniques, Tutorials and Tools

The comic is a Western in a fairly traditional comic-book style, but with a lot of extras. It’s viewable in other browsers, but not as fully as with all of the features built into IE9. There’s also a feature that lets you create your own comic strip using the same characters. We never thought we’d say these words, but the website is actually best viewed in Internet Explorer 9.

Have something useful? Get in touch with us!

Our job is to promote good, high-quality content and resources. If you wrote or developed something useful, contact us — we will do our best to spread the word and help you out.

IE9 Platform Preview

Os rumores sobre o IE9 são cada vez mais audíveis e era de esperar uma amostra do que esta nova versão poderia trazer de novo à cerrada frente competitiva. A espera ainda não terminou, mas a Microsoft “abriu o livro” e disponibiliza algumas linhas mestras do caminho a seguir no desenvolvimento do que será o mais avançado browser de sempre.

Foi apresentada hoje na MIX, uma antevisão do futuro browser da Microsoft. É ainda e só uma versão de testes mas que mostra de forma clara todas as melhorias e novidades que estão para chegar. O Internet Explorer 9 Platform Preview é apenas uma versão de testes. Ainda só temos acesso ao motor de renderização. Nenhuma da interface futura ou passada está presente.

De qualquer forma temos já acesso ao que serão as capacidades do IE9. E pelo que pudemos ver as melhorias são grandes e muitas novidades estão presentes.

Performance

O IE 9 introduz um novo motor de scripting, conhecido como ‘Chakra’, que consegue ganhos significativos em termos de performance e melhor integração com todos os subsistemas. De facto, e de acordo com teste de benchamark SunSpider da Webkit.org, o IE9 Platform Preview consegue ser mais rápido que a versão 3.6 do Firefox.

Finalmente a abertura da Microsoft para introdução dos novos standards ajudou também a melhorar a performance global,permitindo aos programadores aceder de forma mais rápida ao DOM (Document Object Model), a utilização de CSS e a outras funcionalidades, o que vai significar que o AJAX e outras aplicações WEB vão correr de forma mais rápida.

Progressos na Interoperabilidade

A equipa do Internet Explorer tem-se focado em fornecer capacidades de interoperabilidade para quem desenvolve páginas e plataformas Web. Não é desejável ter de estar a altera-las vezes sem conta. Por esta razão têm preocupado em tornar os seus browsers o mais fieis aos standards Web.

HTML5

As novidades do HTML5 foram introduzidas inicialmente no IE8 com o suporte para DOM Store, cross-document messaging, navegação AJAX navigation entre outras.

Novidades HTML 5 no IE9

  • Suporte para parsing de XHTML
  • API de selecção de texto
  • Outras funcionalidades tais como as tags <audio> e <video>.
CSS3

O IE9 Platform Preview adiciona as seguintes funcionalidades CSS3:

  • Rounded corners através da propriedade border-radius
  • Suporte para as propriedades opacity e RGBA color model
  • Selectors API para permitir aos programadores a utilização de padrões de pesquisa para detecção de elementos e aplicar CSS especifico a esses elementos
  • No teste CSS3 Selectors, da CSS3.info, o IE9 Platform Preview obteve um resultado de 100% (578/578). Valor bem mais elevado que os 60% do IE8 (349/578)
Resultados Acid3

Os resultados dos testes Acid3 desta nova versão do IE eram muito baixos, tendo obtido 32 em 100. No entanto com a continuação dos trabalhos de desenvolvimento e através da incorporação de novos standards e de melhorias o IE 9 atinge já um resultado de 55 em 100.

Naturalmente que a Microsoft irá continuar a trabalhar no sentido de melhorar este resultado ao mesmo tempo que tratará de satisfazer as necessidades de todos os que desenvolvem aplicações para a Web.

Novas funcionalidades SVG

A Microsoft introduziu no IE9 o suporte para Scalable Vector Graphics (SVG). O SVG é uma uma linguagem XML para descrever de forma vetorial desenhos e gráficos bidimensionais. O IE9 Platform Preview suporta já as seguintes funcionalidades SVG:

  • Estrutura do documento, incluindo metadata e funcionalidade de expansão
  • Formas básicas (rectângulos, círculos, elipses, linhas e poligonos)
  • Sistema de coordenadas, transformações e unidades
  • Caminhos, incluindo capacidades totais para o caminho do elemento e atributo ‘d’
Melhorias Document Object Model (DOM)
  • Novo suporte para DOM Level 2 Core namespaces, ranges e views
  • Suporte para eventos DOM Level 3 Events
  • Melhorado o suporte para DOM Level 2 Style e características HTML
Melhorias para programadores

O separador Network irá permitir aos programadores capturar, mostrar e gravar os pedidos web. Isto irá permitir a quem desenvolve páginas web ver e compreender de forma mais clara o que está a acontecer sem terem de instalar ferramentas complexas. Tal como o resto das ferramentas vem incorporado de origem no browser.

HTML5 GPU

A ideia base do HTML5 assenta na possibilidade de construirmos aplicações web ricas em grafismos com capacidades acrescidas. O GPU-powered HTML5 vem permitir que utilizemos as capacidades presentes nos GPU’s (Graphics Processing Units) para fazer o processamento gráfico que os browsers necessitam, libertando assim oCPU. No IE9 esta funcionalidade vai estar presente. Podemos assim fazer uso das placas mais modernas e muito mais capacitadas, libertando recursos nos nossos PC’s.

  • O GPU-powered HTML5 consegue desenhar e manipular de forma melhor imagens SVG ou BMP.
  • Assim teremos mapas com scroll mais suave, fontes com maior detalhe e gráficos 3D mais ricos sem termos de recorrer ao CPU.
  • O IE9 Platform Preview necessita de suporte Direct2D, uma funcionalidade introduzida com o Windows 7 e que pode ser conseguida com uma actualização nos sistemas operativos menos recentes.

Agora que já foram apresentadas todas as novidades que podem encontrar no Internet Explorer 9 Platform Preview só nos resta aconselhar-vos a descarregarem a ferramenta e a testarem-na. Encarem-na como uma montra do que será o IE9. Ainda não está completo, mas o que o fará um bom browser já está lá.

Download: IE 9 Platform Preview [14.26MB]
Homepage: IE9 Test Drive

Photo Transfer Edge Effect | Photo Effects | PSHERO


Step 1

Welcome back my naughty little monkeys! I was up most of the night with this nasty flu that’s been going around, it’s not even noon and already I’m on my third can of Dragon, so if my writing’s a little off kilter, you’ll understand why. Did I just use the word kilter?

Lets get this party started with a visit to iStockPhoto where I found a cool looking stock image of an old medium format film border. There are tons of these available for free as well if you’re willing to put in the time to search. Incase you want to replicate this exact effect you can enter the product id (1249016) into the iStockPhoto search field. The nature of my contract with iStockPhoto doesn’t allow me to give away the original but if you know where to look, I may have “accidentally” left the associated Alpha Channel in the download at the end of the lesson.

Here’s the image I got from iStockPhoto. Did I mention I got it at iStockPhoto?

Step 2

Since I ultimately want to use this image as a mask, lets go ahead and invert the tones by choosing Image>Adjustment>Invert from the main menu, or by simply pressing Command-I (PC: Ctrl-I).

Step 3

What I really want from this image is a true black to transparent mask, but what we’re currently working with is a black and white composite. It’ll take a few steps to do it, but trust me, the result will be worth it. Follow along closely, most of this will be keyboard shortcuts that won’t have any visual reference. Don’t worry, I’ll explain it as we go.

Press Command-A (PC: Ctrl-A) to Select All, then press Command-X (PC: Ctrl-X) to cut the entire image onto the clipboard (Yes, everything will disappear and you’ll be left with a white canvas… it’s ok, that’s what’s supposed to happen).

Now click over to the Channels tab in the Layers palette (*note: If your layers palette isn’t open choose Window>Layers from the main menu). Click the Create New Channel icon at the bottom of the Channels palette to add a new Alpha Channel to the bottom of the list of channels. Click on the new channel to select it and press Command-V (PC: Ctrl-V) to paste the image we cut from the stage into the channel.

Step 4

The advantage of having the black and white image in an alpha channel is that it allows us to load the highlights as a selection where a standard layer will not. Lets do that now by holding down the Command (PC: Ctrl) key and clicking on the layer thumbnail of our new Alpha Channel. Although the selection looks rather random and doesn’t seem to encompass all the white areas of the image, it actually does.

Step 5

With our selection made, lets click up on the RGB channel at the top of the Channels palette to make it active (*note: this will hide the channel we were just working on and make only the selection visible.

Click back to the Layers tab and add a new layer by clicking the Add New Layer icon at the bottom of the layers palette then double click on the layer’s name to rename it Frame.

Step 6

Since our alpha channel allowed us to select only the highlights but what we really want are the shadows, lets go ahead and invert the selection by choosing Select>Inverse from the main menu or by using the keyboard shortcut Command-Shift-I (PC: Ctrl-Shift-I).

Press the D key to reset your foreground color to black and then fill the selection by pressing Option-Delete (PC: Alt-Backspace). We’re now done with the selection, so you can press Command-D (PC: Ctrl-D) to deselect.

Step 7

HERO! You might be saying, this looks just like the image we started with! … and of course that would be true, but things aren’t always as they seem. If I change my background color to red (you don’t need to do this, I’m just illustrating my point). You can see that the black has indeed been separated from the white background and is now isolated for use.

Step 8

Ok, we’ve done all the preparation, now lets get to work on the rest of the effect.

Grab the Polygonal Lasso tool from the Lasso tool fly out menu and clicking from point to point create a nice square selection inside the photo area. This selection doesn’t have to be exact or even, in fact, the less perfect the better. When you get back to your starting point the selection will close itself.

Step 9

Now that the selection is made, lets soften the edges just a touch by choosing Select>Modify>Feather from the main menu (*note: In some older versions of PS the path to the Feather option is Select>Feather.) This is a low resolution example, so I’m going to use a small 2pixel Feather, but if you’re working at a larger resolution you’ll want to adjust accordingly.

Now lets duplicate the selected portion of the layer by pressing Command-J (PC: Ctrl-J). This will put the selection onto it’s own layer above the original. Lets call this layer Photo Holder. In order to see what we’re working with lets also turn off the Frame layer by clicking the eye icon to the right of the layer thumbnail in the Layers palette.

Step 10

The edges of this layer are far too hard for this effect to be convincing, so lets press the E key to invoke the Eraser tool, and then by choosing different brushes from the brush picker we’ll delete small areas around the edge of the photo area. I used a variety of grunge edge brushes to distress my edges and I’m including those Photoshop Brush sets in the download at the end of the lesson. Yes, you’re right, that is very cool of me!

Here’s my Photo Holder layer after all the distressing. Remember that you can rotate the brush tips in the Brushes palette like I taught you in the Rotating Brushes tutorial to make the brushes work for every edge.

Step 11

Lets take a break from this file for a moment and open the photo we will use for the effect. Mrs. Hero took this shot of me on a motorcycle trip to Telluride, Colorado last year. Yes, I look cool, I know.

For this effect I wanted to use a grayscale image (though you don’t have to). Because this tutorial isn’t about black and white conversion I just chose Image>AdjustmentS>Desaturate from the main menu to make it easy. If you want to get into black and white conversion in detail, I’d suggest picking up Scott Kelby’s Photoshop Channels Book and reading Chapter 4 in particular which covers using Calculations for B&W conversion (though the whole book is fantastic).

Step 12

With your photo open, press Command-A (PC: Ctrl-A) to Select All, then Command-C (PC: Ctrl-C) to copy the photo to the clipboard. You can now close your photo if you want by pressing Command-W (PC: Ctrl-W). How’s that for a bunch of keyboard shortcuts mashed into a few lines?

Now that we’ve got the photo copied to the clipboard (no, there’s no actual clipboard, it’s just an expression to let us know that the photo is copied into Photoshops virtual memory), lets return to our working file and more specifically to the Photo Holder layer which should still be selected as the active layer in the Layers palette. And just like we did when we were in the Channels palette, lets go ahead and Command-Click (PC: Ctrl-Click) on the Photo Holder layer icon to load it as a selection.

From the main menu (and this is the cool part) choose Edit>Paste Into. This will take the image we just copied to the “clipboard” and paste it into the selection, creating a new layer and using the selection as a layer mask! How awesome is that?

Step 13

Ok, lets turn on the Frame layer again by clicking in the empty box to the left of the layer thumbnail (the eye icon will reappear long with the layer’s contents). Now technically we don’t need the Photo Holder layer anymore, but I’m going to leave it incase I want to modify it later. I’m also going to name the new layer with the photo on it Photo.

Step 14

With the photo thumbnail selected on the Photo layer I now used the Dodge and Burn tools (found in the Tools bar / keyboard shortcut O) and using a soft edged medium sized round brush with the Range set to Highlights and the Exposure set to around 20% I’m going to darken around the edges and corners (Burn tool) and lighten around the subject (Dodge tool). This effect mimics the old darkroom techniques of dodging and burning an image to get this style of look. Perhaps the subject of a future tutorial, but I won’t be going into any further detail about the technique in this tutorial.

(*note: Dodging and Burning aren’t necessary steps here, and I’ll use a layer style in the next step to mimic the edge burning anyway.)

Step 15

If you don’t feel comfortable using the Burn and Dodge tools too much yet, that’s ok, lets use a layer style to mimic the edge burn effect by double clicking to the right of the layer name in the Layers palette, or by Control-Clicking (PC: Right Click) on the layer and choosing Blending Options to bring up the Layer Styles dialog. Choose Inner Glow from the list on the left (Click on the text, not the checkbox) and add the following settings.

Step 16

Here’s what my image looks like so far.

Step 17

I want the photo to look a little more aged so I’m going to use a fantastic brush (which is included in the download at the end of the lesson) called Scratch Heavy to do a little more distressing.

Create a new layer called Scratches, switch to the Brush tool by pressing the B key, load and select the Scratch Heavy brush and press the D key to reset the foreground color to black. I used the bracket keys [ and ] to size my brush to it was just a little larger than my image, then clicked once on the canvas.

Step 18

Obviously we don’t want the scratches to extend beyond the borders of the photo, so Control-Click (PC: Right-Click) on the Scratches layer and choose Create Clipping Mask from the menu. This will clip the Scratches layer to the Photo layer and the clipping will be indicated by an indentation of the Scratches layer and a small arrow between the two layers. The scratches are a little harsh though, so lets lower the Fill opacity of the Scratches layer to around 30%.

Step 19

The last thing I want to do is add a little sepia tone to the image just to make it feel a little older. Click on the Create New Fill or Adjustment Layer icon at the bottom of the layers palette, choose Photo Filter and choose Sepia from the Filter drop down menu, leave the other settings alone and click OK. Now just Create a Clipping Mask with this layer as well just like we did in Step 18 and you’re done!

Step 20

And that’s it folks, a cool aged photo effect with a nifty edge detail. I hope you learned a little something along the way. I’m off to take a nap.

Through the viewfinder (a Photoshop tutorial of sorts) « Hank & Willie


I’m rarely on the bandwagon with photo processing trends, mostly because, well, have you seen the pile of laundry in my living room? And, oh, and these guys keep me a little busy, too.

So while the rest of the photo enthusiasts I love to read were playing with things like selective color, way back when, and texture, sloppy borders, vintage washes and cross processing, I just watched from the sidelines.

But I recently came across this clever technique, called TTV (Through the Viewfinder). Basically, you shoot through the viewfinder of an old camera, using your modern digital or film camera, and create an interesting framing effect in camera. I thought to myself, “That’s kind of fun.”

Apparently hundreds of other people thought the same thing, and decided to make a Flickr group and share their images. You’ll see some AMAZING versions of this technique there.

However, the laundry in my living room didn’t go anywhere, and the 9,000 other things that beckon kept beckoning, so it remained a nice idea until I saw this–a way to do it digitally, without hunting for an old camera to shoot through. Hooray!

So I tried it. And thought I would share the steps with you, since so many of you have taught me wonderful Photoshop techniques.

Hope you’ll share some of your tries with this technique. Or, if you don’t have Photoshop and want me to try on one of your photos, I will pick a few that people send me to try it. (Email me a high-res version at hankandwillieATgmailDOTcom.)

TTV-Through the Viewfinder

1. Find a suitable photo. I loved the old-fashioned feel of the print in her dress, her pigtails and the timeless watermelon-in-summer-moment.

2. Since this effect mimics the old waist-height viewfinders with square pictures, I cropped this one square, even though her buddy was equally cute.

3. Edit to taste. I’ve seen this done with strong, vibrant color, with black and white and with sepia. I went for kind of a mild vintage feel here, using Pioneer Woman’s Soft and Faded action here and reduced the opacity a bit to restore some of the bright color of her watermelon.

4. I opened this file, shared by a very generous photographer out there in Flickrland.There’s a whole group of “through a viewfinder shots” to download here, choose the speckle pattern you like best!

It looks like this:

5. Using layers, drag it on top of your open, edited image, and size it to fit. ( I used free transform.)

6. Choose a blend mode, and voila! (I used multiply, and reduced the opacity to about 80%. You can also try other blending modes, like soft light and hard light for different effects.)

The whole thing took longer to write about than to do. Here are a few other examples.

If you try this, I’d love to see the results, post your link in the comments!

And want to see a super cool way to use this? Photographer Tara Whitney decorated a whole wall with her family photos this way. Wow.

Happy PhotoShopping!

65 Media

image 

Gosto muito de apreciar sites, mas quando conheci esta empresa de webdesign, pensei que mais vale ver o que de melhor se faz em webdesign. Os websites criados por esta empresa são fenomenais, e merecem o meu destaque. Um dos meus websites favoritos é o de Jim Carrey, também produzido pelos 65 Media.

Recomendo vivamente a visita ao portfólio deles.

Programação em Java – Iniciação II – Por Bruno Rodrigues


Criado por Hélio Moreira em 12 de Janeiro de 2010 | 6 comentários

Depois de no primeiro artigo ter dado a conhecer a linguagem e ter introduzido os conceitos de objecto e mensagem, nesta 2ª parte, falando-vos ainda a título introdutório, vou começar por falar de algumas boas práticas da programação em Java para, em seguida, mostrar-vos os básicos para começarem a escrever os vossos programas (tipos de variáveis e operadores, estruturas condicionais, ciclos, etc..). E tenham em atenção que hoje vai haver trabalho de casa!

Boas Práticas a Programar

Muito importante em qualquer LP, não fugindo o Java à regra, são os standards que se devem seguir quando se programa e que, diferem um pouco de linguagem para linguagem. Seguir este tipo de normas, acima de tudo, facilita quem mais tarde vai agarrar no nosso código pois, para além de tornar o código “mais limpo”, torna mais fácil a sua compreensão. É também, pelas razões que iremos ver, uma forma de tornar o nosso trabalho mais produtivo.

Vou-vos falar das “boas regras” específicas do Java e de como programar numa LP object-oriented (OO).

Programar por Objectos

É um erro algo frequente utilizar-se uma LP object-oriented para programar como faríamos recorrendo a uma LP dum paradigma funcional (como a linguagem C). No tutorial anterior expliquei o que era um objecto, agora vamos imaginar um objecto no mundo real.

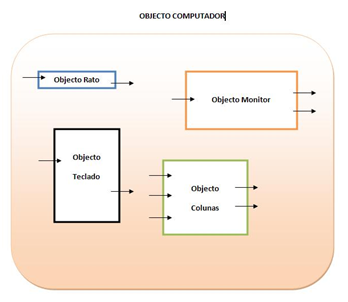
Suponhamos, o Objecto Computador. O Objecto Computador, poderia-se dizer, é constituído por outros tantos objectos – Rato, Monitor, Teclado, Colunas, etc. Cada um desses objectos, funciona independentemente do contexto em que estão inseridos, ou seja, seja qual for o Computador (Objecto no global com todos os seus componentes) a que “pertençam” cumprem a sua função. O fabricante, aquando da construção do Rato, não pensa que é para funcionar “naquele” Computador mas, em qualquer Computador. Isto exemplifica como o programador deverá programar numa LP OO.

O código por nós produzido, quando se utiliza uma linguagem OO, deverá ser modular pensando sempre na sua reutilização. Quer isto dizer que, quando nos propomos a construir o objecto “ComputadorTipoA” (ou seja, desenvolver a classe “ComputadorTipoA”), devemos construir os objectos (definir as classes) Rato, Monitor, Teclado, etc como módulos separados e independentes. Desta forma quando estamos a construir o “Rato”, não temos de nos preocupar com as funções, por exemplo, do teclado. Só temos de definir que o nosso Rato tem o comportamento que se esperaria de um objecto com esse nome e funcionalidade se, receber X como entrada, tendo nesse caso Y como saída/resultado.

Se procedermos desta forma para todos os objectos em causa, na classe ComputadorTipoA, dizemos que sempre que fôr construido um ComputadorTipoA, deve ser adicionado um Rato, um Monitor, etc, não havendo necessidade de estar a definir novamente esses objectos. As vantagens, como já devem ter percebido tem a ver com o facto de que, quando quisermos construir um objecto ComputadorTipoB, TipoC, etc, apenas haverá necessidade de definir os pormenores relativos ao Computador do tipo em causa, os componentes do mesmo já estão definidos, podendo ser reutilizados. A isto chama-se programação modular e, tem como mais valias:

· Abstracção e divisão de um problema maior, dividindo-o em pequenos problemas que, conjuntamente, resolverão a nossa questão inicial;

· Reutilização de código em projectos futuros, poupando desse modo tempo de desenvolvimento, o que leva a uma maior produtividade/lucro.

Convenção de nomes em java

É importante no nosso código, utilizar os standards de nomes para a LP na qual estamos a programar. Isso facilita a compreensão do nosso código. Para Java, utilizam-se as seguintes convenções:

· Nome de Ficheiros – estes deverão começar por maiúsculas e ter um nome o mais descritivo possível. Caso se deseje atribui um nome com várias palavras, a primeira letra de cada uma delas deverá ser maíuscula. Exs.: Automovel.java, AutomovelPesado.java, Circulo.java, FiguraGeometrica.java, etc;

· Nome de Classes – deverão ser idênticos ao nome dos ficheiros retirando, o “.java”. Exs.: Automovel, AutomovelPesado, Circulo, FiguraGeometrica, etc;

· Nome de Métodos – segue as regras dos ficheiros/classes com ligeiras modificações: a primeira letra é uma minúscula, caso seja um método de atribuição de um valor a uma variável deverá começar por “set”, caso seja um método para obter o valor atribuído a uma variável deverá começar por “get”. Exs.: getPesoAutomovel(), setCorAutomovel(), getRaioCirculo(), setTipoFiguraGeometrica();

· Nome de Variáveis – situação idêntica à dos métodos (no caso de variáveis não existirá gets nem sets). Exs.: contador, limiteMaximo, nomeGestorConta;

· Nome de Constantes – em maíusculas. Se contiver várias palavras, estas deverão ser separadas por underscore (‘_’). Exs.: CONSTANTE_GRAVITACIONAL, MAX_PESO_PERMITIDO;

Palavras Reservadas

Ao definir os nomes das variáveis e métodos nos nossos programas, à que ter em atenção as palavras reservadas existentes na LP. Tal como em outras, existem palavras que estão “proibídas” de ser utilizadas uma vez que estas são nomes de métodos/tipos pré-definidos. Em Java são as seguintes:

private, protected, public, abstract, class, extends, final, implements, interface, new, static, strictfp, synchronized, transient, volatile, break, case, continue, default, do, else, for, if, instanceof, return, switch, while, assert, catch, finally, throw, throws, try, import, package, boolean, byte, char, double, float, int, long, short, super, this, void, const, goto, null, true, false.

Comentários

Importante também em qualquer programa independentemente da LP utilizada para o desenvolver, são os comentários. Estes deverão ser feitos sempre que exista um qualquer passo menos óbvio nos nossos programas, facilitando assim a compreensão dos mesmos.


Javadoc

Uma ferramenta muito útil e que deve ser utilizada para fazer a documentação dos nossos projectos (a documentação técnica) é o Javadoc. Esta ferramenta já vem com o SDK que necessitamos de instalar para programar em Java, como demonstrado no anterior tutorial. Esta ferramenta, de uma forma simples, permite criar documentação no formato da API do Java, sendo por isso uma mais valia para todos os developers.

Para conseguir tal feito, os comentários nos nossos programas, ao invés de no formato normal, terão de estar num formato especial – muito simplista – que será reconhecido e compilado pelo próprio compilador do Java, tendo como output a API do nosso projecto em formato HTML. Vamos então ver como devemos construir os comentários nos nossos programas:

· Existem dois tipos de comentários no formato Javadoc: Class-level Comments e Member-level Comments, qualquer um deles começa por ‘/**’ e acaba em ‘*/’;

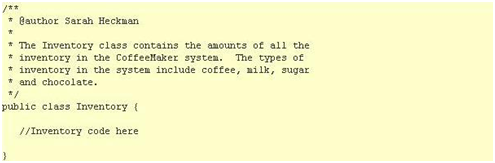
· Class-level comments são utilizados para descrever a classe e são colocados logo acima da linha de código que inicializa a classe:


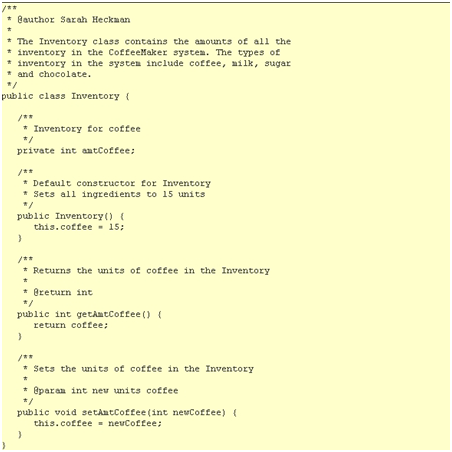
· Member-level comments servem para fazer a descrição dos construtores da classe, dos métodos da mesma, etc:

Generalizando, ou comentários são construídos no seguinte formato:

As tags mais utilizadas em Javadoc – apesar de existirem outras mais – são as seguintes:

o @author: Autor da classe;

o @param: parâmetro do método ou do construtor;

o @return: o que o método retorna;

o @throws: descreve uma excepção que poderá ser lançada pelo método;

o @exception: descreve uma excepção;

o @version: versão de uma classe ou de um método

Depois de termos os nossos comentários num formato Javadoc, para construir a nossa API, temos de executar o seguinte comando (existem mais flags que podem ser adicionadas, estes são os parâmetros base):

javadoc –d directoria_destino_api –sourcepath path_src_projecto

Existe muito mais informações sobre Javadoc – tags, flags de compilação, etc –, o que aqui foi apresentado foi o básico para utilizar a ferramenta. Para os mais curiosos, podem obter mais informações nos seguintes links:

· http://pt.wikipedia.org/wiki/Javadoc

· http://java.sun.com/j2se/1.3/docs/tooldocs/win32/javadoc.html

· http://java.sun.com/j2se/javadoc/writingdoccomments/index.html

Operadores

Agora que já conhecem a linguagem, como deverão programar na mesma e como comentar os vossos projectos, vou passar a apresentar-vos os pormenores da mesma, de modo a que finalmente lancem mãos à obra. Vou começar por vos apresentar os operadores existentes em Java:

· Operadores Aritméticos:

o Soma: +

o Subtracção: –

o Multiplicação: *

o Divisão: /

o Resto da Divisão: %

· Operadores de Atribuição:

o += : op1 += op2 à op1 = op1 + op2

o -= : op1 -= op2 à op1 = op1 – op2

o *= : op1 *= op2 à op1 = op1 * op2

o /= : op1 /= op2 à op1 = op1 / op2

o %= : op1 %= op2 à op1 = op1 % op2

· Operadores Unários: O mais (+) e o menos (-). Para mudar o sinal do operando

· Operador Instanceof: Permite-nos saber se um objecto pertence a uma classe ou não:

o NomeObjecto instanceof NomeClasse

· Operadores de Incremento e Decremento: São os operadores que nos permitem incrementar ou decrementar uma unidade a uma variável:

o ++

o –

o Ex.: se a variável ‘int i = 10’ e fizermos ‘i++’, i ficará com o valor 11.

· Operadores de Comparação:

o Maior do que: >

o Menor do que: >

o Igual a: ==

o Diferente de: !=

o Maior do que: >=

o Menor do que: <=

· Operadores Lógicos:

o «E» Lógico: && (devolve true se ambos forem true)

o «Ou» Lógico: || (devolve true se um fôr true)

o Negação: ! (devolve true se fôr false e vice-versa)

o «E» Bitewise: & (devolve true se ambos forem true mas avalia ambos)

o «Ou» Bitewise: | (devolve true se um fôr true mas avalia ambos)

· Operador de concatenação de Strings: ‘+’

· Operadores de bits:

o Shift direita: >>

o Shift esquerda: <<

o And: &

o Or: |

Tipos de Dados Primários (página seguinte)

Tipos de Dados Primários

Em Java podemos definir as nossas variáveis como sendo do tipo Objecto – sendo esse objecto um dos já existentes na API ou um dos definidos por nós – ou, um dos denominados, tipos primários:

· boolean: admite os valores true ou false.

· char: Usa o código UNICODE

· Inteiros: Diferem nas precisões e podem ser positivos ou negativos.

o byte: 1 byte.

o short: 2 bytes.

o int: 4 bytes.

o long: 8 bytes.

· Reais em ponto flutuante: diferem nas precisões e podem ser positivos ou negativos.

o float: 4 bytes.

o double: 8 bytes.

Estruturas de Dados

Depois de vos apresentar os tipos primários de dados, vou-vos mostrar outro tipo de estruturas mais complexas onde também é possível armazenar informação.

Antes demais esta não pretende ser uma “aula” acerca de estruturas de dados, pois para tal muitos tutoriais teriam de ser feitos só sobre essa tema, mas sim uma apresentação de algumas estruturas já existentes na forma de classes na API do Java e que podem ser utilizadas pelo programador. São muito úteis uma vez que já possuem definidos um número elevado de métodos de grande funcionalidade sobre as mesmas.

Vamos ver algumas das mais úteis e mais utilizadas (na minha opinião, obviamente este tutorial poderia ser completado com muitas outras). Para cada uma, irei dar alguns exemplos de utilização mas, todas elas possuem muitas mais funcionalidades que poderão ser utilizadas, funcionalidades essas que poderão descobrir na API da classe em questão – cujo link indicarei em todas elas.

Array

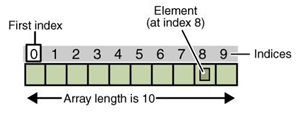
Um array é uma estrutura de tamanho fixo definido aquando da sua criação, que pode conter um único tipo de dados, tipo esse também definido quando o array é criado.

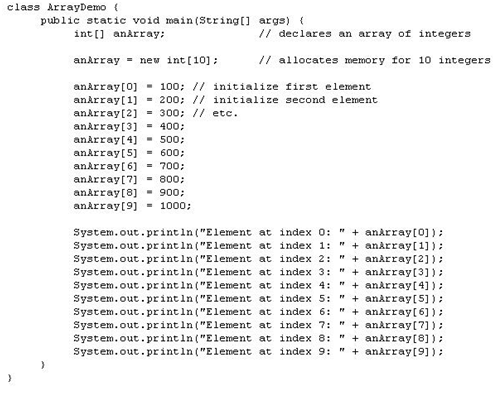
Cada elemento do array pode ser acedido através do sua posição dentro do mesmo, sendo a primeira posição de um array de tamanho n a posição 0 e a última a posição n-1. O exemplo em seguida demonstra o funcionamento de um array:

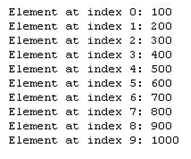
O output do programa anterior, seria:

Um método de grande utilidade quando se utiliza arrays é o método length que nos permite saber o tamanho do array. Utilizando o exemplo anterior, se quisessemos conhecer o tamanho do array anArray, bastava fazer anArray.length.

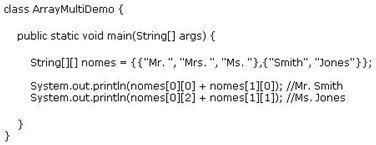
Também útil é o facto de podermos criar arrays bidimensionais (matrizes de dimensão N x M), podendo os mesmos serem inicializados e utilizados como demonstra o exemplo seguinte:

Vector

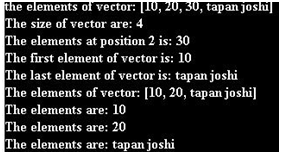
A classe Vector é possivelmente uma das mais úteis da API do Java e, talvez uma das mais utilizadas. Um vector, de um modo simplista, é um array dinâmico. Quer isto dizer que o tamanho deste não é fixo, podendo-se acrescentar ou remover posições com facilidade. No entanto, isto é um processo que poderá consumir muitos recursos do sistema se for utilizado incorrectamente uma vez que, sempre que a estrutura é alterada, o que o Java faz é criar uma nova estrutura com o tamanho desejado e copia os dados da anterior estrutura para a nova. O Vector apenas aceita como seus elementos Objectos, não podendo portanto guardar nele tipos primários de dados. Eis um exemplo de como utilizar a classe Vector:

O programa anterior teria como output o seguinte:
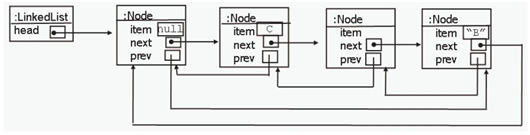
Linked List

A classe LinkedList é uma implementação da Interface List e, tal como o nome indica é uma lista ligada, ou seja, é uma lista em que cada nó da mesma tem informação sobre qual é o nó seguinte e o nó anterior. Esta também é uma estrutura dinâmica. Em comparação com o Vector, tem uma performance superior a nível de inserção/remoção de elementos no início e fim da lista, mas uma menor performance quando os elementos a remover/inserir são no meio da mesma.
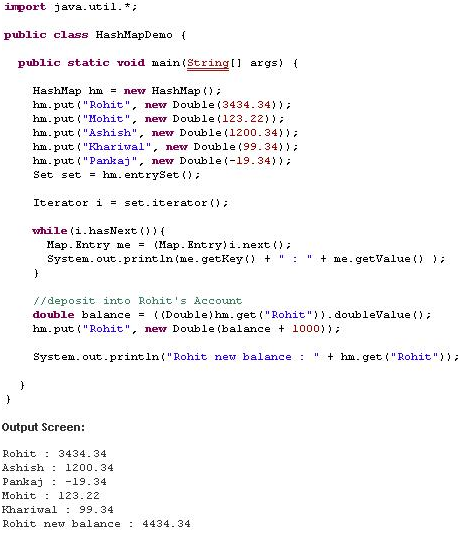
HashMap

A classe HashMap implementa a interface Map e, é nada mais do que a representação Java da estrutura de dados Hash Table. Esta estrutura serve para guardar pares <chave,valor>, sendo chave e valor do tipo definido pelo programador. As chaves devem ser únicas e, dada uma chave conseguimos obter o seu valor correspondente.

Estruturas Condicionais e Ciclos

O código Java, por defeito, será executado sequencialmente. No entanto, programas – minimamente – mais avançados, requerem uma execução condicional do código por nós construído. Para efectuar esses “malabarismos” podemos utilizar as instruções que enunciarei em seguida.
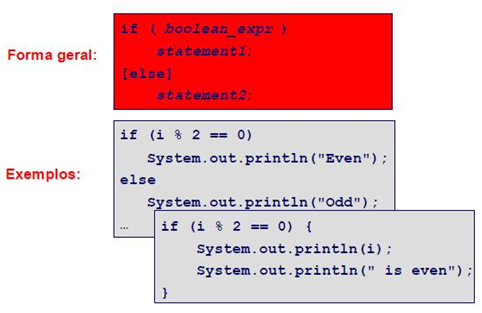
If..Else

Esta instrução valida uma instrução. Se ela for verdadeira executa o bloco de código do if, caso contrário entra no bloco de código do else. Note-se que não é necessário haver um else, o que não pode é haver um else sem um if.

É também possível criar uma sequência de instruções:
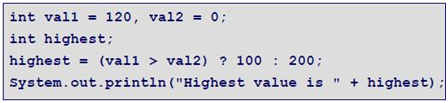
?:

Uma forma muito útil e minimalista de introduzir uma condição algures no nosso código é utilizando o operador condicional ?:, utilizando-se na forma boolean_expr ? expr1 : expr2.Se o resultado da expressão booleana for true, o resultado é expr1, senão, o resultado é expr2.
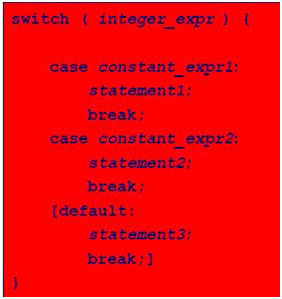
Switch..Case

O switch..case serve para avaliar uma expressão inteira e dependendo do resultado, realizar uma acção.

Deverão sempre ser utilizados breaks para saltar para fora do switch e devemos fornecer sempre uma opção default onde a condição entrará quando der um resultado que não se enquadre em nenhum dos cases (útil para quando acontece um resultado inesperado).
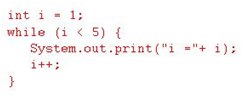
While

Existem 3 ciclos condicionais em Java, o while é o mais simples dos 3. O bloco de execução do while é executado enquanto uma condição for/não for verdade.
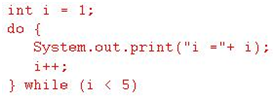
Do..While

O ciclo do..while faz a avaliação da expressão no fim do ciclo e não no início.
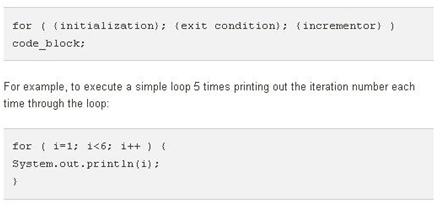
For

O ciclo for é amplamente utilizado em Java. Consiste numa inicialização, numa condição de paragem do ciclo e dum iterador sobre a variável inicializada.
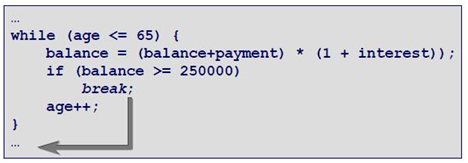
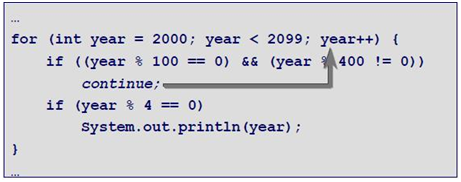
Continue e Break

Os ciclos, muitas vezes são utilizados em conjunto com as estruturas condicionais e, muitas vezes é útil definir uma de duas situações:

· Se se verificar uma determinada condição, o programa deverá sair do ciclo mesmo que este não tenha atingido o seu final – nesse caso deveremos utilizar o break;

· Se se verificar uma determinada condição, o ciclo deverá iterar de imediato, passando portanto à próxima iteração do mesmo – nesse caso utilizamos o continue.

Trabalho de Casa (Próxima Página)

Trabalho de Casa

Agora que já sabem os básicos da linguagem, está na hora de utilizar os vossos conhecimentos. No âmbito de todas as coisas que vos mostrei sintam-se à vontade para explorar mais sobre os assuntos apresentados. As sugestões de “trabalho de casa” que vos apresentarei, como qualquer programa informático tem N soluções distintas. O que vos peço é que, por agora – e isto para aqueles que já têm mais experiência –, não utilizem técnicas muito avançadas, limitem-se a utilizar ou, pelo menos não fugir mais do que o essencial, aos conhecimentos por mim apresentados nestes dois primeiros tutoriais. Seria interessante apresentarem as vossas soluções, para tal sugiro ziparem o vosso projecto, colocarem-no num qualquer free file server (aceito sugestões acerca de qual) e postem o link aqui. A minha sugestão de resolução, irei postar no próximo tutorial, ou seja, daqui a duas semanas.

Loja

A loja “Vendemos Tudo Baratinho – Pplware Shop” é a mais recente Loja da mundialmente conhecida multinacional “Vendemos Tudo Baratinho“.

Esta tem diversos funcionários. Estes funcionários são divididos por funções: caixa, armazém, limpeza, repositores, contabilidade, segurança, Team-Leader, Manager da Loja – cada secção tem no mínimo 2 e no máximo 3 funcionários e cabe-lhe a si contrata-los.

Cada uma dessas funções, corresponde a uma secção e cada secção tem um Team-Leader específico e único a essa secção – também caberá a si contratar os Team-Leaders, aplicando-se o mesmo ao Manager da loja.

A Loja tem a liberdade de escolher que produtos vender mas, tem de vender um mínimo de 15 produtos, de pelo menos 3 categorias diferentes: tecnologia, comida e vestuário – cabe-lhe a si definir com que produtos irá abastecer a loja.

Todos os produtos têm um stock mínimo de 5 unidades e máximo de 10 unidades, podendo este valor ser alterado. Quando se vender um produto, se este baixar do stock mínimo deverá ser automaticamente encomendado uma quantidade que faça com que o stock atinja o valor mínimo + 1.

A loja tem uma lista de clientes com os dados destes.

As vendas contêm a informação do produto, do vendedor e do cliente e são guardadas para consulta futura. Deve ser possível consultar as vendas por mês, por ano, por dia e entre duas datas, mostrando os produtos vendidos, quem os vendeu, quem os comprou e o total de euros conseguido.

As compras poderão ser feitas na loja ou online, caso sejam feitas online é necessário uma fila de espera em que só se procederá ao despacho da 2ª encomenda que chegou depois de despachar a 1ª, a 3ª depois de despachar a 2ª, etc.. ou seja, first in, first out (isto faz parte da política da empresa).

Bem, o exercício foi inventado por mim e nunca fiz nada do género que não sou professor mas, penso que dá para utilizar todos os conhecimentos adquiridos até agora. Poderá ainda ser útil o seguinte recurso: http://java.sun.com/javase/6/docs/api/java/util/GregorianCalendar.html.

Notas finais

Espero que tenham gostado deste segundo tutorial. Só vai haver mais um de iniciação, depois passarei a outros aspectos da programação em Java. O tempo para este tutorial não foi muito devido à época natalícia, ter uma família nesta altura não é fácil J ainda assim espero que corresponda ás expectativas de todos.

Photoshop – crie você mesmo cartões de Natal

Faça você mesmo seus cartões e presenteie amigos e parentes com as suas criações.

As festas de final de ano estão a chegar e não encontrou nenhum cartão que fosse do seu gosto? Pois então faça você mesmo o seu usando o Photoshop CS4! Além de poder usar as imagens que você quiser, o cartão ficará à sua maneira e a mensagem pode ser a que escolher. Personalize da capa ao conteúdo em passos muito simples.
Abra o seu Photoshop CS4 e mãos à obra!
Parte Exterior:
1) Crie um novo documento. No primeiro menu suspenso, escolha “International Paper” (Papel internacional) e em seguida A4. Utilize a folha A4 para que você consiga imprimir em casa.

2)  Tecle CTRL + R para activar as réguas. Agora, determine o meio da página com uma linha horizontal: clique na régua de cima e arraste. A linha azul clara deve ficar próxima do número 14 na régua vertical.

3)  Agora vá ao Google e pesquise as imagens que preferir para montar seu cartão. Se já as tiver no seu computador, é hora de abri-las. Se for à web, pode escolher entre copiar a imagem ou guardá-las no seu disco rígido.
4)  Vamos começar a cuidar dessas imagens que escolheu. Se elas tiverem fundo branco, primeiro apague a camada de fundo clicando com o botão da direita em seguida “Delete Layer” (Deletar camada). Depois, com a ferramenta varinha mágica (tecle W no teclado para usar o atalho), clique no branco do fundo para seleccionar e apagá-lo.

5)  Selecione tudo teclado CTRL + A e copie com CTRL + C. Volte à janela onde estava a montar o cartão e cole com CTRL + V. Se a sua imagem ficou pequena como esta, pode aumentá-la. Aperte CTRL + T e aumente para o tamanho que quiser; ainda pode girar a imagem colocando o mouse nos cantos e arrastando. Quando terminar, aperte ENTER.

6)  Feito isso, agora pode repetir este processo com outras imagens que tiver no seu computador.
7)  Agora vamos utilizar formas para dar cor e variedade de estilos no seu cartão. Seleccione a ferramenta para criação de formas geométricas. Mantenha o clique pressionado para ver as opções de formas e seleccione a que lhe agradar. Lembre-se de que a escolher a cor certa faz toda a diferença. Neste caso, vamos usar um vermelho escuro.


8)  Podemos usar várias imagens. Por exemplo, o enfeite de bola. Repita o Passo 4 para remover o fundo da imagem. Por hora vamos deixá-la pequeno para não chocar com a imagem grande da árvore. Tecle CTRL + J para duplicar a camada. Faça quantas vezes preferir só tome cuidado para não exagerar.
9)  Escolha uma delas (ou todas) para alterar a cor. Seleccione a camada correspondente à bolinha que você quer mudar a cor. Clique em “Image” (imagem), depois em “Adjustments” (Ajustes) e por último em “Color Balance” (Equilíbrio de Cores). Altere as opções até que a bolinha fique da cor que você preferir. Lembre-se que existem as opções “Shadow” (sombra), “Midtones” (Tons médios) e “Highlights” (Cores claras), será necessário alterar em cada uma delas para que o efeito se torne mais real.
Observação: você pode recortar partes de imagens para repeti-las no seu cartão. Seleccione coma ferramenta Laço para delimitar o pedaço da imagem que quer.


10) Depois, é só organizar da maneira que achar melhor. Agora vamos adicionar texto. Clique na ferramenta texto e seleccione as opções de cor e fonte que você achar melhor. Para este cartão, foi utilizada a fonte Candara, tamanho 54pt.

11) Para adicionar o gorro do Papai Noel no seu cartão, faça o mesmo processo que fez com as outras imagens. Depois que encontrar a posição correcta, pressione CTRL + T e em seguida o botão de transformação livre. A sua imagem deve ficar como o exemplo 2. Arraste os cantos e as hastes com bolinhas nas pontas para direccionar o gorro de modo que ele pareça estar em perspectiva.

Parte Interior:

1) Agora que já temos a capa criada, vamos desenvolver a parte interior do cartão. Crie uma nova página e repita os passos 1 e 2 da parte exterior.
2) Importe as imagens que escolher e recorte-as utilizando o passo 4 da parte exterior.
3) Como se trata da parte em que vai escrever, lembre-se de manter a opacidade baixa. Faça as alterações necessárias na imagem usando o passo 4, em seguida seleccione a camada e na janela “Layers” (Camadas) coloque o valor do campo “Opacity” (Opacidade) em 50% ou menos.

4) No interior, pode dar um tratamento especial à imagem. Clique em “Filters”, “Artistic” e depois em “Cutout” (veja a imagem). Aceda à mesma opção de filtros mas clique em “Poster Edges” (Posterizar bordas), veja a imagem para configurar. Por último, vá a “Filters”, “Distort” (Distorcer) e depois em “Diffuse Glow” (Brilho difuso). A sua imagem deve ficar parecida com a da imagem abaixo. Não esqueça de reduzir a opacidade.


5) A ferramenta livre de transformação também funciona em formas geométricas. Pressione CTRL + T e o botão para a transformação citado no passo 11 da parte exterior e modele à vontade.
6)    Para finalizar, se quiser crie linhas com a ferramenta Texto para escrever sua mensagem à mão. Clique e arraste para criar uma caixa de texto e faça vários traços por baixo (underline). Pressione CTRL + T e gire para ficar do formato do seu cartão e aperte ENTER. Você ainda pode digitar a sua mensagem, se preferir.

Repita os passos quantas vezes achar necessário. A quantidade de repetições dependerá da quantidade de imagens que decidir usar. Quando terminar, salve em JPG e imprima! Lembre-se apenas de virar a folha de modo que o lado em branco fique para cima. Assim a sua impressão frente e verso ficará correcta. Use sua criatividade e faça vários cartões de natal para distribuir entre seus amigos e familiares, será uma boa forma de presenteá-los.

Se preferir, existem outras maneiras de fazer seu cartão de Natal. Os programas MonkeyPhoto e Photo Card Maker são boas opções para quem prefere fazer seus cartões com o auxílio de programas específicos. E pra quem já os quer prontos, os Cartões de Natal: Árvore 2 e Cartão de Natal: Árvore 3 são outras opções bastante práticas.