Dica: Como somar horas no Excel
Criado por Pedro Pinto em 18 de Março de 2010 | 55 comentários
Um dia destes tive a necessidade de somar um conjunto de número de horas, para uma determinada actividade que realizei. Abri o Excel, incluí as horas que pretendia por célula e mandei fazer o SUM (=SOMA) do conjunto das células. O resultado da soma total era simplesmente “estranho”.

Como é habitual, gosto de partilhar estas pequenas dicas com os nossos leitores pois nunca se sabe quando necessitamos de recorrer a elas.
O Somar horas parece inicialmente um processo simples mas, para que realmente funcione temos de realizar alguns procedimentos adicionais.
Vamos então pegar no exemplo anterior, vamos à célula da soma e carregamos no botão do lado direito e escolhemos Format Cells

Vamos ao separador Number, escolhemos Custom e no Type colocamos [h]:mm
Neste exemplo vamos apenas ficar com a hora e os minutos.

Dá-mos OK e o resultado será o seguinte (agora correcto !!)

IE9 Platform Preview
Os rumores sobre o IE9 são cada vez mais audíveis e era de esperar uma amostra do que esta nova versão poderia trazer de novo à cerrada frente competitiva. A espera ainda não terminou, mas a Microsoft “abriu o livro” e disponibiliza algumas linhas mestras do caminho a seguir no desenvolvimento do que será o mais avançado browser de sempre.

Foi apresentada hoje na MIX, uma antevisão do futuro browser da Microsoft. É ainda e só uma versão de testes mas que mostra de forma clara todas as melhorias e novidades que estão para chegar. O Internet Explorer 9 Platform Preview é apenas uma versão de testes. Ainda só temos acesso ao motor de renderização. Nenhuma da interface futura ou passada está presente.
De qualquer forma temos já acesso ao que serão as capacidades do IE9. E pelo que pudemos ver as melhorias são grandes e muitas novidades estão presentes.
Performance
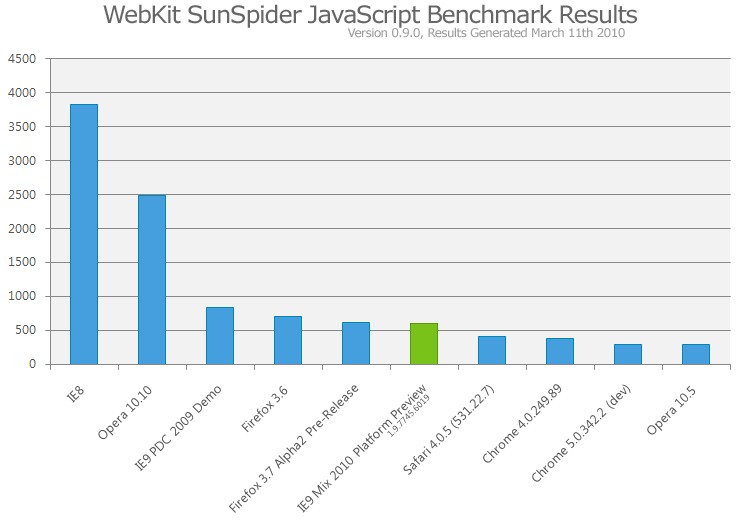
O IE 9 introduz um novo motor de scripting, conhecido como ‘Chakra’, que consegue ganhos significativos em termos de performance e melhor integração com todos os subsistemas. De facto, e de acordo com teste de benchamark SunSpider da Webkit.org, o IE9 Platform Preview consegue ser mais rápido que a versão 3.6 do Firefox.
Finalmente a abertura da Microsoft para introdução dos novos standards ajudou também a melhorar a performance global,permitindo aos programadores aceder de forma mais rápida ao DOM (Document Object Model), a utilização de CSS e a outras funcionalidades, o que vai significar que o AJAX e outras aplicações WEB vão correr de forma mais rápida.
Progressos na Interoperabilidade
A equipa do Internet Explorer tem-se focado em fornecer capacidades de interoperabilidade para quem desenvolve páginas e plataformas Web. Não é desejável ter de estar a altera-las vezes sem conta. Por esta razão têm preocupado em tornar os seus browsers o mais fieis aos standards Web.
HTML5
As novidades do HTML5 foram introduzidas inicialmente no IE8 com o suporte para DOM Store, cross-document messaging, navegação AJAX navigation entre outras.
Novidades HTML 5 no IE9
- Suporte para parsing de XHTML
- API de selecção de texto
- Outras funcionalidades tais como as tags <audio> e <video>.
CSS3
O IE9 Platform Preview adiciona as seguintes funcionalidades CSS3:
- Rounded corners através da propriedade border-radius
- Suporte para as propriedades opacity e RGBA color model
- Selectors API para permitir aos programadores a utilização de padrões de pesquisa para detecção de elementos e aplicar CSS especifico a esses elementos
- No teste CSS3 Selectors, da CSS3.info, o IE9 Platform Preview obteve um resultado de 100% (578/578). Valor bem mais elevado que os 60% do IE8 (349/578)
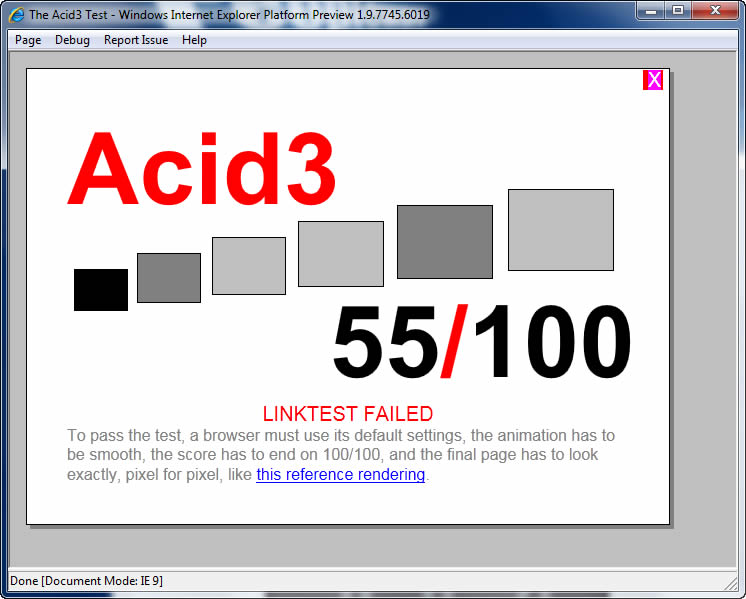
Resultados Acid3
Os resultados dos testes Acid3 desta nova versão do IE eram muito baixos, tendo obtido 32 em 100. No entanto com a continuação dos trabalhos de desenvolvimento e através da incorporação de novos standards e de melhorias o IE 9 atinge já um resultado de 55 em 100.
Naturalmente que a Microsoft irá continuar a trabalhar no sentido de melhorar este resultado ao mesmo tempo que tratará de satisfazer as necessidades de todos os que desenvolvem aplicações para a Web.
Novas funcionalidades SVG
A Microsoft introduziu no IE9 o suporte para Scalable Vector Graphics (SVG). O SVG é uma uma linguagem XML para descrever de forma vetorial desenhos e gráficos bidimensionais. O IE9 Platform Preview suporta já as seguintes funcionalidades SVG:
- Estrutura do documento, incluindo metadata e funcionalidade de expansão
- Formas básicas (rectângulos, círculos, elipses, linhas e poligonos)
- Sistema de coordenadas, transformações e unidades
- Caminhos, incluindo capacidades totais para o caminho do elemento e atributo ‘d’
Melhorias Document Object Model (DOM)
- Novo suporte para DOM Level 2 Core namespaces, ranges e views
- Suporte para eventos DOM Level 3 Events
- Melhorado o suporte para DOM Level 2 Style e características HTML
Melhorias para programadores
O separador Network irá permitir aos programadores capturar, mostrar e gravar os pedidos web. Isto irá permitir a quem desenvolve páginas web ver e compreender de forma mais clara o que está a acontecer sem terem de instalar ferramentas complexas. Tal como o resto das ferramentas vem incorporado de origem no browser.
HTML5 GPU
A ideia base do HTML5 assenta na possibilidade de construirmos aplicações web ricas em grafismos com capacidades acrescidas. O GPU-powered HTML5 vem permitir que utilizemos as capacidades presentes nos GPU’s (Graphics Processing Units) para fazer o processamento gráfico que os browsers necessitam, libertando assim oCPU. No IE9 esta funcionalidade vai estar presente. Podemos assim fazer uso das placas mais modernas e muito mais capacitadas, libertando recursos nos nossos PC’s.
- O GPU-powered HTML5 consegue desenhar e manipular de forma melhor imagens SVG ou BMP.
- Assim teremos mapas com scroll mais suave, fontes com maior detalhe e gráficos 3D mais ricos sem termos de recorrer ao CPU.
- O IE9 Platform Preview necessita de suporte Direct2D, uma funcionalidade introduzida com o Windows 7 e que pode ser conseguida com uma actualização nos sistemas operativos menos recentes.
Agora que já foram apresentadas todas as novidades que podem encontrar no Internet Explorer 9 Platform Preview só nos resta aconselhar-vos a descarregarem a ferramenta e a testarem-na. Encarem-na como uma montra do que será o IE9. Ainda não está completo, mas o que o fará um bom browser já está lá.
 Download: IE 9 Platform Preview [14.26MB]
 Homepage: IE9 Test Drive
Como será a Internet no futuro?
A Word Wide Web, este serviço que nos é tão precioso, foi criada há 20 anos, pelo cientista Sir Timothy John Berners-Lee, de modo a que toda a informação de tornasse simples de dividir e partilhar com colegas.
A Internet, desde o seu inicio, até aos dias de hoje, já sofreu uma grande evolução. Permite-nos, hoje, com a facilidade de um clique, aceder a (quase) todo o lado, e entrar em contacto com (quase) qualquer pessoa de qualquer ponto do mundo. Penso que muitos de nós nem temos noção da imensidade daquilo que ela possibilita e pode proporcionar.

No entanto, estamo-nos a deparar com várias outras mudanças e inovações, como por exemplo, acesso a uma internet mais rápida, em hardware mais sofisticado e pequeno.
O jornalista especializado da BBC, Rory Cellan-Jones, obteve as seguintes informações à conversa com cientistas que tentam prever e antecipar o futuro da Web.
Em baixo são apresentadas algumas dessas previsões, talvez as mais relevantes.
Uma Rede mais Inteligente

Na óptica dos cientistas, a Internet está a caminhar no sentido de se tornar numa rede muito mais inteligente.
O objectivo será, inserirem-se mais dados online, e ensinar a rede a interpretá-los de diversas maneiras, desta forma quando o utilizador, por exemplo, necessitar de efectuar uma pesquisar e procurar online o que procura, os resultados podem ser muito mais precisos.
O investigador da Universidade de Southampton, Nigel Shadbolt, sugere “pense numa rede como um grande banco de dados, descentralizado, que alberga de tudo, desde horários de autocarros, lugares para comer e sites que nos informam onde encontrar a melhor oferta. Esta rede irá oferecer um sistema de buscas muito mais refinadas, como ‘grãos mais finos”
Desta forma, quando digitássemos “próximo autocarro para Lisboa”, não nos iria aparecer apenas várias páginas com a informação referente à informação digitada, mas sim a resposta real como por exemplo “O próximo autocarro para Lisboa desta rede, é às X horas, daquela rede é às Y horas, etc.”.
Uma Rede Omnipresente

Shadbolt faz também parte de uma campanha liderada pelo criador da Web, que tem como objectivo, convencer o público e órgãos privados a disponibilizarem a maior quantidade possível de dados online.
O nosso senso comum indica-nos que, para pesquisarmos, temos que, a partir de um teclado, inserir os dados num browser. Mas Wendy Hall, outro cientista da Universidade de Southampton, indica que isto está prestes a mudas, pois “vamos conseguir aceder à Internet onde quer que estejamos, a fazer seja o que for, sem precisar de nenhum aparelho. Podemos vê-la a partir dos óculos, ou por meio de algum visor que passaríamos a usar”, por exemplo.
Assim sendo, o browser não tardará a desaparecer, e iremos interagir com a Web por meio de aplicativos, como os smartphones.
E também muitos dos objectos que fazem parte do nosso quotidiano estarão ligados à Internet, como é o caso dos nossos carros, casas com sensores, monitorização cardíaca, entre outros, o que resultará numa grande e crescente disposição e fluxo de dados online para o utilizador desta rede.
Todos estes dados serão então armazenados na chamada “cloud”, ou “computação em nuvem”, que são os enormes bancos de dados existentes na Web.
Para Andrew Herbert, do laboratório da Microsoft em Cambridge “de certa forma, esta rede está-se a tornar num grande computador.”
Uma Rede nos Telemóveis
Como muitos de nós estamos já habituados a ver, os telemóveis de hoje já vêm equipados para terem Internet, e todos os serviços que um computador pode fornecer. Desta forma, pode-se afirmar, que o futuro da Internet está nos telemóveis. Até porque, muitas pessoas que, no futuro, irão conhecer a Internet, já não a irão conhecer como muitos de nós, num computador, a partir de um modem, mas sim num sofisticado smartphone.
Tal como tudo, este cenário pode ter os seus pontos menos fortes, pois tal como indica Benoit Schillings, da empresa Myrias Software “Vai-nos tornai ainda mais dependentes da rede. Partimos do princípio que é algo que temos connosco sempre. Então quando perdemos o telemóvel, é um desastre, e agora é uma parte essencial, que mostra como os seres humanos funcionam. ”
Será esta uma Rede Sustentável?

Esta ideia de rede inteligente, e a constante evolução da Internet, é realmente muito cativante, mas temos também que pensar se não haverá consequências menos boas para a vida do ser humano.
Andy Hopper, investigador da Universidade de Cambridge, lidera um programa designado “Computação pelo Futuro do Planeta”, e mostra uma perspectiva optimista em relação ao futuro da Web, pois para ele, esta evolução será marcante para o planeta e uma parte indispensável para a civilização. No entanto, e para isso, está-se à procura de meios e formas para que estas tecnologias de computação possam também ser usadas para controlar e/ou reduzir os custos e consumos de dióxido de carbono.
Exemplo disso está num dos alunos de Hopper, que visa criar um monitor pessoal de energia, com o intuito de usar esta nova “rede de objectos”, para juntar todo o tipo de informações de sensores online, de forma a realizarem a manutenção do uso da energia utilizada.
Quem irá controlar esta Evolução?

Ao mesmo tempo que vemos esta evolução acontecer a passos largos, perguntamo-nos “quem a irá controlar? Será que irá parar? Onde irá parar?”
Apesar de muitos termos noção que com este forte crescimento da Internet, ele poderá vir a perder estabilidade, o líder do desempenho da rede da Arbor Networks, Craig Labowitz, indica que a web vai continuar a depender das grandes empresas que agora controlam o tráfego.
Labowitz afirma que, nos últimos 3 anos, a participação da Google no tráfego global da Internet aumentou de 1% para 10%.
Desta forma a pergunta fica no ar “quem irá controlar o futuro da Internet?”.
Desde sempre que esta rede cresceu sob a alçada de princípios e parâmetros acertados mutuamente, mas agora teme-se que as grandes empresas, ou uma só grande empresa tome conta deste mundo “virtual” e ponha me causa e inovação e a liberdade de expressão.
Wendy Hall afirma mesmo que “não há garantias de que esta rede irá continuara a evoluir de forma gratuita e com parâmetros universais. Se perdermos isso, ou se estes parâmetros forem superados por preocupações corporativas, estão esta rede vai mudar drasticamente”.
A pergunta continua no ar.. Como será a Internet no futuro?
Crackar o Internet Explorer 8 num Windows 7? Dois minutos chegam
No Pwn2Own, um hacker quebrou, em dois minutos, a segurança de um Internet Explorer 8 instalado no Windows 7. Não se riam os fãs da Apple: iPhone e Safari passaram pela mesma “vergonha” neste concurso de hackers.
O Pwn2Own é um concurso direccionado a hackers que é organizado em simultâneo com a conferência CanSecWest, que se realiza anualmente em Vancouver, Canadá.
Mais uma vez o concurso provou que nenhuma das “vítimas do costume” está a salvo do engenho dos “suspeitos do costume” – nem mesmo o recém-lançado browser Internet Explorer 8, quando usado num Windows 7 de 64 bits, escapou.
De acordo com a Computerworld, um especialista holandês e outro alemão ganharam prémios de 10 mil euros depois de assumirem o controlo de uma máquina com a versão mais recente do Windows.
O hacker holandês, que dá pelo nome de Peter Vreugdenhil, surpreendeu a plateia ao combinar vários métodos de ataque para superar as barreiras de segurança criadas pelos sistemas DEP (data execution prevention) e ASLR (address space layout randomization), da Microsoft.
Com esta combinação de técnicas de ataque, que já se encontra publicada na Web , Vreugdenhil precisou apenas de dois minutos para ganhar o prémio na categoria de “ataques ao IE8 no Windows 7” – mas demorou mais de meia hora para alcançar o mesmo feito com o Firefox 3.6 (a correr num Windows 7 de 64 bits), arrecadando mais uma vez 10 mil dólares de prémio.
A Microsoft já informou que vai investigar as vulnerabilidades.
O concurso de Hackers premiou ainda com 10 mil dólares Charlie Miller, que assumiu o controlo à distância de um MacBook Pro Air, a partir de uma vulnerabilidade do browser Safari.
Miller não é um novato no concurso e já em 2009 ganhou 5000 dólares com um ataque ao Safari, lembra a Cnet.
Ainda no reino da Apple, resta lembrar que nem a “jóia da coroa” – que é como quem diz, o iPhone – se livrou das partidas dos peritos de segurança.
E ao contrário do que possa parecer o método usado não foi assim tão diferente do que costuma acontecer com as máquinas que correm outros sistemas operativos.
A Vincenzo Iozzo e a Ralf Philipp Weinmann bastou o desenvolvimento de um código malicioso, durante duas semanas, e encaminhar um iPhone para um site que distribui esses códigos para aceder aos SMS que se encontram no terminal.
AudioGrail 6.17.2.166
O AudioGrail (K-MP3) é o que se pode chamar de canivete suíço quando o assunto é ficheiros de áudio (MP3, MPC, OGG…).

Esta ferramenta consegue facilmente renomear e classificar (classificação do tipo: nome do artista, nome do álbum, número da faixa, nome da faixa) os seus ficheiros de forma automática.
Possibilita para além disto, analisar a qualidade do áudio, organizar os ficheiros no disco, criando para isso uma “pasta mágica” para um rápido acesso às colecções áudio. Nesta versão pode também contar com outras ferramentas, igualmente úteis, por exemplo a ferramenta USB para PC que lhe permite transferir os ficheiros de áudio, com todos os dados informativos, de dispositivos USB para o seu PC.

Destacamos:
- Suporta: MP3, OGG, MPC, APE, AAC, FLAC e ficheiros WavPack
- Renomeação e Tagging automático de albuns(ID3Tag V1 & V2 tags, Vorbis (Ogg))
- Editor de tags um a um com queue (para edição de multipolos ficheiros).
- Remoção em massa de tags
- Organizador de ficheiros
- PEsquisa de ficheiros duplicados
- Criador e analizador de lista de reprodução(Formatos suportados: m3u, pls e xpl)
- Analizador de qualidade
- Suporte para vários idiomas
Mas muitas outras estão à espera de quem lhes possa dar atenção. Se gosta dos seus ficheiros de áudio organizados, então gostará certamente de experimentar esta ferramenta.
Licença: Freeware
Sistemas operativos: Windows XP/Vista / 7
Download: AudioGrail 6.17.2.166 [1.67MB]
Homepage: KC Software


jDigiClock – Digital Clock (HTC Hero inspired).
jDigiClock
Digital Clock (HTC Hero inspired)
Author: Radoslav Dimov
Version: 2.1 (Changelog)
Download: jdigiclock.zip
Licence: Dual licensed under the MIT and GPL licenses.
Contents
Introduction
jDigiClock is a jQuery plugin inspired from HTC Hero Clock Widget.
Examples


Tue, 16 Mar
0°C
![]()
![]()
Update Weather …
Getting started
To use the jDigiClock plugin, include the jQuery library, the jDigiClock source file and jDigiClock core stylesheet file inside the <head> tag of your HTML document:
<link rel="stylesheet" type="text/css" href="css/jquery.jdigiclock.css" />
http://lib/jquery-1.3.2.min.js
http://lib/jquery.jdigiclock.js
To setup jDigiClock, add the following code inside the <head> tag of your HTML document:
    $(document).ready(function() {
        $('#digiclock').jdigiclock({
            // Configuration goes here
        });
    });
jDigiClock accepts a lot of configuration options, see chapter “Configuration” for further informations.
jDigiClock expects a very basic HTML markup structure inside your HTML document:
Configuration
jDigiClock accepts a list of options to control the appearance and behaviour of the Digital Clock. Here is the list of options you may set:
Property
Type
Default
Description
clockImagesPath
string
“images/clock/”
Clock images path.
weatherImagesPath
string
“images/weather/”
Weather images path.
am_pm
boolean
false
Specifies the AM/PM option.
weatherLocationCode
string
“EUR|BG|BU002|BOURGAS”
Weather location code (see: WeatherLocationDatabase.txt).
weatherMetric
string
“C”
Specifies the weather metric mode: C or F.
weatherUpdate
integer
0
Weather update in minutes.
proxyType
string
“php”
Specifies proxy type: php or asp (see: README.txt).
Compatibility
jDigiClock has been tested and works on the following browsers:
- Internet Explorer 7 (PC)
- FireFox 3.5 (PC/Linux)
- Google Chrome 3.0 (PC)
- Safari 4.0 (PC)
50 Fresh JavaScript Tools That Will Improve Your Workflow – Smashing Magazine
JavaScript is an integral part of the RIA revolution. JavaScript allows developers to create rich and interactive web interfaces and establish asynchronous communication with servers for constantly up-to-date data without a page refresh.
Many things that were once accomplished using Flash objects can now be built using JavaScript – with the added benefit that it is free, typically more web and mobile accessible under most circumstances using best practices for development techniques, and without the need to use proprietary software for development.
Though JavaScript has been around for a while, new tools, techniques, and information are constantly being pumped out to continually push the technology into greater heights. In this article, we wish to share with you a huge list of fresh and new tools and resources that JavaScript developers will find useful and informative.
Here are a few other posts that you might find interesting:
[By the way: The network tab (on the top of the page) is updated several times a day. It features manually selected articles from the best web design blogs!]
Useful JavaScript Tools
FireUnit
Unit testing is an integral part of building high-performance and efficient web applications. John Resig (creator of jQuery library) and Jan Odvarko have developed an excellent Firefox/Firebug extension called FireUnit which gives developers logging and testing capabilities via a simple JavaScript API. For those interested in the tool, you should also read Odvarko’s post detailing the usage of FireUnit.

Sugar Test
SugarTest makes it easy to write elegant and understandable JavaScript tests. Its API is inspired by both RSpec, Shoulda and jQuery. It works as a DSL running on top of JsUnitTest.

JS.Class: Ruby-style JavaScript
JS.Class is a library designed to facilitate object-oriented development in JavaScript. It implements Ruby’s core object, module and class system and some of its metaprogramming facilities, giving you a powerful base to build well-structured OO programs.

JSON Formatter and Validator
The JSON Formatter was created to help with debugging. As data expressed as JSON is often written without line breaks to save space, it became extremely difficult to actually read it. This tool hopes to solve the problem by formatting the JSON into data that is easily readable by human beings.
Faux Console: Simulating a Firebug, Safari or Opera debugging in IE
Browsers like Safari, Opera and Firefox use the Firebug extension that offers a developer a comfortable way to output debugging information using the console.log() command. Microsoft Internet Explorer does not support this though – Faux Console is a small JavaScript that you can embed in the document to have a basic debugging console in IE.
JS Bin
JS Bin is a web application for testing and debugging JavaScript and CSS collaboratively. You input your source code and save it to a publicly-accessible URL which you can then share to your fellow developers or in social networking outlets like Twitter or Facebook groups. Be sure to check out the video introduction to see JS Bin in action.

PHP.JS
PHP.JS is an open source project in which we try to port PHP functions to JavaScript. By including the PHP.JS library in your own projects, you can use your favorite PHP functions client-side.
Page Speed
Page Speed, released by Google, is a Firefox/Firebug extension very similar to YSlow that evaluates your web pages for performance. Read more about Page Speed best practices to see what aspects of a web page are being evaluated. YSlow and Page Speed are based off Steve Souder’s work (who worked for Yahoo! and now works for Google).

prettyPrint
prettyPrint is an in-browser JavaScript utility for dumping variable information, inspired by ColdFusion’s built-in cfdump utility function. Using prettyPrint on JS objects, variables, and arrays will give you a large array of information about them, which you can then use for debugging purposes or simply for gathering data about them for documentation.

Spket IDE
Spket is an excellent toolkit for JavaScript and XML development. It has a robust and intuitive GUI, and integrates with popular and powerful JavaScript/Ajax libraries such as Y!UI and jQuery. Its JavaScript Formatter feature gives you unparalleled control and standardization for you or your team’s JavaScript code formatting standards.

Obtrusive JavaScript Checker
Obtrusive JavaScript Checker, created by Robert Nyman, is a tool for finding inline JavaScript on web pages. It highlights elements that have inline JavaScript properties and provides a summary report when you mouse over them. The tool is available as a Firefox extension or a Greasemonkey script.
Highlight.js
Highlight.js highlights syntax in code examples on blogs, forums and other web pages. The tool works automatically: it finds blocks of code, detects a language and highlights it accordingly.

Javascript Compressor
Javascript Compressor is a web-based tool for compressing your JavaScript to reduce their file sizes. It works by removing unnecessary characters (such as extra tabs and spaces). Developers who use the tool to compress their code can also use the decoding feature to uncompress their source code. It also obfuscates your code, making it harder to read – which can be desirable if you want to delay prying eyes from analyzing your publicly-available code base.

Firediff
Firediff is a Firefox/Firebug extension that allows you to track changes in the DOM and CSS. By logging these changes, you can gain information about how web applications work, and what elements (and what properties) are being altered by way of DOM manipulation.

RockStar Web Profiler
RockStar Web Profiler (aka Razor) logs and profiles information about client-side performance. It provides developers with a console for analyzing the data gathered by the tool. Check out the RockStar Web Profiler presentation to get an overview of its many awesome features.
bookmarklet maker
This plain and simple web tool allows you to create JavaScript-based bookmarklets. Usage is simple: simply copy and paste your source code into it and it will output the processed code in the lower pane.

Tiny JS
Tiny JS is an online directory of small but powerful plugins for popular JavaScript/Ajax libraries (MooTools, jQuery, and YUI at the moment). Its aim is to hunt down and feature lightweight plugins that give you a lot of bang for the buck.

JSCharts
JS Charts is a free JavaScript based chart generator that requires little or no coding. With JS Charts drawing charts is a simple and easy task, since you only have to use client-side scripting (i.e. performed by your web browser). No additional plugins or server modules are required. It’s enough to include the scripts, prepare your chart data in XML or JavaScript Array and your chart is ready.
Glimmer
Glimmer is an interactive design tool for incorporating slick JavaScript-based animation effects using the jQuery library. Glimmer comes with a wizard-style user interface which can reduce the amount of coding that you have to write manually.

JSSPec
A testing environment for JavaScript that runs on IE 6+, Firefox 2+ and Safari 3+. The tool shows differences between expected value and actual value, displays the failed line exactly and supports conditional execution. Released under GNU and available for free download.
CodeRun Code Search
CodeRun’s Code Search tool lets you search and view user-submitted Ajax, PHP, and .NET source code. Once you’ve found a script or project that you’re interested in, you can edit it via their web-based IDE without having to download the project locally.
BaseJS: A Mobile (Safari) Javascript Framework
a simple, lightweight framework created specifically for Mobile Safari (perfect for iPhone development).

MochaUI
MochaUI is a web-based tool for building web application interfaces built on top of the MooTools JavaScript framework. Jump right in by taking MochaUI for a spin in their demo page.

Utility Libraries and Components for JavaScript
narwhal
narwhal is a server-side JavaScript library following the ServerJS standard. Developers can create and share “packages” for website widgets, site features, programming patterns, in a similar fashion as PEAR for PHP.
uploadify
uploadify is a useful jQuery plugin for dealing with file uploads. It’s powered by a simple PHP script for handling the server-side stuff. Be sure to check out the uploadify demos to see the plugin in action.
Blackbird
Blackbird lets you log messages in JavaScript using a simple and intuitive JS-based API. The library also provides you with an attractive console GUI for viewing and analyzing messages. No more annoying alert() functions to see your objects’ contents (which can be frustrating for printing out array values) and for setting breakpoints.

Booklaylet
Booklaylet is a JS library for letting you easily deploy your bookmarklet applications. The implementation is dead simple: take the Booklaylet source and modify it to point to your app’s URL.
JavaScripTools
JavaScipTools is a collection of useful JS components, functions, and classes with the aim of addressing some of the more common web developer tasks such as parsing and formatting of data types (i.e. date and time). It also comes with a dynamic table function for creating sortable HTML tables.
Doodle.js
HTML 5’s Canvas element gives developers a way to draw stuff on web pages programmatically. Doodle.js is a utility library/framework for working with more complex and robust Canvas drawing processes. Check out Spiral Pattern demo and the Marbles in Space (3D simulation) demo in a browser that already supports Canvas to get a feel for how Doodle.js works.

liteAJaX
liteAJaX is a lightweight JavaScript class for working with AJAX. This library is perfect for projects that don’t use a JavaScript/Ajax framework or projects that don’t need a more robust and fully-featured framework.
Burst
Burst is a vector animation engine for HTML 5’s Canvas element. With it, you can create smooth, Flash-like animation effects for browsers that support Canvas.

JSTestDriver
JSTestDriver is a Java-based framework for creating unit test following Test-Driven Development philosophies and best practices. Be sure to check out this video demonstration of JSTestDriver in action.
jsPDF
This library allows you to create PDF’s using nothing else but JavaScript. See the jsPDF demo page to see the library in action.
Useful JavaScript Libraries
GlassBox
GlassBox is a beautiful and refreshing take on modal windows that creates an interesting feeling of transparency as if you were looking through a glass. Check out the example page to see different types of GlassBox implementations.

jQuery TOOLS
jQuery TOOLS is a toolbox that gives developers some of the most popular UI design patterns at their disposal in an easy-to-use manner. View some of the things you can do with jQuery TOOLS in the project’s demo page.

Moousture
Moosture is a JavaScript library for dealing with mouse gestures, written on top of the MooTools framework.
Tablecloth
Tablecloth is a lightweight and unobtrusive JavaScript library for styling and adding dynamic user interaction to HTML tables.

Unobtrusive Table Actions Script
This simple and lightweight library brings together a set of common and useful functions for dealing with HTML tables, such as zebra-striping rows, highlighting rows on mouse over, and column highlighting.
LivePipe
LivePipe is a set of widgets and controls for adding common user interaction components to web applications using the Prototype JavaScript framework.

JavaScript Graphical / Virtual Keyboard Interface
This JavaScript package adds a virtual keyboard interface into web pages.

Tipmage
Tipmage is a JavaScript class for handling tooltips and annotations on images, similar to annotated images on Flickr.

qGallery
qGallery is a simple but beautiful JavaScript for creating image galleries with smooth and slick animation effects.

Educational JavaScript Resources and Tutorials
Ajax Frameworks Decision Center
For large companies, committing to a JavaScript/Ajax framework such as Prototype, MooTools, or jQuery is a big decision because it affects a large amount of employees and will dictate the direction of the company’s client-side interaction and RIA development philosophies. Using the Ajax Frameworks Decision Center gives you an organized, quantitative, and thorough method for making a solid decision.

jQuery vs MooTools
This single-page site by MooTools Dev Team member Aaron Newton is a comparative look into jQuery versus MooTools.
Ajax Framework Analysis Results
This analysis of popular JavaScript/Ajax frameworks (Dojo, Ext JS, GWT, YUI) is a great resource for gathering research data for your own frameworks: the analysis matrix factors in criteria such as scalability, extensibility, quality and quantity of documentation, and much more. You can adapt this matrix, tweak their weights, and modify criterions to help you decide which JS framework to go with.

Sexy Drop Down Menu w/ jQuery & CSS
In this tutorial, you’ll learn how to create a multi-tiered drop down menu with the use of the jQuery library.

Easy Display Switch with CSS and jQuery
This tutorial outlines a method for using jQuery to smoothly-transition into different viewing modes, which can be helpful in image galleries.

Create a Slick and Accessible Slideshow Using jQuery
This is a step-by-step jQuery tutorial that I wrote for creating a simple and slick slideshow that can be adapted to display different content types. Check out the demo page to see the slideshow in action.

Learning Advanced JavaScript
John Resig has a slideshow-style, web-based tutorial on advanced JavaScript development. It is a wonderful stepping-stone for JavaScript developers ready to make the leap into RIA development using JavaScript.

JavaScript tests & Compatibility tables
This resource is a well-organized cheatsheet for JavaScript methods cross-browser compatibility backed by sample tests that you can run to see how they work (or don’t work) in your browser.

Code Conventions for the JavaScript
On this page, you can find suggested coding conventions for JavaScript. It is important to note that there is no one correct convention, but this is a great place to start developing your own.
Converta uma imagem de texto em texto “editável”
O mundo digital, a cada dia que passa, ocupa mais espaço nas nossas vidas. Exemplo disso é a forma de lidarmos com os documentos que nos servem em muitos serviços e até na nossa profissão. A forma tradicional de lidarmos com esses documentos está paulatinamente a perder terreno. Um texto numa folha de papel é hoje um entrave para muita gente, tendo em conta que enviar um fax – que em tempos atalhava os processos burocráticos – está em desuso e pode dificultar mesmo os serviços administrativos. É a era digital que nos obriga a usar a web e o mail como principais meios de comunicação.
Mas então o que fazemos às resmas de papel que ainda circulam na nossa mesa de trabalho?
A ideia é digitalizar… ou melhor, “fotografar” e converter o texto do papel em texto “editável”. Podemos para isso usar um OCR.
OCR – Reconhecimento Óptico de Caracteres
A técnica de reconhecimento de caracteres facilita o transporte do texto e das imagens do papel para o editor de texto. Existem várias aplicações que podemos usar, falei aqui numa aplicação extraordinária, para este serviço, o Abbyy FineReader. Mas é pago e bem pago… no entanto vale cada euro gasto.
Claro que nem todos precisam de uma ferramentas destas todos os dias. Existem aplicações gratuitas e existem serviços onde podemos fazer esta conversão.
Hoje deixo-vos três interessantes serviços online que podem usar para a conversão.
Free OCR
Este serviço é bastante rápido e eficaz. É um serviço gratuito online de OCR (Reconhecimento Óptico de Caracteres). Com ele pode extrair o texto a partir de qualquer imagem que forneça. Sem registos necessários nem colocação de qualquer email, basta enviar os seus ficheiros em formato imagem. Free-OCR retirar o texto de um JPG, GIF, BMP TIFF ou PDF (somente da primeira página).
A única restrição é que as imagens não devem ser maiores do que 2MB, não superiores a 5000 pixels e há um limite de 10 uploads de imagens por hora.
Free-OCR pode manipular imagens com texto multi-coluna e também suporta vários idiomas: búlgaro, catalão, checo, dinamarquês, holandês, Inglês, finlandês, francês, alemão, grego, húngaro, indonésio, italiano, letão, lituano, norueguês, polaco , português, romeno, russo, sérvio, eslovaco, esloveno, espanhol, sueco, filipino, turco, ucraniano e vietnamita.
OCR Terminal
OCR Terminal é um serviço online OCR que permite converter PDF para Word e imagens JPEG para documentos Word. Uma das suas características relevantes prende-se pela disciplina na formatação, este retém exatamente a formatação e layout dos ficheiros originais. Exporta para Word, PDF, TXT e RTF.
Neste caso já necessita de se registar e para usar o serviço gratuito tem uma limitação de 20 páginas por mês.
Google Docs OCR
Google Docs API permite executar o OCR (reconhecimento óptico de caracteres) numa imagem. Há uma demonstração ao vivo, que ilustra esta característica: o utilizador pode carregar uma imagem em alta resolução, nos formatos JPG, GIF ou PNG. Essa imagem deverá ter menos de 10 MB e o texto é extraído no Google Docs, convertendo a imagem num novo documento. A Google refere que “actualmente a operação pode levar até 40 segundos” e um pequeno teste revelou que o serviço ainda não é confiável: é lento e frequentemente apresenta erros. Mas, conhecendo a Gppgle como conhecemos, podemos muito em breve ler um excelente serviço completamente integrado com a suite de produção.
Por hoje fico-me por aqui. Estes serviços gratuitos online já aumentam de sobremaneira as opções para transformar uma folha de papel escrito em texto “editável”. Bom proveito.
Photo Transfer Edge Effect | Photo Effects | PSHERO
Step 1
Welcome back my naughty little monkeys! I was up most of the night with this nasty flu that’s been going around, it’s not even noon and already I’m on my third can of Dragon, so if my writing’s a little off kilter, you’ll understand why. Did I just use the word kilter?
Lets get this party started with a visit to iStockPhoto where I found a cool looking stock image of an old medium format film border. There are tons of these available for free as well if you’re willing to put in the time to search. Incase you want to replicate this exact effect you can enter the product id (1249016) into the iStockPhoto search field. The nature of my contract with iStockPhoto doesn’t allow me to give away the original but if you know where to look, I may have “accidentally” left the associated Alpha Channel in the download at the end of the lesson.
Here’s the image I got from iStockPhoto. Did I mention I got it at iStockPhoto?

Step 2
Since I ultimately want to use this image as a mask, lets go ahead and invert the tones by choosing Image>Adjustment>Invert from the main menu, or by simply pressing Command-I (PC: Ctrl-I).

Step 3
What I really want from this image is a true black to transparent mask, but what we’re currently working with is a black and white composite. It’ll take a few steps to do it, but trust me, the result will be worth it. Follow along closely, most of this will be keyboard shortcuts that won’t have any visual reference. Don’t worry, I’ll explain it as we go.
Press Command-A (PC: Ctrl-A) to Select All, then press Command-X (PC: Ctrl-X) to cut the entire image onto the clipboard (Yes, everything will disappear and you’ll be left with a white canvas… it’s ok, that’s what’s supposed to happen).
Now click over to the Channels tab in the Layers palette (*note: If your layers palette isn’t open choose Window>Layers from the main menu). Click the Create New Channel icon at the bottom of the Channels palette to add a new Alpha Channel to the bottom of the list of channels. Click on the new channel to select it and press Command-V (PC: Ctrl-V) to paste the image we cut from the stage into the channel.

Step 4
The advantage of having the black and white image in an alpha channel is that it allows us to load the highlights as a selection where a standard layer will not. Lets do that now by holding down the Command (PC: Ctrl) key and clicking on the layer thumbnail of our new Alpha Channel. Although the selection looks rather random and doesn’t seem to encompass all the white areas of the image, it actually does.

Step 5
With our selection made, lets click up on the RGB channel at the top of the Channels palette to make it active (*note: this will hide the channel we were just working on and make only the selection visible.
Click back to the Layers tab and add a new layer by clicking the Add New Layer icon at the bottom of the layers palette then double click on the layer’s name to rename it Frame.

Step 6
Since our alpha channel allowed us to select only the highlights but what we really want are the shadows, lets go ahead and invert the selection by choosing Select>Inverse from the main menu or by using the keyboard shortcut Command-Shift-I (PC: Ctrl-Shift-I).
Press the D key to reset your foreground color to black and then fill the selection by pressing Option-Delete (PC: Alt-Backspace). We’re now done with the selection, so you can press Command-D (PC: Ctrl-D) to deselect.

Step 7
HERO! You might be saying, this looks just like the image we started with! … and of course that would be true, but things aren’t always as they seem. If I change my background color to red (you don’t need to do this, I’m just illustrating my point). You can see that the black has indeed been separated from the white background and is now isolated for use.

Step 8
Ok, we’ve done all the preparation, now lets get to work on the rest of the effect.
Grab the Polygonal Lasso tool from the Lasso tool fly out menu and clicking from point to point create a nice square selection inside the photo area. This selection doesn’t have to be exact or even, in fact, the less perfect the better. When you get back to your starting point the selection will close itself.

Step 9
Now that the selection is made, lets soften the edges just a touch by choosing Select>Modify>Feather from the main menu (*note: In some older versions of PS the path to the Feather option is Select>Feather.) This is a low resolution example, so I’m going to use a small 2pixel Feather, but if you’re working at a larger resolution you’ll want to adjust accordingly.
Now lets duplicate the selected portion of the layer by pressing Command-J (PC: Ctrl-J). This will put the selection onto it’s own layer above the original. Lets call this layer Photo Holder. In order to see what we’re working with lets also turn off the Frame layer by clicking the eye icon to the right of the layer thumbnail in the Layers palette.

Step 10
The edges of this layer are far too hard for this effect to be convincing, so lets press the E key to invoke the Eraser tool, and then by choosing different brushes from the brush picker we’ll delete small areas around the edge of the photo area. I used a variety of grunge edge brushes to distress my edges and I’m including those Photoshop Brush sets in the download at the end of the lesson. Yes, you’re right, that is very cool of me!
Here’s my Photo Holder layer after all the distressing. Remember that you can rotate the brush tips in the Brushes palette like I taught you in the Rotating Brushes tutorial to make the brushes work for every edge.

Step 11
Lets take a break from this file for a moment and open the photo we will use for the effect. Mrs. Hero took this shot of me on a motorcycle trip to Telluride, Colorado last year. Yes, I look cool, I know.
For this effect I wanted to use a grayscale image (though you don’t have to). Because this tutorial isn’t about black and white conversion I just chose Image>AdjustmentS>Desaturate from the main menu to make it easy. If you want to get into black and white conversion in detail, I’d suggest picking up Scott Kelby’s Photoshop Channels Book and reading Chapter 4 in particular which covers using Calculations for B&W conversion (though the whole book is fantastic).

Step 12
With your photo open, press Command-A (PC: Ctrl-A) to Select All, then Command-C (PC: Ctrl-C) to copy the photo to the clipboard. You can now close your photo if you want by pressing Command-W (PC: Ctrl-W). How’s that for a bunch of keyboard shortcuts mashed into a few lines?
Now that we’ve got the photo copied to the clipboard (no, there’s no actual clipboard, it’s just an expression to let us know that the photo is copied into Photoshops virtual memory), lets return to our working file and more specifically to the Photo Holder layer which should still be selected as the active layer in the Layers palette. And just like we did when we were in the Channels palette, lets go ahead and Command-Click (PC: Ctrl-Click) on the Photo Holder layer icon to load it as a selection.
From the main menu (and this is the cool part) choose Edit>Paste Into. This will take the image we just copied to the “clipboard” and paste it into the selection, creating a new layer and using the selection as a layer mask! How awesome is that?

Step 13
Ok, lets turn on the Frame layer again by clicking in the empty box to the left of the layer thumbnail (the eye icon will reappear long with the layer’s contents). Now technically we don’t need the Photo Holder layer anymore, but I’m going to leave it incase I want to modify it later. I’m also going to name the new layer with the photo on it Photo.

Step 14
With the photo thumbnail selected on the Photo layer I now used the Dodge and Burn tools (found in the Tools bar / keyboard shortcut O) and using a soft edged medium sized round brush with the Range set to Highlights and the Exposure set to around 20% I’m going to darken around the edges and corners (Burn tool) and lighten around the subject (Dodge tool). This effect mimics the old darkroom techniques of dodging and burning an image to get this style of look. Perhaps the subject of a future tutorial, but I won’t be going into any further detail about the technique in this tutorial.
(*note: Dodging and Burning aren’t necessary steps here, and I’ll use a layer style in the next step to mimic the edge burning anyway.)

Step 15
If you don’t feel comfortable using the Burn and Dodge tools too much yet, that’s ok, lets use a layer style to mimic the edge burn effect by double clicking to the right of the layer name in the Layers palette, or by Control-Clicking (PC: Right Click) on the layer and choosing Blending Options to bring up the Layer Styles dialog. Choose Inner Glow from the list on the left (Click on the text, not the checkbox) and add the following settings.

Step 16
Here’s what my image looks like so far.

Step 17
I want the photo to look a little more aged so I’m going to use a fantastic brush (which is included in the download at the end of the lesson) called Scratch Heavy to do a little more distressing.
Create a new layer called Scratches, switch to the Brush tool by pressing the B key, load and select the Scratch Heavy brush and press the D key to reset the foreground color to black. I used the bracket keys [ and ] to size my brush to it was just a little larger than my image, then clicked once on the canvas.

Step 18
Obviously we don’t want the scratches to extend beyond the borders of the photo, so Control-Click (PC: Right-Click) on the Scratches layer and choose Create Clipping Mask from the menu. This will clip the Scratches layer to the Photo layer and the clipping will be indicated by an indentation of the Scratches layer and a small arrow between the two layers. The scratches are a little harsh though, so lets lower the Fill opacity of the Scratches layer to around 30%.

Step 19
The last thing I want to do is add a little sepia tone to the image just to make it feel a little older. Click on the Create New Fill or Adjustment Layer icon at the bottom of the layers palette, choose Photo Filter and choose Sepia from the Filter drop down menu, leave the other settings alone and click OK. Now just Create a Clipping Mask with this layer as well just like we did in Step 18 and you’re done!

Step 20
And that’s it folks, a cool aged photo effect with a nifty edge detail. I hope you learned a little something along the way. I’m off to take a nap.

